18
G
B
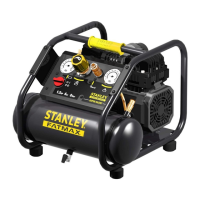
E. Drain Valve:Thisvalveallowstodrainmoisturefromthetank,
when opened.
F. Quick Coupler:Thequickcouplerisusedtoconnecttheairline
to your tool.
G. Safety valve:Thesafetyvalveissettoavoidover-pressurization
oftheairtanks.Thisvalveisfactorypre-setandwillnotfunction
unless tank pressure reaches this pressure. Do not attempt to
adjust or eliminate this safety device.
Any adjustments to this valve could cause serious injury. If
thisdevicerequiresserviceormaintenance,seeanAuthorized
Service Center.
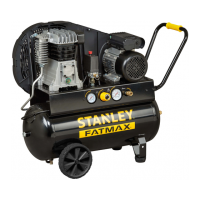
H. Handle for lifting/moving.
I. Wheel(onlyformodels“TAB200/10/30VW”and
“TAB230/10/50VW”).
J. Rubber foot.
3. SCOPE OF USE
The compressor is designed for generating compressed air for tools
operated by compressed air.
Please note that our equipment has not been designed for use
in commercial, trade or industrial applications. Our warranty will
be voided ifthe machineis used in commercial, trade or industrial
businessesorforequivalentpurposes.
The machine is to be used only for its prescribed purpose. Any other
use is deemedto be a case ofmisuse.The user/operator and not
the manufacturer will be liable for any damage or injuries of any kind
caused as a result of this.
4. ELECTRICAL GROUNDING INSTRUCTIONS
This product should be electrically grounded. In the event of an
electricalshortcircuit,groundingreducestheriskofelectricalshock
by providing an escape wire for electrical current. This product is
equipped with a cord having a grounding wire with an appropriate
grounding plug. The plug must be plugged into an outlet that is
properly installed and grounded in accordance with all local codes and
ordinances.
4.1 Connection of the mains plug
Important!
The wires in the mains lead fitted to this product are coloured in
accordance with the code shown in fig. 6.
●The3pinplugmustcomplytoBS1363/A.
●FusemustcomplytoBS1362.
If for any reason the 13 amp plug fitted to this product requires
replacement it must be wired in accordance with the following instruction:
Do not connect the brown (live) or blue (neutral) to the earth pin
marked ‘E’ on the 3 pin plug.
ConnecttheBluewiretotheterminalmarkedNeutral (N). Connect
theBrownwiretotheterminalmarkedLive(L).ConnecttheYellow
&GreenwiretotheterminalmarkedEarth(E).Ensurethattheouter
insulation is gripped by the cord grip and that the wires are not trapped
when replacing the plug cover. The mains lead on this product is fitted
witha13 amp (BS1363/A) plug.A13amp(BS1362)fuse must be
fitted in the plug.
If in doubt consult a qualified electrician
There are no user serviceable parts inside this product except those
referredtointhemanual.Alwaysreferservicingtoqualifiedservice
personnel.Neverremoveanypartofthecasingunlessqualifiedtodo
so;thisunitcontainsdangerousvoltages.
Warning!
For your protection if this product is to be used outdoors it should not
be exposed to rain or used in damp locations. Do not place the product
ondampsurfaces,useaworkbenchifavailable.Foraddedprotection
useasuitableresidualcurrentdevice(R.C.D.)atthesocketoutlet.
Note: Ifthemainscablerequiresreplacingitmustbereplacedwith
anidenticaloneandfittedbyaqualifiedperson.
5. PRE-START PROCEDURES
●
Examine the machine for signs of transport damage. Report any
damage immediately to the company which delivered the compressor.
● Verify that the tanks have been drained and are clear of any
moisture or dirt.
● Thecompressorshouldbesetupneartheworkingconsumer.
● Avoidlongairlinesandlongsupplylines(extensions).
● Makesuretheintakeairisdryanddust-free.
● Donotsetupthecompressorindamporwetrooms.
● Thecompressormayonlybeused in suitable rooms(withgood
ventilationandanambienttemperaturefrom+5°Cto+40°C).There
mustbenodust,acids,vapours,explosivegasesorinflammable
gases in the room.
● The compressor is designed to be used in dry rooms. It is
prohibited to use the compressor in areas where work is conducted
with sprayed water.
5.1 Fittingthewheelkit
Ifprovided,thewheelkitmustbeinstalledasshowninfigure2.
5.2 Fittingthesupportingfeet
Ifprovided,therubberfeetmustbefittedasshowninfigure2.
6. OPERATING INSTRUCTIONS
6.1 Start-Up Procedures
1. VerifythattheOn/OffswitchisintheO position.
2. Verifythatthetankairpressureisat0BAR(andPSI).
3. Attach the air hose to the discharge line.
4. Plug the unit into a properly grounded outlet.
5. Rotate the On/Off switch in I position (fig. 3). The compressor
will automatically cycle on and off to keep the tank pressure
maintained.
6. Adjust the pressure regulator to the proper pressure setting
requiredfortheairtool.
6.2 Shut-Off Procedures
1. RotatetheOn/OffswitchintheOposition(fig.3).
2. Unplug the power cord and vent all the air in the tank (using a
pneumatic tool, connected to the compressor through the quick
coupling).
7. CLEANING AND MAINTENANCE
Warning!
Pull the power plug before doing any cleaning and maintenance
work on the appliance.
Warning!
Wait until the compressor has completely cooled down! Risk of
burns due to hot surfaces!
Warning!
Always depressurize the tank before carrying out any cleaning
and maintenance work.
7.1 Cleaning
●Keepthesafetydevicesfreeofdirtanddustasfaraspossible.Wipe
theequipmentwithacleanclothorblowitwithcompressedairat
low pressure.
●Werecommendthatyoucleantheapplianceimmediatelyafteryou
use it.
●Cleantheapplianceregularlywithadampclothandsomesoftsoap.
Donotusecleaningagentsorsolvents;thesemaybeaggressiveto
the plastic parts in the appliance. Ensure that no water can get into
the interior of the appliance.
●You must disconnect the hose and any spraying tools from the
compressor before cleaning. Do not clean the compressor with
water,solventsorthelike.
7.2 Draining tank
The condensation water must be drained off each day by opening the
drainvalve(ref.E)(onthebottomofthepressurevessel)(fig.4).
1. Verify that the compressor is turned Off.

 Loading...