EasyManua.ls Logo

Steelcase Solo - User Manual

Steelcase Solo
8 pages
Print Icon
To Next Page IconTo Next Page
Loading...
Solo
Sit-to-Stand
Desk
Quick-Start Guide
Question and Answer IconNeed help?

Do you have a question about the Steelcase Solo and is the answer not in the manual?

Summary

Solo Sit-to-Stand Desk Quick-Start Guide

Whats Included

Lists all components provided for assembling the sit-to-stand desk.

Helpful Tips for Use

Provides advice on desk placement, usage, and additional resources.

Step-by-Step Assembly

Connect the Legs

Attaching the desk legs to the worksurface using alignment and clicks.

Mount the Switch

Securely installing the control switch with screws and plugging in the controller.

Add Power Connection

Connecting the power cord to the desk's understructure outlet.

Final Setup and Initialization

Flipping the desk, connecting to wall power, and initializing the system.

Safety Precautions and Support

Important Safety Warnings

Details risks like electrical shock, crushing, and guidelines for safe operation.

Contact and Additional Resources

Provides support contact number and website for further assistance.

Overview

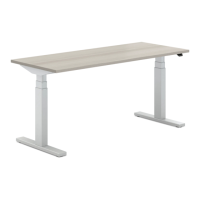
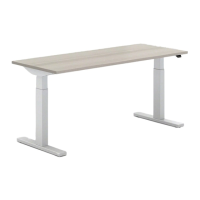
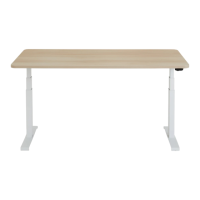
The Steelcase Solo Sit-to-Stand Desk is a height-adjustable desk designed to promote healthier work habits by allowing users to easily switch between sitting and standing positions throughout the day. This quick-start guide provides essential information for assembly and initial use, emphasizing safety and optimal ergonomic practices.

Function Description:

The primary function of the Solo Sit-to-Stand Desk is to provide a versatile workspace that can be adjusted in height. This adjustability encourages movement and reduces the sedentary nature of traditional desk work, which can contribute to improved well-being and productivity. The desk is operated via a simple switch, allowing for smooth transitions between desired sitting and standing heights.

Important Technical Specifications:

While specific technical dimensions and weight capacities are not detailed in this quick-start guide, the desk is designed with a sturdy understructure to support a worksurface and typical office equipment. The assembly process involves connecting two legs to the worksurface, indicating a robust two-leg frame system. The desk requires electrical power for its height adjustment mechanism, which is connected via a power cord to an outlet on the understructure and then to a wall power source. The control mechanism is a switch, which needs to be mounted and plugged into a controller.

Usage Features:

  • Sit-to-Stand Functionality: The core feature is the ability to adjust the desk height, allowing users to alternate between sitting and standing.
  • Simple Control: Height adjustment is managed by a user-friendly switch. The desk is initialized by pressing and holding the switch for two seconds after plugging it into wall power.
  • Ergonomic Recommendations: The guide advises against prolonged sitting or standing, recommending not to sit for more than 2 hours and not to stand for more than 30-45 minutes at a time. This promotes dynamic movement throughout the workday.
  • Customizable Switch Placement: The control switch can be mounted on either the right or left side of the desk, accommodating both right-handed and left-handed users. If a left-handed setup is desired, the cable clip needs to be moved to a pre-drilled hole on the opposite side during assembly.
  • Safety Considerations: The manual highlights the importance of keeping the worksurface adjustment range clear of obstructions to prevent crushing or trapping body parts. It also warns against electrical shock and serious injury or death, advising users to read all instructions and not to allow children or untrained people to use the furnishing.

Maintenance Features:

The quick-start guide does not explicitly detail maintenance features. However, it implies that the desk is designed for user assembly and includes a "Leg Disassembly Tool," suggesting that components may be replaceable or serviceable if needed. For more detailed information on maintenance, users are directed to the comprehensive Assembly Directions and User Guide included in the box.

Assembly and Setup:

The assembly process is outlined in four main steps:

  1. Connect the Legs: The legs are attached to the worksurface by aligning hooks on the leg with notches on the understructure until a "click" is heard. The worksurface should be face-down, and the side with pre-drilled holes (front of the desk) should be identified. A screwdriver is required for subsequent steps.
  2. Mount the Switch: The control switch is secured to the chosen side of the understructure using two provided screws and a screwdriver, then plugged into the controller.
  3. Add Some Power: The power cord is plugged into the outlet on the understructure, but the desk should not be plugged into wall power at this stage.
  4. Get to Work: The desk is carefully flipped over, plugged into wall power, and then initialized by pressing and holding the switch for two seconds.

Additional Information:

  • Location Advice: Users are advised to pick a location with enough room between the desk and other objects to allow for full adjustment.
  • Support: For any questions or assistance, Steelcase provides a customer service number: 1-888-STEELCASE.
  • Online Resources: A QR code is provided for users who prefer to watch a video on how to assemble the desk. Further solutions for new ways of working can be found on Steelcase.com.

The Steelcase Solo Sit-to-Stand Desk is presented as a straightforward, user-friendly solution for creating a more dynamic and ergonomically sound workspace, with clear instructions and safety warnings to ensure a positive user experience.

Steelcase Solo Specifications

General IconGeneral
BrandSteelcase
ModelSolo
CategoryIndoor Furnishing
LanguageEnglish

Related product manuals