Do you have a question about the SteppIR SDA 100 and is the answer not in the manual?
Warns about voltage on control cables and recommends grounding the controller chassis.
Advises against transmitting while the antenna is adjusting, especially with over 200 watts.
Details connecting power, checking display, and connecting the control cable.
Advises performing a "Calibrate" function after connecting for the first time to ensure controller sync.
Explains "Data In/Out" ports and mentions other optional feature ports.
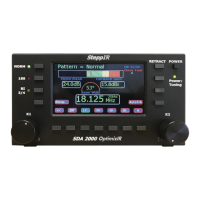
Illustrates and labels the front panel controls and display of the SDA 100 Controller.
Details the rear panel connectors, including power, antenna, USB, and data ports.
Explains the power-up sequence, display behavior, and holding current to elements.
Describes using BAND, COARSE, and FINE buttons to adjust frequency with accuracy.
Explains how to retract antenna elements to the home position.
Explains NORM mode for manual operation, band tuning, and frequency adjustment.
Describes the 180-degree and BI (bi-directional) modes for beam rotation and dual gain.
Lists options available in the SETUP menu, including RETRACT ELEMENTS, CALIBRATE, and TRANCEIVER SETUP.
Describes the steps to initiate calibration and what to expect during the process.
Discusses using computer modeling for antenna design and modifying element lengths.
Explains the difference between electrical and physical lengths and how the controller accounts for it.
Explains how to set the baud rate for communication between the controller and the radio.
Details the process of restoring single or all factory default antenna settings.
Details the step-by-step process for testing each element individually.
Warns against pressing band buttons during initial testing without poles installed.
Explains how to activate and use the 6-meter band option for the antenna.
Details activating dipole options for 30m/40m or 80m bands.
| Operating temperature | -20°C to +60°C |
|---|---|
| Display | LCD |
| Interface | RS-232 |
| Compatibility | SteppIR Antennas |
| Frequency Range | 1.8 to 54 MHz |