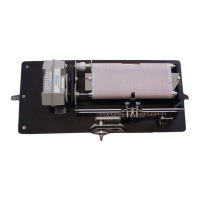
2 Installation
4
2.1 Unpacking
Remove all shipping tie-downs, packing
pieces, etc. Several parts and accessories
are individually wrapped. Check the Sales
Order to insure that all items are accounted
for before disposing of the packing
materials.
2.2 Equipment and tools required
The following equipment and tools are
usually required for proper installation of
the Type A Recorder:
Float, float pulley, counterweight, float
line or tape, and a set of end hooks.
Guide pulley (if required) and mounting
hardware.
Necessary mounting hardware and tools
(screw drivers, screws, drill, combination
pliers, etc.) as required.
2.3 Mounting
The surface on which the recorder is to be
mounted should be reasonably level. The
recorder's feet are adjustable to
compensate for minor variations. The
recorder can be positioned so that the
input pulley will hang over the edge of the
surface, or holes can be drilled in the
surface to allow for the float line or tape to
pass through. Because the carriage
reverses at each margin, the float pulley
can rotate in either direction for rising water
levels; thus the float can hang off of either
side of the pulley. Position the recorder in
its approximate final position. Final
positioning and securing will be done after
float and counterweight clearance is
checked.
Install the float pulley on the recorder input
shaft. Install the cupped washer with the
recessed side toward the pulley. Thread
the clamping disk onto the pulley shaft.
Thread the hex nut onto the shaft, and
tighten it against the pulley clamp. Loosely
tighten the right- and left-hand screws
down onto the washer, clamping the pulley
in place.
Attach the float line or tape to the two
adjustable end hooks. Adjust the length so
the counterweight does not touch bottom
when the float is at its highest point. Also
verify that the length is great enough so the
counterweight does not run into the
support shelf when the float is at its lowest
position.
A guide pulley can be used to route the
float line or tape for a vertical drop different
than just straight off the float pulley. It is
normally mounted on the underside of the
shelf, and used to shift the counterweight
drop. This is typically done to route the
counterweight out, so it does not hit a large
diameter float, or in closer, for small
diameter stilling wells.
If necessary, extra float line or tape may be
removed. Tape may be broken by sharply
bending it. Beaded float line should be cut
6mm (1/4 in.) beyond a bead to reduce
raveling. Non-beaded cable should be
heated until red hot at the desired point for
annealing, and then cut.
Attach the float and counterweight to
opposite ends of the float line or tape using
the end hooks. Lower the float into the
well. Pass the float line or tape over the
float pulley, engaging the beads or
perforations into their proper position on
the pulley. Lower the counterweight down
the opposite side.