► If the chain sprocket cover is not flush with the
chainsaw: Twist the adjusting wheel and repo‐
sition the chain sprocket cover.
The teeth of the adjusting wheel engage with
the teeth of the tensioning gear.
► Rotate the wing nut clockwise until the chain
sprocket cover sits tightly at the chainsaw.
► Close the handle of the wing nut.
6.1.3 Removing the Guide Bar and Saw
Chain
► Shut off the engine and engage the chain
brake.
► Rotate the nut counterclockwise until the chain
sprocket cover can be removed.
► Remove the chain sprocket cover.
► Turn the tensioning screw counterclockwise as
far as it will go.
The saw chain is now slack.
► Remove the guide bar and saw chain.
6.1.4 Removing the Guide Bar and Saw
Chain (Quick Chain Tensioner)
► Shut off the engine and engage the chain
brake.
► Open the handle of the wing nut.
► Rotate the wing nut counterclockwise until the
chain sprocket cover can be removed.
► Remove the chain sprocket cover.
► Turn the tensioning gear clockwise as far as it
will go.
The saw chain is now slack.
► Remove the guide bar and saw chain.
► Remove the screw of the tensioning gear.
► Remove the tensioning gear.
6.2 Tensioning the Chain
6.2.1 Tensioning the Saw Chain
The saw chain expands or contracts during cut‐
ting work. The saw chain tension changes as a
result. Check the saw chain tension regularly
during operation and readjust if necessary.
► Shut off the engine and engage the chain
brake.
► Loosen the nuts (1).
► Disengage the chain brake.
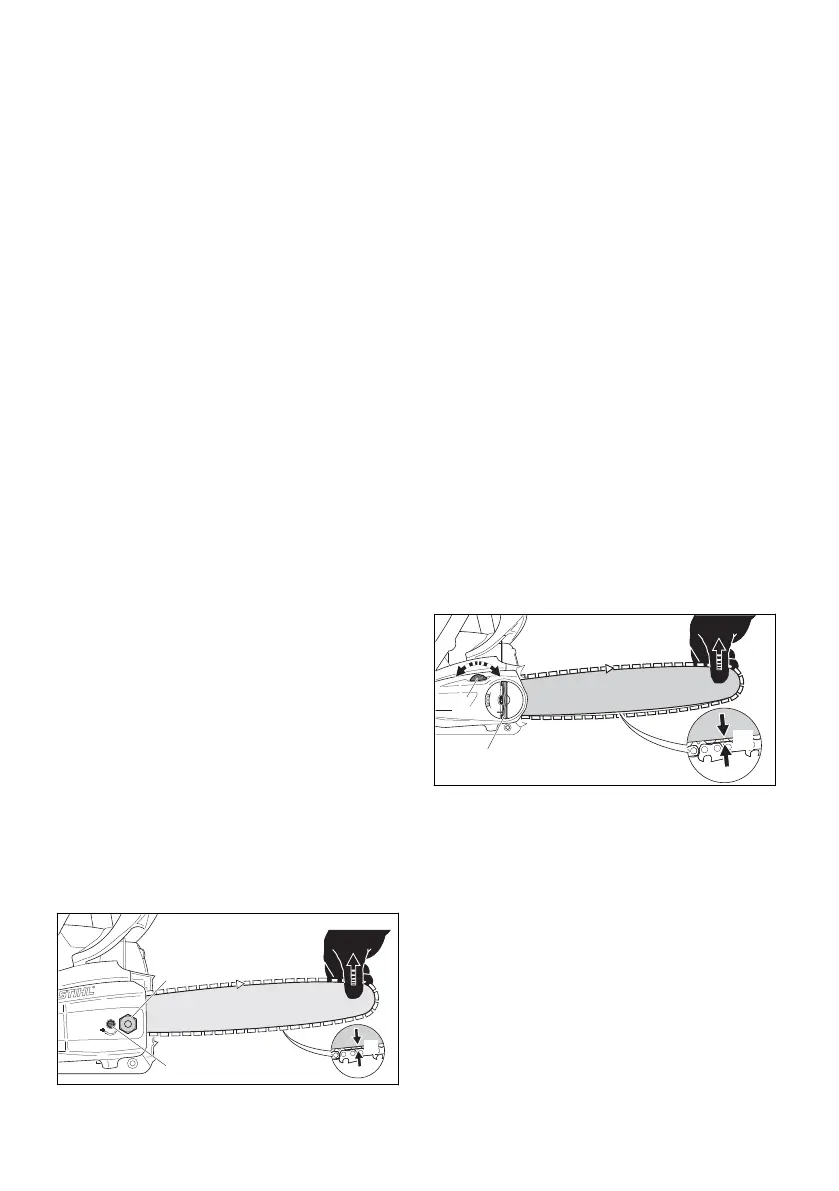
► Hold the guide bar nose up and turn the ten‐
sioning screw (2) clockwise or counterclock‐
wise until the following points apply:
–
The chain sag ‘a’ in the center of the guide
bar is 1 - 2 mm.
–
The saw chain can still be pulled easily
along the guide bar with two fingers.
► If a Carving guide bar is used: Turn the ten‐
sioning screw (2) clockwise until the drive links
on the underside of the bar are just half-visi‐
ble.
► Keep holding the guide bar nose up and screw
the nuts (1) tight.
► If the chain sag ‘a’ in the center of the guide
bar is not 1-2 mm: Readjust the saw chain ten‐
sion.
► If you are using a Carving bar and the drive
links on the underside of the bar are less than
half-visible: Readjust chain tension.
6.2.2 Tensioning the Saw Chain (Quick
Chain Tensioner)
The saw chain expands or contracts during cut‐
ting work. The saw chain tension changes as a
result. Check the saw chain tension regularly
during operation and readjust if necessary.
► Shut off the engine and engage the chain
brake.
► Open the handle of the wing nut (1).
► Back off the wing nut (1) 2 turns counterclock‐
wise.
You have loosened the wing nut (1).
► Disengage the chain brake.
► Hold the guide bar nose up and turn the
adjusting wheel (2) clockwise or counterclock‐
wise until the following points apply:
–
The chain sag ‘a’ in the center of the guide
bar is 1 - 2 mm.
–
The saw chain can still be pulled easily
along the guide bar with two fingers.
► If a Carving guide bar is used: Turn the ten‐
sioning screw (2) clockwise or counterclock‐
wise until the drive links on the underside of
the bar are just half-visible.
6 Assembling the Saw English
0458-200-0121-B 13
 Loading...