► Service or repair the guide bar and saw
chain as described in this User Manual.
■ The user may be cut by the sharp cutters
while cleaning or servicing the saw chain. This
may result in injury to the user.
►
Wear work gloves made from resistant
material.
5 Preparing the Saw for
Operation
5.1 Preparing the Saw for Opera‐
tion
Perform the following steps before starting work:
► Make sure the following components are in a
safe condition:
–
Chainsaw, 4.6.1.
–
Guide bar, 4.6.2.
–
Saw chain, 4.6.3.
►
Clean the saw,
15.1.
►
Mount the bar and chain, 6.1.
►
Tension the saw chain, 6.2.
►
Fill up with chain oil, 6.3.
►
Check the chain brake, 10.4.
►
Refuel the saw, 8.2.
►
Check the controls, 10.5.
►
Check chain lubrication, 10.6.
► If you cannot carry out these steps: Do not use
your chainsaw and contact your STIHL servic‐
ing dealer for assistance.
6 Assembling the Saw
6.1 Mounting and Removing the
Bar and Chain
6.1.1 Mounting the Guide Bar and Saw
Chain
The guide bar and saw chain combinations that
can be used with the chain sprocket are listed in
the specifications,
20.1.
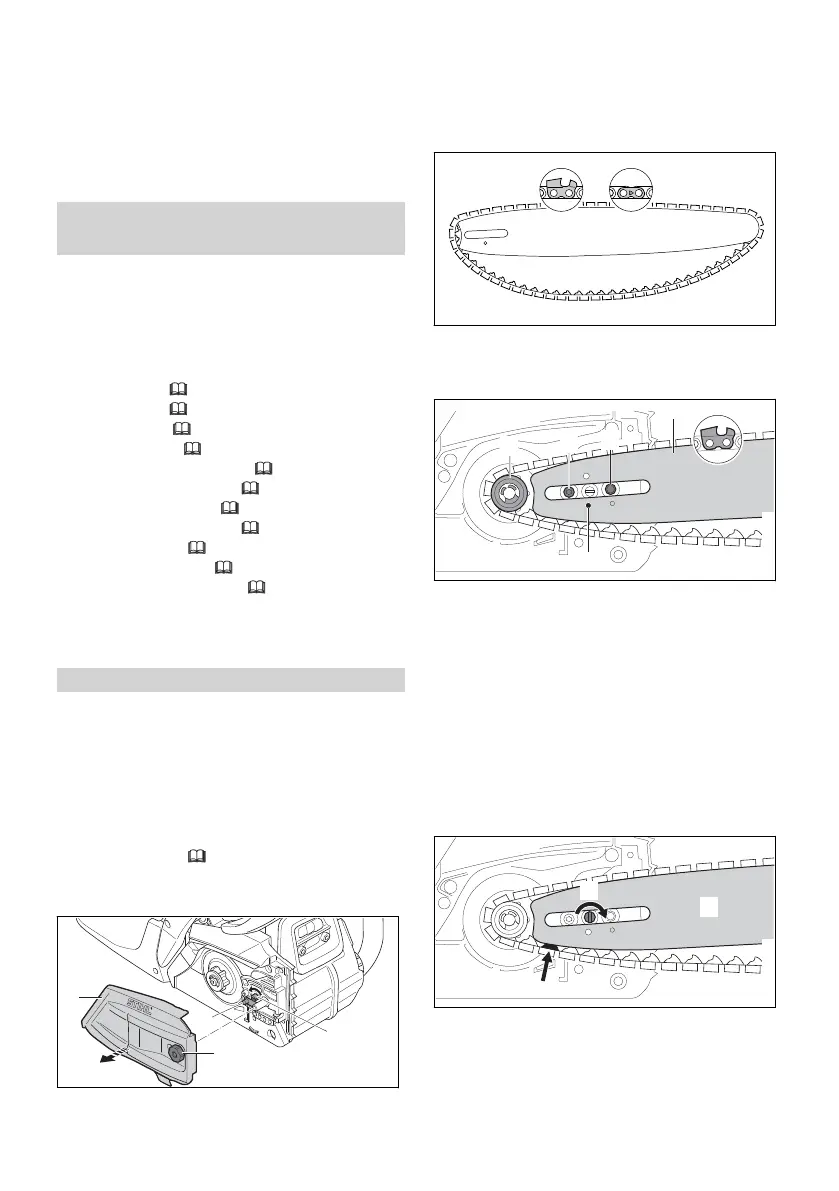
► Shut off the engine and engage the chain
brake.
► Rotate the nut (1) counterclockwise until the
chain sprocket cover (2) can be removed.
► Remove the chain sprocket cover (2).
► Turn the tensioning screw (3) counterclock‐
wise until the tensioner slide (4) butts against
the left end of the housing.
► Fit the saw chain in the guide bar groove so
that the arrows on the tie straps on the top of
the bar point in the direction of rotation.
► Fit the guide bar and saw chain on the chain‐
saw and check the following points:
–
The drive links of the saw chain are seated
in teeth of the chain sprocket (7).
–
The collar studs (5) are located in slot in tail
of guide bar (6).
–
The peg of tensioner slide (4) engages the
hole (8) in guide bar (6).
The guide bar (6) may be fitted either way round.
The logo on the guide bar (6) may also be upside
down.
► Disengage the chain brake.
► Turn the tensioning screw (3) clockwise until
the saw chain fits snugly against the guide
bar. Make sure the drive links of the saw chain
engage the guide bar groove.
The guide bar (6) and saw chain are posi‐
tioned against the chainsaw.
5 Preparing the Saw for Operation English
0458-200-0121-B 11
 Loading...