EasyManua.ls Logo

Strong SRT 8541 User Manual

Strong SRT 8541
31 pages
To Next Page IconTo Next Page
Page #1 background imageLoading...
Page #1 background image
USB
Wiedergabe
Installaonsanleitung
Installaon Instrucons
Digitaler Terrestrischer HD Receiver
SRT 8541
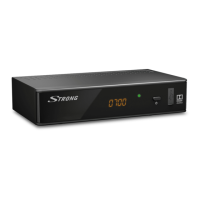
Picture similar

Questions and Answers:

Strong SRT 8541 Specifications

General IconGeneral
Aspect ratio4:3, 16:9
Signal sourceTerrestrial
Video resolutions1920 x 1080 pixels
Supported video modes576i, 576p, 720p, 1080i, 1080p
Analog signal format systemPAL
Digital signal format systemDVB-T2
Personal Video Recorder (PVR) included-
Tuner typeDigital
Demodulation16-QAM, 64-QAM, 256-QAM, QPSK
Product colorBlack
Audio decodersDolby Digital Plus
Number of tuners1 tuner(s)
Channels quantity700 channels
Favorite list TV programs4
Electronic Program Guide (EPG)Yes
Audio formats supportedAC3, PCM
Video formats supportedH.265, HEVC
Built-in HDDNo
USB 2.0 ports quantityUSB 2.0 ports have a data transmission speed of 480 Mbps, and are backwards compatible with USB 1.1 ports. You can connect all kinds of peripheral devices to them.
USB 3.2 Gen 1 (3.1 Gen 1) Type-A ports quantity0
AC input voltage220 - 240 V
AC input frequency50 - 60 Hz
Power consumption (standby)1 W
Power consumption (typical)7 W
Storage temperature (T-T)-10 - 50 °C
Operating temperature (T-T)0 - 40 °C
Operating relative humidity (H-H)10 - 85 %
Display typeLCD
Weight and Dimensions IconWeight and Dimensions
Depth99 mm
Width168 mm
Height39 mm
Weight350 g

Summary

1.0 INTRODUCTION

1.1 Safety Instructions

Read all instructions, avoid rain/moisture, proper ventilation, handle batteries carefully.

1.2 Storage

1.3 Equipment Set-up

Consult professional installer or follow instructions for connecting antenna, TV, and other components.

2.0 YOUR RECEIVER

2.1 DEFAULT PIN: 0000

Default PIN for accessing menus and settings is 0000.

2.2 Front Panel

Details the components on the front of the receiver, like IR sensor, LED display, and standby button.

2.3 Rear Panel

Describes the connectors on the back of the receiver, including ANT IN, HDMI, SCART, and USB.

2.4 Remote control

Explains the basic functions of the remote control buttons for navigation and operation.

2.4 Remote control

3.0 CONNECTION

3.1 Connecting to a terrestrial antenna

Connects the antenna to the ANT IN connector for broadcast signal reception.

3.2 Connecting to TV with HDMI cable

Connects the receiver to the TV using an HDMI cable for optimal picture quality.

4.0 STARTING UP FOR THE FIRST TIME

4.3 Aerial Adjustment

5.0 QUICK GUIDE TO USING YOUR RECEIVER

6.0 OPERATION

6.5 Subtitles

6.7 Record, Time shift and Format

Details functions for recording, time-shifting, and formatting USB devices for storage.

6.7 Record, Time shift and Format

6.7.1 Instant recording

Starts recording a programme immediately using a dedicated button on the remote.

6.7.2 Timeshift

Pauses live TV, allowing playback and rewinding of the current broadcast.

6.7.3 Timer recording

Schedules programmes for recording using the EPG or the timer menu.

6.7.4 Playback

Plays back recorded files from the USB storage device, with options for preview and full-screen.

7.0 MAIN MENU

7.1 Installation of channels

Accesses submenus for manual/auto channel search, information, and factory settings.

7.1 Installation of channels

7.1.4 Load Factory Settings

Resets the receiver to factory default settings, clearing all stored channels and configurations.

7.2 Channels

7.3 Settings

7.3.4 Parental Control

Protects installation menus and channels with a PIN code and sets age-based ratings.

7.3.2 Output Settings

Matches receiver output to TV or home cinema set, configuring resolution, aspect ratio, and connection.

7.4 Multimedia

7.4.1 Playback of Multimedia

Plays back various media files (movies, music, pictures) from a connected USB storage device.

7.4.2 Record Setup

Configures Timeshift and recording functions, including duration and start/end times.

7.5 Network

7.6 Software update

7.6.1 S/W Upgrade by OTA

Updates receiver software wirelessly via Over-The-Air broadcast.

7.6.2 Upgrade by USB

Updates receiver software using a USB storage device with downloaded files.

8.0 TROUBLESHOOTING

No signal found

Troubleshoots signal loss, checking antenna connection, damage, and signal strength.

No picture or sound on TV or amplifier

Resolves issues with no picture or sound by checking TV input, resolution, and connections.

9.0 TECHNICAL SPECIFICATIONS