Do you have a question about the Studiomaster Professional MINI Series and is the answer not in the manual?
Details on microphone input connectors and signal types.
Explains line level inputs for instruments and audio devices.
How to adjust input signal gain for microphones and line signals.
Describes the 2-band equalizer for tone adjustment.
Connects the mixer's main output to amplifiers or speakers.
Shows signal presence and clipping at the output.
Sets the final output volume for left and right channels.
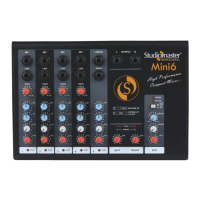
The Studiomaster Professional MINI series mixer is a compact and high-performance audio mixing console designed for a variety of applications. This manual covers the MINI 6, 6U, 8, and 8U models, providing comprehensive instructions for optimal performance and safety. The mixer is equipped with a range of features to facilitate versatile audio control, including gain control with a 2-band EQ per channel, a built-in echo/delay processor, an integrated MP3 music player with USB and Bluetooth connectivity, and clear LED indications for clipping and master level. Its design emphasizes ease of use while offering robust functionality for both novice and experienced users.
The input section of the MINI series mixer is designed to accommodate various audio sources. Each channel features two connectors: a 1/4" MIC input and a 1/4" Jack input. It is crucial to note that both inputs should not be used simultaneously on the same channel, as this can lead to permanent damage to the mixer.
MIC Inputs: These are electrically balanced 1/4" stereo (TRS) jack inputs, specifically designed to accept low-impedance balanced signals from microphones. This ensures clear and robust signal capture from vocalists or instruments requiring microphone input.
Line Inputs: The line inputs are also 1/4" stereo (TRS) jack inputs, designed to accept line-level balanced signals. These are ideal for connecting instruments such as keyboards, guitars, drum machines, and other electronic devices. Both MIC and Line jacks can also accept unbalanced inputs when using a quasi-balanced cable (pin 2 for signal, pins 1 & 3 shorted to GND).
Gain Control: Each input channel is equipped with a gain control knob. This knob is used to adjust the input level for both MIC and Line signals. Users are advised to avoid operating at excessively high gain levels, as this can introduce distortion and lead to audio clipping. Proper gain staging is essential for maintaining signal integrity.
EQ Section: The MINI series mixers feature a 2-band equalizer per channel, designed for intuitive and effective tone shaping. This EQ allows users to cut or boost specific frequencies to achieve a desired sound or to eliminate undesirable characteristics from the audio signal.
EFX Send: Each channel includes an EFX knob, which controls the send level of the audio signal to the mixer's built-in effects section. This allows users to apply internal effects, such as echo or delay, to individual channels.
Channel Control: This knob is used to set the individual channel's level, determining how much of its signal is sent to the master output.
Clip LED: A clip LED is present on each channel. This LED illuminates when the incoming audio signal is clipping, indicating that the signal level is too high and causing distortion. To prevent distortion, users should reduce the gain levels if the clip LED glows.
Stereo Input (MINI 6U/8U): The MINI 6U and 8U models include a stereo input section.
The output section manages the final audio signal sent from the mixer to external devices.
Master (L/R) Output: This output is used to connect the main stereo output of the mixer to an amplifier or powered speakers. It utilizes 1/4" TS unbalanced jack connectors. The overall output level is controlled by the master control knobs. The wiring configuration for this output is unbalanced TRS, with the tip carrying the signal (+ve phase) and the sleeve connected to ground.
Power LED: A blue LED indicates when the unit is powered ON, providing a quick visual confirmation of the mixer's operational status.
Signal/Peak LED: This LED provides visual feedback on the master output level. A green signal LED glows when the output is below the clip level, indicating a healthy signal. If the clip LED illuminates, it signifies that the output signal is clipping, and the master output levels should be reduced to prevent distortion.
Master (L/R) Control: These left and right control knobs determine the master output level. They regulate the level of all signals being sent to the output connectors, allowing for precise control over the overall volume.
The MINI series mixers feature a built-in effects section, primarily focused on echo and delay.
Delay Time Control: This control knob adjusts the duration of the delay effect. Turning the knob clockwise increases the delay time, making the echo longer.
Repeat Control: This control adjusts the feedback amount, which determines the number of repetitions for the delay sound (echo). Turning the knob clockwise increases the number of repetitions. Users should be mindful that turning the repeat knob too high can lead to oscillations; if this occurs, the knob should be turned down until the oscillations cease.
EFX Level Control: This knob controls the overall output level of the effect signal, allowing users to blend the desired amount of effect into the mix.
Effect ON/OFF Switch: A dedicated switch allows users to easily turn the effects section ON or OFF.
EFX ON LED: This LED illuminates when the effects section is active, providing a visual indicator of its status.
The integrated USB media player enhances the mixer's versatility, allowing for direct playback of audio files.
USB Input: This is the dedicated channel for connecting USB devices. Studiomaster Professional emphasizes respect for intellectual property rights and requests users to only play legally purchased MP3 downloads. Pirated music or programs should not be used.
Display: A seven-segment display visualizes all media player operations, providing clear information about track numbers, time, and mode.
On-Off/Mode Selection:
Next/Vol+:
Prev./Vol-:
Play/Pause/Repeat:
IR Sensor: An infrared sensor is included for remote operation, allowing convenient control of the media player from a distance.
Gain Control: This knob is specifically used to adjust the overall gain of the media player's output.
The mixer's media player can be controlled remotely, offering additional convenience.
Mute: A dedicated switch on the remote allows users to mute the audio track instantly.
EQ: The remote includes an EQ switch to select various audio effects for the track, such as Jazz (JAZ), Pop (POP), Classic (CLA), Rock (rOC), Normal (Nor), and Cut (Cut), which bypasses low frequencies.
U/SD: This feature is currently not active.
0-9 Number Buttons: These buttons allow users to directly play tracks within the library by entering the track number. The remote control has an effective range of approximately 6-8 meters, provided the batteries are fully charged.
Proper care and maintenance are crucial for ensuring the longevity and optimal performance of your Studiomaster Professional MINI series mixer.
Handling: The mixer should not be dropped, as this can severely damage the product. Gentle handling is recommended during setup, operation, and transportation.
Environmental Protection: Keep the product away from direct sunlight and rain to prevent damage from heat and moisture. Additionally, avoid placing the mixer near heavy magnetic or electromagnetic fields, as these can affect its performance.
Power Management: When the product is not in use for an extended period, it is advisable to disconnect it from the power supply. This helps conserve energy and protects the unit from potential power fluctuations.
Servicing: Users should not attempt to open any of the components themselves for repairs. For any servicing needs, it is recommended to contact your Studiomaster dealer. Unauthorized tampering can void warranties and cause further damage.
Transportation: For safe transportation, it is highly recommended to place the mixer in a flight case. This provides robust protection against physical impacts and environmental factors during transit.
By adhering to these guidelines, users can ensure their Studiomaster Professional MINI series mixer remains in excellent working condition, delivering reliable audio performance for years to come.
| Type | Analog Mixer |
|---|---|
| Channels | 4 |
| Aux Send | 1 |
| Line Inputs | 4 |
| Phantom Power | Yes |
| EQ | 2-band |
| Main Outputs | 2 |
| Power Supply | External PSU |
| Series | Professional MINI Series |