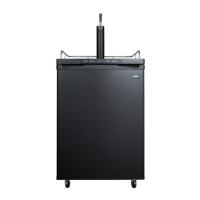
Note: When using as a refrigerator, we do not recommend the use of casters, as stored
items may fall off the shelves when the unit is in motion.
1. Close the main valve on the CO
2
cylinder
2. Close the connection between the beer keg and the keg tap by pulling and lifting the
handle of the keg into an upright position
3. Disconnect both the beer line and the CO
2
gas line from the keg tap
4. Remove the beer keg from the cabinet
5. Disconnect the gas line from the CO
2
regulator
6. Remove the CO
2
cylinder from the cabinet
7. Remove the beer tower from the workshop unscrewing 4 screws.
8. Pull the beer line through the top pf the cabinet
9. Install the cabinet plug on the worktop
10. Lay the unit down sideways. We recommend that you place a piece of cardboard or
cloth underneath the cabinet to avoid dents or scratches to the cabinet. Remove
the casters and install leveling legs and raise the unit back into upright position
11. Install the two wire shelves.
A. Insert on end of each support pin into the holes on the right side of the
cabinet
B. Place one end of the wire shelf into the left side of the cabinet and rest the
other end onto the exposed support pins on the right side
C. Repeat the same with the second shelf
12. The conversion process is now complete. Store all removed
accessories in a safe place for future use
13. Adjust the temperature of the unit as required for beverage storage
Note: allow the beer dispenser to stand in an upright position for 8 hours before turning
on the power.
CONVERTING THE BEER DISPENSER TO A BUILT-IN UNIT
For your convenience, we offer beer dispensers that can be quickly built-in under your
counters. Simply follow the steps below for a quick and easy installation.
12