Do you have a question about the Sun-Mar CENTREX 3000 and is the answer not in the manual?
Details residential/continuous and weekend/vacation use capacities for Centrex 3000 models.
Certification for liquid containment, odors, and solid end products in residential and cottage use.
Explains the function and operation of the Bio-Drum for mixing and composting waste.
Describes the purpose and use of the compost finishing drawer for manual compost removal.
Details the function of the evaporation chamber in managing excess liquid.
Explains the role of the collection chamber in the Autoflow technology.
Discusses the importance of aeration for aerobic bacteria growth in composting.
Covers optimal temperature ranges and their impact on decomposition efficiency.
Explains the role of moisture in composting and desired levels for bacteria.
Details the importance of balancing carbon and nitrogen materials for effective composting.
Explains the necessity of proper vent installation for odorless operation.
Provides guidance on vent pipe routing, limiting bends, and avoiding slopes.
Advises against merging vents to maintain airflow and prevent odor issues.
Indicates the diffuser is placed on top of the vent stack to encourage updraft.
Explains vent placement relative to roof peaks to prevent downdraft and odors.
Suggests using guy wires for securing vent stacks extending significantly above the roof.
Recommends using only supplied or recommended venting materials for optimal performance.
Advises continuous plugging for electric models unless unused for three or more days.
States overflow drains are required for both electric and non-electric Centrex 3000 models.
Refers to local regulatory practices for proper effluent handling system connections.
Explains the need for additional heat or insulation in environments below 55°F.
Details space and installation considerations for the electric Centrex 3000 model.
Details space and installation considerations for the non-electric Centrex 3000 NE model.
Explains how to install the diffuser at the top of the vent stack for optimal airflow.
Outlines various options for managing and disposing of liquid effluent from the unit.
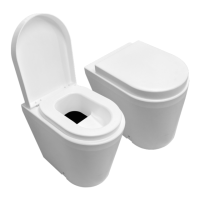
Provides considerations and guidelines for installing the waste pipe from the toilet.
Lists important warnings and items to avoid during toilet maintenance.
Provides advice for no winter use, occasional, and heavy/residential winter use.
Discusses causes and solutions for urine odor within the bathroom area.
Explains potential causes and remedies for odors detected outside the unit.
Covers reasons for fan noise, including bearing wear and debris, with potential fixes.
Troubleshooting steps for diagnosing and resolving fan operational failures.
Discusses issues related to liquid accumulation in the evaporation chamber and its causes.
Addresses problems causing liquid overflow, including blocked drains and improper leveling.
Troubleshooting steps for heating system failures or lack of evaporation.
Details troubleshooting steps for issues with the heating element.
Explains troubleshooting for blown fuses in 230V models, checking power sources.
Discusses common issues related to liquid presence in the finishing drawer.
Troubleshooting steps when the drum mechanism fails to rotate.
Addresses problems with the drum door mechanism, including stuck hinges.
Visual breakdown of the toilet's components with numbered parts.
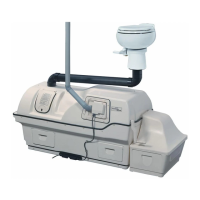
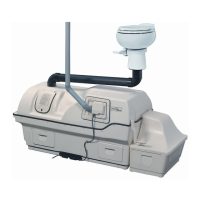
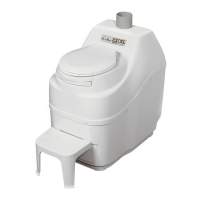
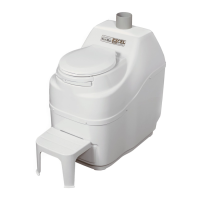
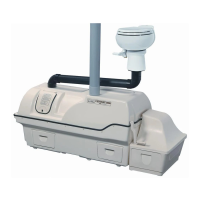
The Sun-Mar Centrex 3000 is a composting toilet system designed for efficient waste decomposition in both residential and cottage settings. Its core functionality relies on a three-chamber design, each contributing to an optimal environment for composting. The system is available in both electric and non-electric (NE) versions, catering to different power availability scenarios.
At the heart of the Centrex 3000 is the patented Bio-drum™, a key component that provides the necessary volume for composting and facilitates aeration. Users manually rotate a handle in a clockwise direction to mix and aerate the compost within the Bio-drum™. This mixing action is crucial for encouraging aerobic bacteria growth, which efficiently breaks down waste. Excess liquid from the composting process exits through a screen at the bottom of the drum and flows into the evaporation chamber. The Bio-drum™ also features Sun-Mar's unique Autoflow™ technology, which automatically discharges finished compost into a separate collection chamber located near the end of the unit as the drum rotates. To remove compost from the drum manually, the user pulls out a white drum lock button (located on the right-hand side, under the handle) and rotates the handle counter-clockwise, causing compost to drop into the finishing drawer.
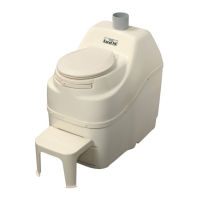
The compost finishing drawer is situated in the front right opening of the unit. While the Centrex 3000 automatically directs finished compost to the collection chamber, this drawer serves as an alternative for removing all compost from the drum or creating space for extended use. Removing the finishing drawer and an access panel provides access to the evaporation chamber for cleaning and maintenance.
The evaporation chamber forms the floor of the unit beneath the compost drawer. This area collects any excess liquid that is not evaporated. A safety drain, located on the left side of the composting unit, ensures that any overflow liquid is directed to an approved facility. This safety drain is a critical feature and must be connected in all Centrex 3000 installations, sloping downward at all points to prevent blockages. It is important not to merge this drain with sinks, bathtubs, or other household drains.
The electric version of the Centrex 3000 includes a thermostatically controlled heater and a fan assembly. These components are designed to enhance liquid evaporation and must be continuously connected to electricity when the toilet is in use, unless it will be unused for three or more consecutive days. The fan operates 24 hours a day in primary residences. For areas with power fluctuations, a ground fault interrupter (GFI) circuit and a surge protector are recommended. Some 230V models may also have an overcurrent protection device on the heating element circuit for fuse protection.
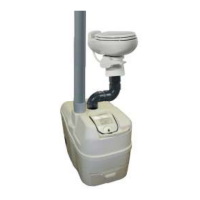
The non-electric (NE) version of the Centrex 3000 is designed for locations without readily available electricity. It does not have a built-in fan or heater but includes a 12-volt fan. For both electric and non-electric models, proper ventilation is paramount for odorless operation. The vent pipe must be installed separately from all other household vents and should not be merged with pre-existing venting. It is crucial to avoid any downward sloping or horizontal runs in the vent pipe, no matter how small, as these can lead to condensation accumulation and reduced venting capacity, potentially causing odors. The vent pipe should be installed vertically, with a maximum of four 45° bends for electric systems and two 45° bends for non-electric systems. All vent pipe connections should be sealed with silicone caulking (near the toilet) and PVC cement (for other connections). The vent stack should extend approximately 24-30 inches above the peak of the roof to encourage updraft and prevent downdraft. If the vent extends more than 30 inches above the roofline, guy wires should be used for stability. The provided 4-inch diffuser should be installed at the top of the vent stack to further encourage updraft.
Initial start-up involves several steps to prepare the toilet for use. First, "Compost Quick" is sprayed onto the inner floor of the evaporation chamber, the Bio-drum™, and the finishing drawer to prevent organic material from hardening and to initiate the composting process. Next, a mixture of "Compost Sure Blue" and "Microbe Mix" (with warm water) is prepared and allowed to absorb for about an hour. This mixture is then scooped into the Bio-drum™ through the access door, and the drum is rotated to mix the contents. The drum opening must remain centered under the waste pipe. For electric toilets, the fan should run continuously. It takes approximately six weeks at optimal temperatures (70-90°F or 21-38°C) for sufficient microbial cultures to develop and for the compost to become uniformly dark and moist. During this initial period, any "Compost Sure Blue" that falls through the drum screen into the evaporation chamber should be raked out and removed.
Ongoing maintenance is essential for optimal performance. Daily, at least one cup of "Compost Sure Blue" should be added per person, per day, just before turning the drum. The Bio-drum™ opening must always be centered under the waste pipe when in use. Every second day, before turning the handle, 3-4 sprays of "Compost Quick" are applied to the compost surface, and "Compost Sure Blue" is added at a rate of one cup per person per day. The handle is then turned clockwise for six complete revolutions (42 turns of the handle) to mix and aerate the compost. Every two weeks, one scoop (tablespoon) of "Microbe Mix" is added to "recharge" the microbe colony. Every three months, the evaporation chamber should be raked to remove any solid debris, paying attention to the back corners, and the debris disposed of. Twice a year, the drum screen should be cleaned by spraying it with "Compost Quick," letting it sit for 15 minutes, and then scrubbing vigorously with a wire brush to loosen encrusted debris. If brushing is insufficient, a screwdriver or nail may be used to clear the holes.
When removing compost from the Bio-drum™, the compost level should never exceed half full, or approximately four inches from the bottom of the drum door. While the Autoflow™ technology directs finished compost to the collection chamber, manual removal to the finishing drawer may be necessary during prolonged use exceeding rated capacity. This involves pulling out and holding the drum lock button (located below the handle) and rotating the handle counter-clockwise for three revolutions. Releasing the button and continuing to turn the handle until it stops hard will open the drum door, allowing compost to fall into the finishing drawer. The compost in the drawer should then be leveled and allowed to rest for 3-4 weeks to complete the composting process.
Seasonal usage guidelines are also provided. For spring start-up, any remaining compost from the previous season should be extracted from the drum, leaving 4-6 inches as a "starter base." The evaporation chamber should be raked to clear any loose material, and warm water and "Sun-Mar Microbe Mix" should be added to the remaining compost before rotating the drum to mix. For winter shut-down, enough water should be added to soak the compost in the Bio-drum™, and electric units should be unplugged. Objects can be placed over the diffuser to prevent animals from entering the vent stack, but these must be removed before spring start-up. Anti-freeze or similar substances should never be added to the toilet. For occasional winter use (3-4 weekends), composting activity will slow below 55°F (13°C), and the toilet will act as a holding tank. The drum should not be turned when the compost is frozen to prevent damage. For heavy or residential winter use, the toilet should be kept in a heated area above 55°F (13°C). Vent pipes in electric models should be insulated where exposed, and heat tape may be applied to prevent ice blockages. The safety drain should be installed and insulated above the frost line, with heat tape optionally applied to prevent ice blockages. If an ultra-low flush toilet is installed in an area with freezing temperatures, the water valve must be drained and removed to prevent cracking.
Troubleshooting guidance covers various issues. For a "Compost Too Wet" symptom, ensuring "Compost Sure Blue" is used and scrubbing a clogged drum screen with "Compost Quick" and a wire brush are recommended. If "Waste not Breaking Down" or "Large Lumps in Compost" occur, it could be due to insufficient microbes (add "Sun-Mar Microbe Mix"), low room temperature (install a heat source to maintain above 55°F/13°C), or compost being too dry (add warm water). A "Drum Too Full" indicates compost was not emptied in a timely fashion; remove compost until the drum is half full or less, aerate, and add accelerant. "Strong Odor" suggests anaerobic compost, requiring aeration and "Compost Sure Blue." "Flies Present" can be caused by kitchen/garden waste (do not add), compost being too dry (keep moist), or foreign material (do not add topsoil, composted matter, or kitchen scraps). Pesticides like pyrethrin can be used as an immediate remedy, or the toilet can be completely cleaned with soap and water.
Mechanical troubleshooting addresses "Urine Odor in Washroom" (re-install vent to avoid horizontal/downward slopes, use wall brackets), "Fan has failed" (call Sun-Mar for replacement), "Occasional Urine Odor Outside" (check vent installation above roof peak, add lime to evaporation chamber, consider a filter box), and "Fan Noisy" (clean fan, replace bearings, or use a fan speed control). "Fan not Working" requires checking for debris, power source, and calling Sun-Mar if needed. "Liquid Build up in Evaporation Chamber" can be due to increased usage or climatic conditions; the overflow drain must be installed. If the drain is blocked, check for kinks, blockages, or upward bends, rake solid materials away from safety drains, or use a wire to clear blockages. "Heating System not Working/Lack of Evaporation" may indicate a thermostat failure (call Sun-Mar for replacement) or a lack of warmth despite the heater working (check for liquid build-up). "Liquid in Finishing Drawer" can be caused by a clogged drum screen or condensate coming down the vent stack (NE); clean the drum screen thoroughly. If the "Drum will not turn," the set screw securing the handle to the shaft or the steel roll-pin securing the gear wheel to the shaft may be broken, requiring replacement parts from Sun-Mar. If the "Drum Door Not Opening/Closing Properly," the drum may be too full (remove compost until less than half full) or hinges are stuck (spray with "Compost Quick" and scrub).
The manual emphasizes that Sun-Mar's customer service should be contacted for any mechanical repairs, providing the serial number for warranty purposes and correct part identification. It also includes a warranty registration form to be completed and returned, or registered online.
| Type | Composting Toilet |
|---|---|
| Fan | Yes |
| Waterless | Yes |
| Power Requirements | 12V DC |
| Heater | Yes |
| Installation | Floor-mounted |
| Odor Control | Ventilation system, composting process |
| Ventilation | 4-inch vent pipe |