8
NOTE: The charge indicator light will illuminate red when
the charger is plugged in and is charging the grass shear +
shrubber. The indicator will turn green when the grass shear +
shrubber is fully charged.
The charging process starts as soon as the charger is plugged
into both the proper electrical outlet and the tool.
• During the charging procedure, the handle of the tool will
feel slightly warm to the touch. This is normal.
• When no further use is planned for an extended period of
time, disconnect the battery charger from the outlet and
the unit.
• Do not use the tool during the charging procedure.
Battery Charging
The length of service between each charging varies depending
on the type of work you are doing. The battery in this grass
shear + shrubber has been designed to provide maximum
trouble-free life. However, like all batteries, it will eventually
wear out. To obtain the longest possible battery life, we
suggest the following:
• Store and charge your grass shear + shrubber in a
cool area. Temperatures above or below normal room
temperature will shorten battery life.
• Never store the grass shear + shrubber with the battery
in a discharged condition. Recharge the unit immediately
after it is discharged.
• All batteries gradually lose their charge. The higher the
temperature is, the faster they lose their charge. If you
store your grass shear + shrubber for long periods of time
without using it, recharge the battery every 6 months. This
will extend battery life.
NOTE: The grass shear + shrubber has been shipped in a low
charge condition and should be fully charged before use.
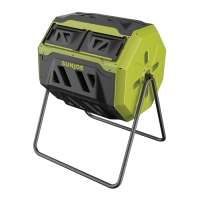
1. Plug the charger adapter into an appropriate power outlet.
Connect the charger plug into the charging socket of the
grass shear + shrubber (Fig. 9).
2. The charging indicator will illuminate red when charging
(Fig. 9).
3. The battery will take up to 3 hours to charge due to
the level of charge left in the battery and the ambient
temperature.
NOTE: A charging indicator light will always be illuminated
when the charger is plugged in and the mains power is turned
on. The charging indicator indicates the charge status of the
grass shear + shrubber as shown below:
Operation
IMPORTANT! The product is intended for light-duty trimming
of shrubs and lawn edges for residential properties.
NOTE: Charge the battery then use it until it runs down (i.e. the
tool will only slowly operate and stop soon). Recharge again
before resuming operation.
mWARNING! The blades continue to move for a few
seconds after the tool is switched OFF. Turn OFF the tool and
wait until the blades come to a complete stop before adjusting
or cleaning.
mCAUTION! Never touch the blade rail while the tool is
in operation and be aware of the sharp edges even when the
grass shear + shrubber is not in use.
NOTE: Do not touch the moving blades.
Starting + Stopping
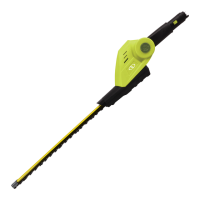
1. To power ON, push and hold one of the safety lock-o
buttons, while pressing the ON/OFF trigger switch with
your forenger. Once the trigger switch engages, you
can release the safety lock-o button and proceed with
operation (Fig. 10).
NOTE: The safety lock-o button reduces the risk of
accidental starting.
Fig. 9
Charging indicator
Charging Condition
Charging
Fully Charged
Color of
Charging Indicator
Red
Green
Fig. 10
Safety lock-o button
ON/OFF trigger
switch