Superiorfireplaces.US.com
126631-01B
11
VENTING INSTALLATION Continued
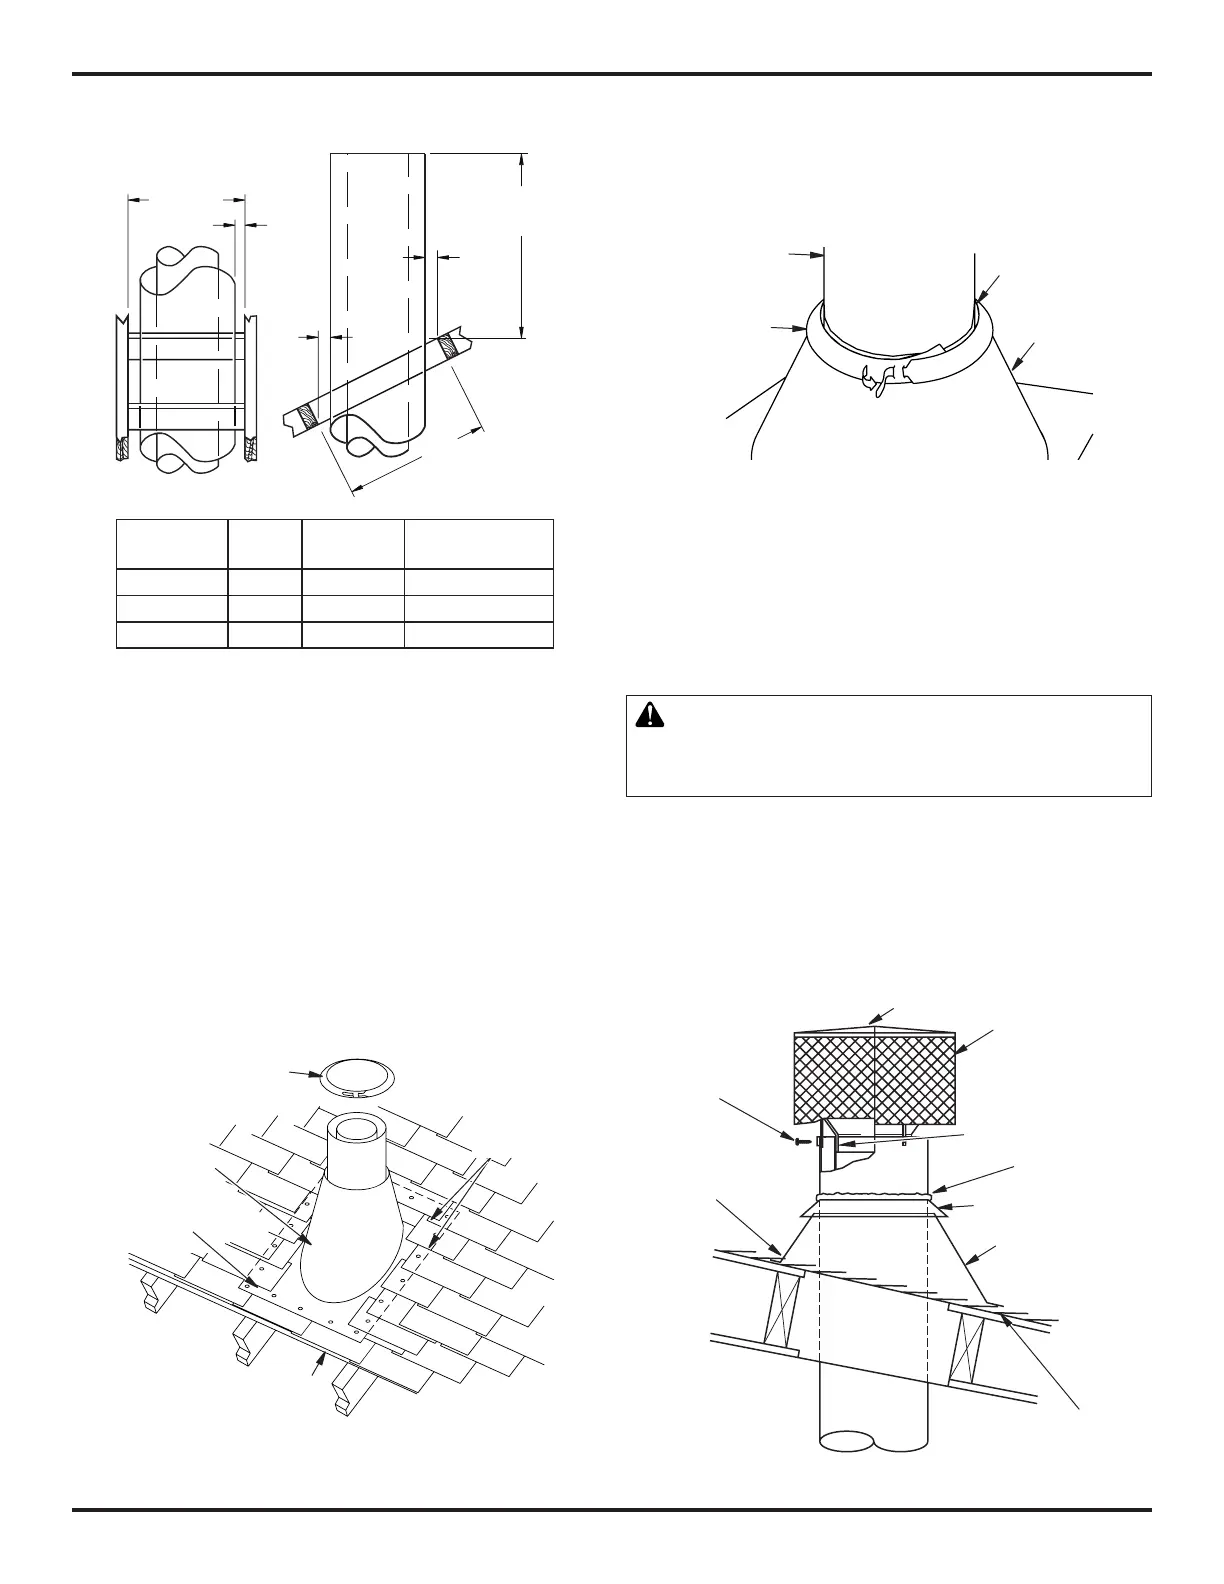
Pitch Slope Opening
"A"Max.
UsedFlashing
ModelNo.
Flat 0° 15" V6F-8DM
0-6/12 26.6° 16
1
/
8
" V6F-8DM
6/12- 12/12 45.0° 20
3
/
8
" V12F-8DM
Figure 14 - Roof Opening Measurements
FLASHING INSTALLATION (V6F-8DM OR V12F-8DM)
Determineashingtobeusedwithroofopeningchart.Slideashing
over pipe until base is flat against roof. Replace as many shingles as
needed to cover exposed area and flashing base. Secure in position
bynailingthroughshingles(seeFigure15).DONOTNAILTHROUGH
FLASHINGCONE.
Installing Flashing on a Metal Roof
When installing flashing on a metal roof, it is required that putty tape
be used between flashing and roof. Flashing must be secured to roof
using #8 x 3/4" screws and then sealed with roof coating to prevent
leakagethroughscrewholes.Aroofcoatingmustalsobeapplied
around perimeter of flashing to provide a proper seal.
Nail Only Outer
Perimeter of
Flashing
Storm Collar
Underlap Shingles
at Bottom
Figure 15 - Flashing Installation
Flashing
Cone
Overlap
Shingles Top
and Sides Only
Storm Collar Installation (SC1)
Place storm collar over pipe and slide down until it is snug against
openedgeofashing(seeFigure16).UseSC1forallroundtermina-
tions.Applywaterproofcaulkaroundperimeterofcollartoprovide
a proper seal.
Figure 16 - Storm Collar
Chimney
Pipe
Waterproof
Caulk
Storm
Collar
Flashing
Terminations/Spark Arrestor
Fireplace system must be terminated with listed round top or chase
terminations.Inanycase,refertoinstallationinstructionssupplied
with termination. Terminations approved for this fireplace are RT-
8DM,RTL-8DMandRLT-8DMthatcanbeusedforashingorchase
andET-8DM,ETO-8DM,ETL-8DMandETLO-8DMforchasestyleter-
minationonly.Figure17showsanRTL-8DMroundtoptermination.
CAUTION: Do not seal openings on the rooftop
flashing. Follow the installation instructions provided
with the termination being used.
Terminations with 16" slip pipe sections are available. RTT-8DM,
RTTL-8DMandRLTT-8DMareapprovedforashinginstallations.
When needed, these adjustable terminations may be used in combina-
tion with pipe assembly to achieve correct chimney height.
Note:Intherareinstancethereisaproblemwithsidedrivenrainor
windor chimney isnot drafting properly, an ADS-8DM (Anti-Draft
Shield)canbeusedwithroundterminations.
Attach Bracket
Tabs to
Outer Pipe
(3 Places)
Secure with
Screws
RTL-8DM
Level of Flue
Gas Outlet
Caulk
Collar
Flashing
Underlap Shingles
Bottom Only
Figure 17 - Termination
Overlap
Shingles Top
and Sides
Flue Pipe of
RTL-8DM
Inside Inner
Pipe of
Chimney
30"
(76.2 cm)
Minimum Measurements
Opening "A"
14
3
/
8
"
(48.3 cm)
1"
(2.54
cm)
1"
(2.54
cm)
1"
(2.54 cm)
 Loading...