EasyManua.ls Logo

Symmons SLC-5512 Series User Manual

Symmons SLC-5512 Series
5 pages
To Next Page IconTo Next Page
Page #1 background imageLoading...
Page #1 background image
1
You may need/Usted puede necesitar/
Aticles dont vous pouvez avoir besion
TWO HANDLE LAVATORY FAUCET
Model SLC-5512 Series
MEZCLADORA PARA TINA LAVABO DE DOS
Modelos SLC-5512 Serie
ROBINET DE LAVABO À DEUX POIGN ÉES
Modèles
SLC-5512 Série
CAUTION-TIPS FOR REMOVAL
OF OLD FAUCET:
Always turn off water supply before
removing existing faucet or replacing any
part of the faucet. Open the faucet handle
to relieve water pressure and ensure that
water is completely sh
ut off.
CARE INSTR
UCTIONS:
To preserve the finish of your faucet, apply
non-abrasive wax. Any cleaners should be
rinsed off immediately. Do not use abrasive
cleaners on the faucet.
PRECAUCIÓN-CONSEJOS PARA
CAMBIAR LA LLAVE MEZCLADORA.
Siempre CIERRE la toma de agua antes
de quitar la llave existente o desmontar la
v
álavula. Abra la llave para liberar la presión,
yasegúrese de que esté bien cerrada
el agua.
INSTRUCCIONES DE CUIDADO
P
ara conservar el acabado que cubre
las partes metálicas de su llave mezcladora,
aplique cera que no sea abrasive, como una
cera para autos. Si usa alg ún tipo de
limpiador, deber á enjuagarlo inmediatamente.
Los abrasivos suaves son aceptables en
acabados platinum y LifeShine.
ATTENTION-SUGGESTIONS POUR
ENLEVER L'ANCIEN ROBIENT:
Toujours couper l'alimentation en
eau avant d'enlever ou de d émonter
le robinet.Ou
vrir le robinet pour libérer
la pression d'eau et pour s'assurer que
l'alimentation en eau a bien
été coupée.
DIRECTIVES D'ENTRETINE
Pour préserver le fini des pièces
métalliques du robinet,appliquer une
cire non abrasive comme une cire à
votiure. Rincer immédiatement le robinet
aprés l'avoir nettoyé avec un agent
nettoyant. Les finis platinum et LifeShine
peuvent être nettoy és à l'aide de produi
ts
abrasifs doux.
English
Español
Français
HELP LINE
Si necesita ayuda para la instalación,
piezas de repuesto o tiene alguna
pregunta relacionada con nuestra
garatía, por favor llame a nuestros
asesores de producto al:
(800)796-6667,(781)848-2250
LĺNEA DE AYUDA
Pour obtenir de l'aide pour l'installation,
le replacement de pièces ou pour toute
question concemant notre garantie,
appeler un de nos sp
écialistes
des produits:
(800)796-6667,(781)848-2250
S
ERVICE À LA CLIENTÈLE
Wrench
Llave
Clé ajustable
Goggles
Anteojos Protectores
Lunettes de sécurité
(2) 1/2 in Supply Lines
2 Líneas de Suministro
(2) Tuyaux d'alimentation
Basin Wrench
Llave para Instalar Grifos
Clé pour lavabo
Sealant Tape
Cinta Selladora
Ruban d'étanchéité
Plumber's Putty
Masilla para Tuberías
Mastic de plombier
Document #ZV-1067
Rev: E
Need Help?
Symmons customer service:
(800) 796-6667, (781) 848-2250
customerservice@symmons.com
Mon - Fri 7:30 am - 7:00 pm EST
www.symmons.com/service,
technical help, product information
and warranty policy
Question and Answer IconNeed help?

Do you have a question about the Symmons SLC-5512 Series and is the answer not in the manual?

Symmons SLC-5512 Series Specifications

General IconGeneral
SeriesSLC-5512
Product TypeShower System
MaterialBrass
FinishChrome
Valve TypePressure Balance
Pressure BalanceYes
Temperature ControlYes
Flow Rate2.5 GPM
Flow Rate at Pressure2.5 GPM at 80 PSI
Installation TypeWall Mount
Wall MountYes
Handle StyleLever
Number of Handles1
Diverter IncludedNo
ADA CompliantYes
Connection Size1/2 inch
ComplianceASME A112.18.1
TypeShower Only Faucet

Summary

Help Line and Support

Customer Service Contact

Provides contact details for Symmons customer service via phone and email, including operating hours.

Technical Assistance

Offers technical help, product information, and warranty policy details via the company website.

Faucet Installation and Care

Removal of Old Faucet Caution

Always turn off water supply before removing or replacing faucet parts. Relieve water pressure.

Faucet Care Instructions

Preserve faucet finish with non-abrasive wax. Rinse cleaners immediately. Avoid abrasive cleaners.

Installation Steps

Mounting the Faucet

Shut off water, place gasket on new faucet, insert through sink holes, and secure with mounting nuts.

Connecting Water Lines

Connect 1/2" IPS lines or use supplied nuts with 3/8" O.D. risers. Tighten connections with wrenches.

Installing Pop-up Assembly

Install tailpipe with Teflon tape, then stopper and flange. Screw nut down and push gasket.

Securing Faucet Body

Apply plumber putty to flange underside, insert body into sink, screw flange, align pivot hole.

Final Installation Steps

Pivot Nut and Rod Installation

Remove pivot nut, install horizontal rod and stopper. Hand tighten nut, attach rod to strap.

Lift Rod Installation

Insert lift rod through faucet and into strap, then tighten the screw.

Post-Installation Check

Remove aerator, turn on water (hot/cold) for one minute, check for leaks, then replace aerator.

Maintenance and Parts

Faucet Leak Troubleshooting

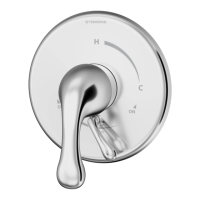
If faucet leaks from spout, shut off water and replace cartridge correctly for handle rotation.

Parts Identification

Diagram and labels identifying faucet components like handle, cartridges, aerator, and drain assembly.
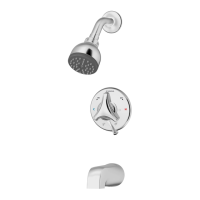
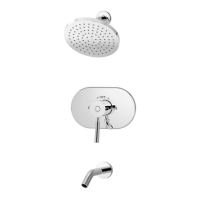
Related product manuals