1-6-7 H9400IB
s Button
Press to cancel a setting of timer program. Press to
correct digits when setting program (For example:
setting clock or timer program). Press to add or
delete channel numbers during channel preset.
7. ENTER Button
Press to accept a setting.
8. g Button
● DVD mode
Press to fast forward the Disc. Press PAUSE, then
press this button to begin slow motion playback.
Press this button repeatedly to change the forward
speed of slow motion.
● VCR mode
Press to rapidly advance the tape, or view the pic-
ture rapidly in forward during playback (Forward
Search).
9. PLAY Button
● DVD mode
Press to begin playback.
● VCR mode
Press to begin playback.
0. VCR Button
Press to select VCR mode for the remote control.
● You can switch the OUTPUT mode either by
pressing OUTPUT on the front panel, or by pressing
DVD or VCR on the remote control. However, if you
press OUTPUT on the front panel first, you need
to re-select the corresponding mode by pressing
DVD or VCR on the remote control.
1. PAUSE Button
● DVD mode
Press to pause Disc playback. Press repeatedly to
advance the DVD picture step by step (or one
frame at a time).
● VCR mode
While recording, press to temporarily stop t
recording (pause). Press a second time to resum
normal recording. You can not pause a One-Tou
Recording. Or, press during tape playback
freeze the picture. Press to advance the picture on
frame at a time during still mode.
52. SLOW Button
During tape playback, press to view the video tape
slow motion. Press again to resume normal playbac
This button does not affect DVD playback.
53. VCR/TV Button
Use to select VCR or TV position.
●VCR Position
To view playback, to monitor video recording or
watch TV using the VCR tuner.
● TV Position
To watch TV or to view one program while recor
ing another.
54. SKIP/CH. Buttons
● DVD mode
Press to skip Chapters or Tracks.
● VCR mode
Press to change TV channels on the VCR.
55. AUDIO Button
Press to select a desired audio language or soun
mode.
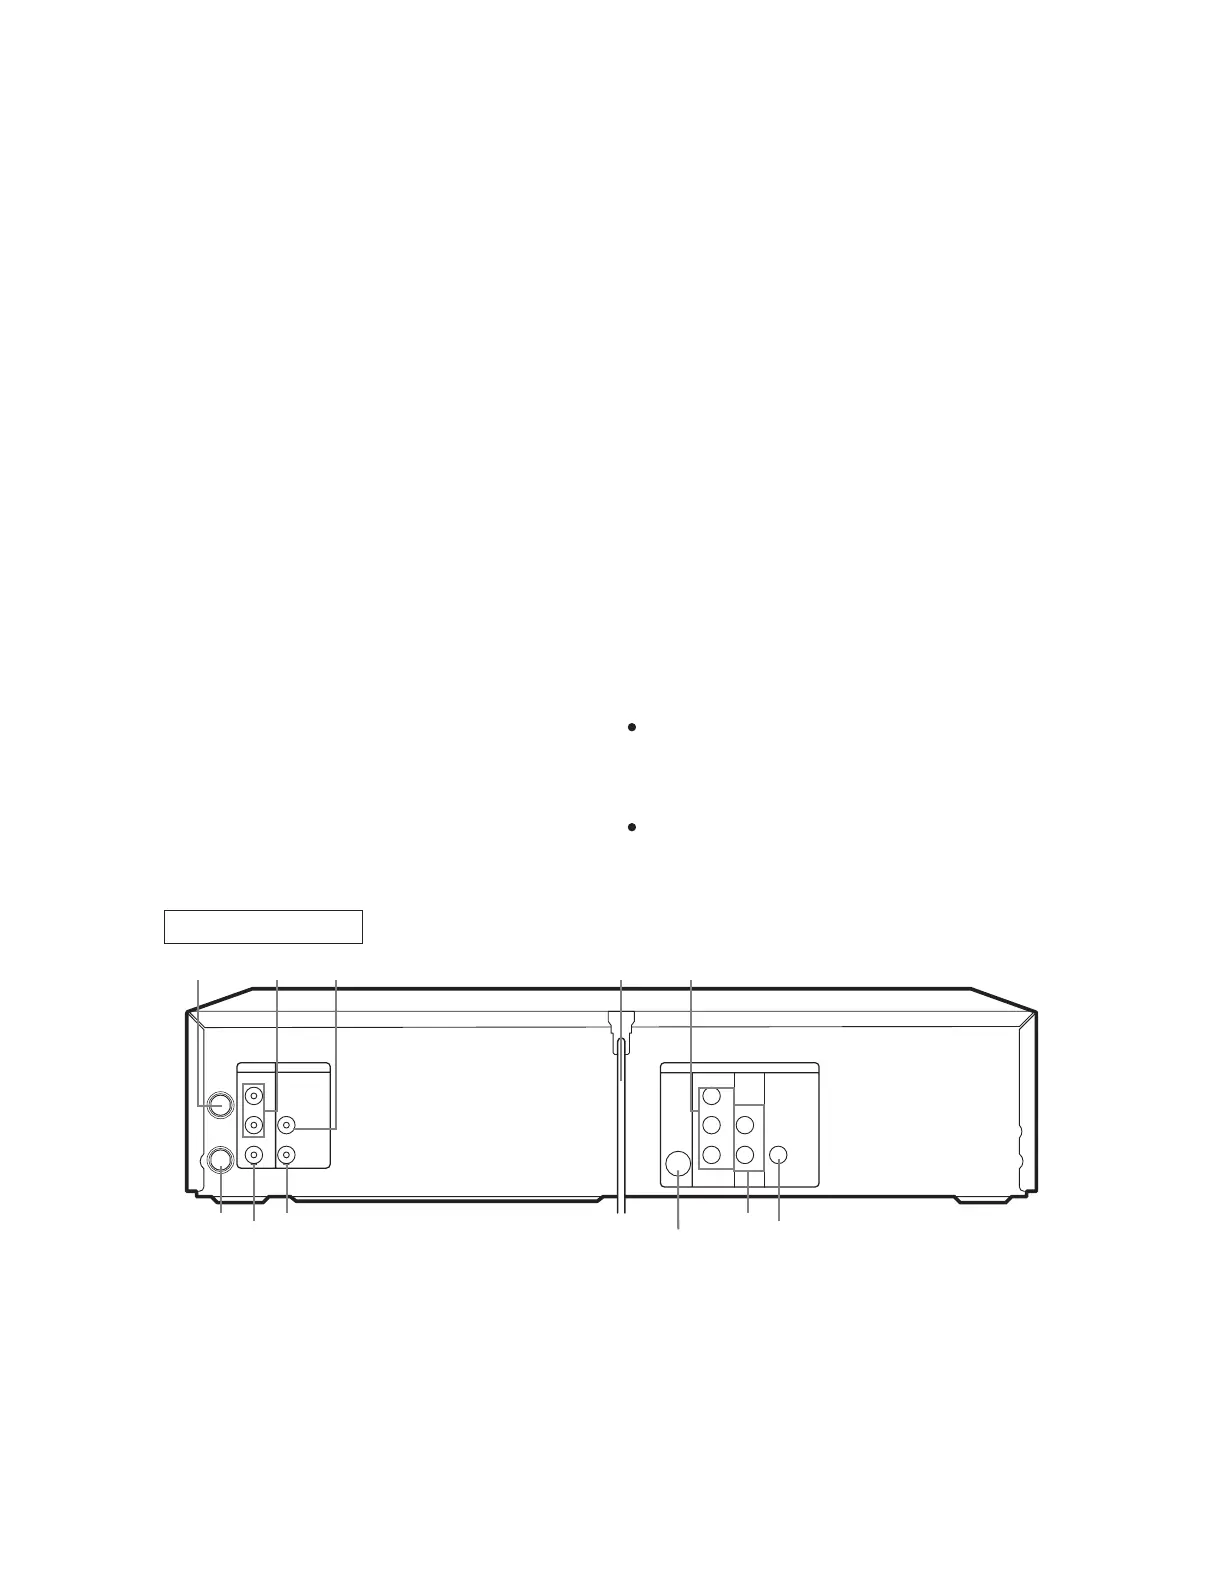
6. ANT-IN (Antenna In) Jack
Connect your antenna, Cable Box, or Direct
Broadcast System.
7. DVD/VCR AUDIO OUT Jacks
Connect the supplied audio cables here and to the
Audio In jacks of a television or other audio equip-
ment.
8. AUDIO IN Jack
Connect audio cable coming from the audio out jack
of a camcorder, another VCR, or an audio source
here.
59. AC Power Cord
Connect to a standard AC outlet to supply power
the DVD/VCR COMBINATION UNITS.
60. COMPONENT VIDEO OUT Jacks
Connect optional component video cables here an
to the component Video In jacks of a television.
61. COAXIAL Jack
Connect an optional coaxial digital audio cable he
and to the Coaxial Digital Audio In jack of a decod
or audio receiver.
ANT-IN
ANT-OUT
VIDEO OUT
AUDIO OUT
S-VIDEO
OUT
AUDIO
OUT
DIGITAL
AUDIO OUT
COAXIAL
Y
Cb
Cr
L
R
COMPONENT
VIDEO OUT
AUDIO IN
VIDEO IN
DVD/VCR VCR DVD
R
L
66
65
64
63
62
61
5756 58 59 60
REAR VIEW
Notes
To use the remote control to operate the DVD/VC
COMBINATION UNITS and its features, press DV
on the remote control before pressing other DVD ope
ation button. Verify that the green DVD OUTPU
Light is on.
To use the remote control to operate the VCR and
features, press VCR on the remote control befo
pressing other VCR operation button. Verify that t
green VCR OUTPUT Light is on.