20
Freshman Series - Owner's Manual - Installation, Operation, and Service Instruction - Version 1.1 EN
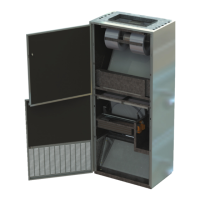
General Installation Instructions of the Classroom Air Handler
1. Once the Rear Standoff (RSO) or Rear Plenum Assembly (RPA) installation has been completed (if applicable) and the Wall
Sleeve has been installed, proceed with fastening the Classroom Air Handler in place. (Refer to Page. 25, 26)
2. To assure a tight seal between the unit (or standoff) and the wall, apply foam tape to the 1” wide mounting edge and to
any partitions of the rear standoff (or unit).
3. If the unit has a cooling coil and drain pan, pass the drain hoses that come out the back of the unit through the wall sleeve.
These hoses must gravitate drain downward to the outside as they pass through to the exterior louver. They must allow
condensate to drain freely to the outside without restriction and without inhibiting the operation of the dampers. (It will be
necessary to cut away enough of the bird screen in the back of the exterior louver to allow the condensate hoses to pass
between the blades of the louver to the exterior.)
-
ping over once the shipping crate is removed. Never lean a ladder against the unit or put weight
on or against the unit prior to completing the installation as it may tip.
6.3 General Assembly and Installation
It is important to read and understand the instructions outlined in this document, as well as any job specic documentation pro-
vided in the Information Package before proceeding with the installation.
Care should be taken to protect the painted nish when handling the unit and accessories.
You may require an assistant's help for this procedure.
The condensate hose is supplied with a loop (trap). DO NOT REMOVE THIS LOOP. If the loop
NOTE:
Keep the tape back from the outside edges by at least ¼” so the tape does not become unsightly when
compressed.
Installation Guide
 Loading...