Do you have a question about the Tascam 3030 and is the answer not in the manual?
Checks for thrust clearance of rotating parts like capstan shaft and reel motors.
Procedure for replacing the capstan motor and checking belt movement.
Adjusting brake solenoid plunger stroke and band contact.
Measuring brake torque using a spring scale.
Adjusting pinch roller position for tape clearance in pause mode.
Adjusting pinch roller pressure stroke for proper clearance.
Measuring pinch roller pressure using a spring scale.
Adjusting tape tension in play, fast forward, and rewind modes.
Adjusting tension arm height for proper tape path alignment.
Adjusting reel table height to prevent tape rubbing on flanges.
Adjusting pinch roller parallelism to the capstan shaft.
Adjusting play, fast wind, and rewind tape speeds.
Measuring wow and flutter at different tape speeds.
Lubrication points and recommended oils for the tape deck.
Procedure for converting voltage for general export models.
Mounting record and playback heads to the head mounting plate.
Adjusting playback head tangency and azimuth for maximum output.
Adjusting record head tangency and azimuth after playback head adjustment.
Identifying and connecting to adjustment points on the REC and PLAY PCB.
Checking playback performance including head azimuth, level, and frequency response.
Checking monitor performance for line input, VU meter, and headphone output.
Adjusting and checking recording performance parameters like bias and level.
Checking playback and overall frequency response curves.
Adjustments related to the DBX noise reduction PCB.
Diagram showing exploded view and parts for the main tape transport mechanism.
Diagram showing exploded view and parts for the capstan and reel motor assembly.
Diagram showing exploded view and parts for the reel table and brake mechanism.
Diagram showing exploded view and parts for the front panel and control section.
Diagram showing exploded view and parts for the tension arm and pinch roller assembly.
Diagram showing exploded view and parts for the rear panel and power supply.
Component layout and parts list for the Record/Playback amplifier PCB.
Component layout and parts list for the tape counter PCB.
Component layout and parts list for the spooling control PCB.
Component layout and parts list for the transistor PCB.
Component layout and parts list for the power supply PCB.
Component layout and parts list for the DBX noise reduction PCB.
Component layout and parts list for the control switch PCB.
Component layout and parts list for the headphone output PCB.
Component layout and parts list for the tension sensor PCB.
Component layout and parts list for the roller sensor PCB.
Component layout and parts list for the pitch control PCB.
Component layout and parts list for the input/output amplifier PCB.
Component layout and parts list for the volume control VR PCB.
Component layout and parts list for the bias VR control PCB.
Component layout and parts list for the head switch PCB.
Component layout and parts list for the dupli sync PCB.
Component layout and parts list for the DBX lamp driver PCB.
Component layout and parts list for the DBX switch PCB.
Component layout and parts list for the fuse holder PCB.
Component layout and parts list for the voltage selector PCB.
Component layout and parts list for the power switch PCB.
Wiring diagram for the keyboard control PCB.
Wiring diagram for the tape counter PCB.
Wiring diagram for the roller sensor PCB.
Wiring diagram for the sensor PCB (likely related to reel rotation).
Wiring diagram for the transistor PCB.
Wiring diagram for the power supply PCB, second part.
Wiring connections between the Spooling PCB and the Power PCB.
Wiring connections between the Spooling PCB and the Head Switch PCB.
Wiring connections between the Spooling PCB and the Rec/Play PCB.
Wiring connections between the In/Out Amp PCB and the Headphone PCB.
Wiring connections between the In/Out Amp PCB and the Rec/Play PCB.
Wiring connections between the In/Out Amp PCB and the Volume PCB.
Wiring connections within the In/Out Amplifier PCB.
Schematic diagram for the DBX decoder section.
Schematic diagram for the DBX encoder section.
Guidelines for service personnel before returning the appliance.
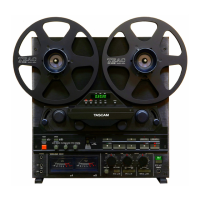
| Track System | 4-track, 2-channel stereo |
|---|---|
| Total Harmonic Distortion | 0.8% |
| Tape Type | Metal |
| Output | XLR and RCA |
| Inputs | XLR, RCA |