Do you have a question about the TC-Helicon VoiceTone Harmony-M and is the answer not in the manual?
To reduce the risk of fire or electric shock, do not expose this appliance to rain or moisture.
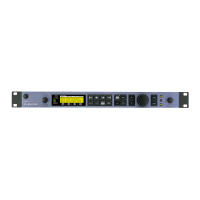
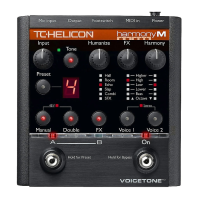
Connect your microphone to a mic cable as the first step in setting up the Harmony-M.
Connect the unit's output to a 1/4" line level input on your sound system.
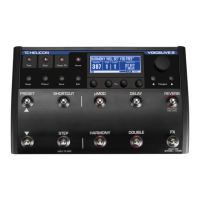
Set the Input Knob fully left, then Humanize, FX, and Harmony controls to the detent at 12 O'Clock.
Raise the Input Knob while singing until the Input Light turns green, orange on loud parts, but never red.
Raise mixer fader, tap On footswitch to hear harmonies, and experiment with presets using A/B footswitch.
Connect the microphone cable to the designated Mic Input on the Harmony-M unit.
Connect a MIDI cable from your keyboard's MIDI Out to the MIDI IN on Harmony-M.
Connect the power adapter to main power and to the Power Input on Harmony-M.
Check that the LEDs conform to the status shown and press buttons to change them if necessary.
Adjust the Input Knob so the LED flashes green, sometimes orange, but never red.
Engages Live Engineer Effects for smoother and brighter vocal sound.
Allows changing default MIDI settings: Receive Channel, CC Receive Channel, Program Change On/Off.
Troubleshooting steps for MIDI not changing harmonies: check MIDI dot, cable, and play chords.
Voice buttons are inactive when the Manual button is lit. Turn off Manual button.
Likely set to Off FX style. Press FX button to cycle through styles.
Lower the Harmony control knob value.
Hold Voice I and Voice 2 buttons to exit Mono mode.
Hold On footswitch for Bypass mode; press again to exit.
Yes, press Voice I or Voice 2 buttons so their LEDs are not lit.
Yes, refer to External Mixing with Mono and Dry Outputs in For Advanced Users.
Details Mic Connector, Mic Input Sensitivity, EIN, MIDI In, Footswitch In, and Power Input specifications.
Details Main Output Connectors, Output Impedance, and Output Level.
Lists Dynamic Range, THD+Noise, and Frequency Response figures.
Lists compliance with EN, FCC, IEC, UL, and CSA standards.
| Type | Vocal Harmony Processor |
|---|---|
| Technology | Digital Signal Processing |
| USB | No |
| Inputs | 1 x XLR (mic), 1 x 1/4" (instrument) |
| Outputs | XLR, 1/4" TRS |
| Harmony Voices | 2 |
| Effects | Reverb, Delay |
| Power Supply | 9V DC |
| Presets | 10 |