OPERATION
36953002A
GENERAL:
Power Source (AC) ............. Input: 100-240V AC, 50/60Hz,
........................................ 1.2 A max, Output: 19 V DC, 2A
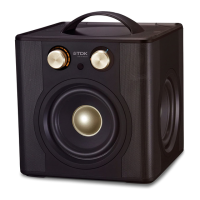
Dimensions ........................... 6 (W) x 6 (H) x 6 (D) inches
................................... 15.2 (W) x 15.2 (H) x 15.2 (D) cm
Weight ...................................................... 4.4 lbs / 2.0 kg
Speakers ............................... 4 x 1 inch full-range drivers,
..............................................................4 inch subwoofer
Specifications are subject to change without notice.
The TDK Life on Record Logo is a trademark of TDK Corporation and is used under license.
All other trademarks and logos are property of their respective owners.
The Bluetooth
®
word mark and logos are registered trademarks owned by Bluetooth SIG, Inc. and any
use of such marks by Imation Corp is under license.
Speaker Power Output .......... 2 W x 4 + 15 W (subwoofer)
Wireless Audio .............................. Bluetooth version 2.1,
.................................................. A2DP profile, AAC Codec
Line-input Audio .........................3.5 mm stereo jack up to
....................................................... 2.5 Vrms input signal
USB Port. ................................. 5.0 V @ 0.5 A charge only
SPECIFICATIONS AND COMPATIBILITY
Turning the A360 On and Off:
1. For AC operation: Press the Power/Volume control u on the main unit to turn the power on.
2. For DC operation: Slide the Battery switch al to the ON position. Press the Power/Volume control
u; the unit will turn on the previous source and volume.
3. To turn the power off, press the Power/Volume control u.
Pairing a Bluetooth Device
1. Turn the A360 on; the LED(s) around the Power/Volume control will light and the previously
listened to source and volume will be selected.
2. Press and hold the Source/Select button V until the Bluetooth indicator blinks rapidly to make the
A360 “discoverable.”
3. On the Bluetooth device, enable Bluetooth and select “A360” from the Device List. If the Bluetooth
device asks for a passkey, use “0000”. Some Bluetooth devices will ask you to accept the
connection. If the units are paired properly, the speaker will beep and the Bluetooth indicator will
light solid blue. If it failed, the Bluetooth indicator will blink slowly.
IMPORTANT: After step 3, you have two minutes to pair the units.
Note: After you pair a device, the A360 will remember it for future use.
Using a Bluetooth Device
1. Turn the A360 on; the LED(s) around the Power/Volume control will light and the previously
listened to source and volume will be selected
2. With a unit paired (see previous section), press the Source/Select button V so the Bluetooth
indicator lights.
3. Operate your Bluetooth device and its sound will be heard through the A360’s speakers.
4. Adjust the volume by rotating the Power/Volume control u on the A360, or the Volume control on
the Bluetooth device, and adjust the Bass and Treble as described later in this guide.
AUX Jack (Rear of A360)
1. Insert one end of an audio cable (not included) into
the LINE OUT or Headphone jack on your external
audio unit and the other end into the AUX jack ak on
the rear of the A360, under the flap.
2. To listen to the external audio unit, turn the A360 on
and press the Source/Select button V once so the
AUX indicator lights to select the Line In mode.
3. Start playback of the external unit and the external
audio unit’s output sound will be heard through the
A360’s speakers.
4. Adjust the volume using the Power/Volume control u
on the A360, or the Volume control on the Bluetooth
device, and adjust the Bass and Treble as described later in this guide.
Charging a USB Device with the A360’s USB Jack
Connect your device via USB to the USB jack W on the A360. Your device will charge when the A360
is connected to AC power. Your device will also charge during operation in DC mode if Battery OFF/ON
switch al is ON.
Note: USB charging will significantly reduce battery life in DC mode.
Setting the Treble and Bass
1. TREBLE: Press the Treble/Bass button y until the Treble Indicator lights. Adjust the setting using the
Power/Volume control u.
2. BASS: Press the Treble/Bass button y until the Bass Indicator lights. Adjust the setting using the
Power/Volume control u.
Note: After five seconds, the unit will save the Bass/Treble settings and revert to Volume selection mode.
Auto Power Off
If the unit has no audio signal or a USB device is not charging, for 20 minutes, the unit will turn itself
off. To “wake” the unit up, simply press the Power/Volume control u.
Splash Resistant
The A360 is splash resistant, but cannot be submerged in water or be subject to constant flow of water.
In order to ensure the product is splash resistant, close the rubber flap on the rear of the A360. To
properly close flap, fully insert center rubber dongle (on inside of flap at) into the DC IN jack X until
flap center is flush. Insert the other dongle into USB jack W, then smooth out entire flap until flap is
flush with the sides of the A360.
Troubleshooting
If the A360 is not producing sound, adjust the volume level on your digital music device to high.
AC CONNECTION/RECHARGING THE BATTERY
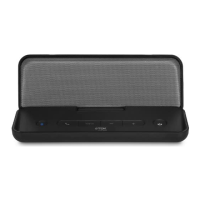
LOCATION OF CONTROLS
1. Power/Volume Control
2. Low Battery Indicator
3. Carrying Handle
4. Bluetooth
®
and Aux Source Indicators
5. Treble/Bass Button
6. Treble/Bass Indicators
7. Source/Select Button
8. USB Charge Jack
9. DC IN Jack
10. Rubber Flap
11. AUX Jack
12. Battery OFF/ON Switch
Notes:
• OnlyusethesuppliedACadapter.
• RemoveboththeDCplugandAC-INplugtodisconnectACadapterwhennotinuse.
• DisconnecttheACcordtousewithDCpower(rechargeablebattery).
1. Select the appropriate
plug for your country
and connect it to the AC
power adapter.
2. Connect the AC power adapter jack to the DC IN jack X on the rear of the unit and then connect
the plug to a 100V-240V wall outlet.
This unit has a built-in rechargeable battery that will automatically be charged as long as the unit is
plugged in. If the battery is low, the Battery indicator v will turn on. The Battery indicator will blink red
when low. It will be solid red when charging.
Note: The battery will provide approximately 6 hours of operation at normal listening level.
Rechargeable Battery Notes:
• Eachtimeyouchargeanddischargethebattery(chargecycles),batterycapacityslightlydiminishes.
Rechargeable batteries have a limited number of charge cycles and need to be replaced eventually.
• Youmaywishtoreplaceyourbatterywhen,orbefore,thebatterydoesnotsupplyenoughpower
to function your device. Also, proper disposal is essential from environmental and safety point of
view. Putting any battery directly in the trash will harm the environment.
• Donotincinerate.
Replacing the Rechargeable Battery:
If the battery does not supply enough power (see Rechargeable Battery Notes below), order a replacement
battery at www.tdkperformance.com and remove the four screws on the left side of the unit. Disconnect
the connector and remove the battery. Then connect the new battery and reinsert the four screws.
1
2
12
9
8
11
7
4
6
5
10
3
Wireless 360
Speaker
TDKperformance.com
A360
Guide d'utilisation
Veuillez lire l'ensemble des instructions
ci-dessous avant d'utiliser ce produit.
TDKperformance.com
A360
User Guide
Please read these instructions completely
before operating this product
Wireless 360
Speaker