EasyManua.ls Logo

Teac AG-V1200 - Audio Playback and Recording; Video Source Playback

Teac AG-V1200
22 pages
Print Icon
To Next Page IconTo Next Page
To Previous Page IconTo Previous Page
Loading...
Preset
Tuning:
This
unit
has
a
station
preset
memory
which
is
convenient
when
you
{isten
to
many
radio
ations.
Preset
tuning
allows
you
to
store
a
total
of
up
to
30
FM/AM
stations,
in
any
desired
sequence.
Once
these
stations
have
been
stored
in
memory,
as
long
as
the
power
plug
is
connected
to
the
wall
outlet,
they
are
retained
indefinitely.
Even
if
the
power
plug
is
disconnected
from
the
wall
outlet,
they
are
Maintained
for
about
four
hours.
Refer
to
“Memory
Backup
Function"
on
page
11.
Therefore,
it
is
not
necessary
to
re-enter
the
preset
stations
every
time
the
power
is
turned
on.
2
rie
the
Preset
Memory
.
Tune
to
a
station
using
the
AUTO,
MANUAL
or
DIRECT
tuning
mode
as
described
above.
2.
To
store
the
station
in
the
preset
memory,
press
the
MEMORY
button.
The
MEMORY
indicator
will
light
for
approximately
5
seconds.
3.
While
the
MEMORY
indicator
is
lit,
input
the
desired
channel
number
by
pressing
the
numeric
key(s).
In
this-way,
the
currently
displayed
information
--
band
(FM
or
AM)
and
frequency
--
are
stored
in
memory
in
that
channel.
Note:
If
a
frequency
has
already
been
stored
in
the
preset
channel
specified,
the
previously
stored
frequency
will
be
replaced
by
the
new
frequency.
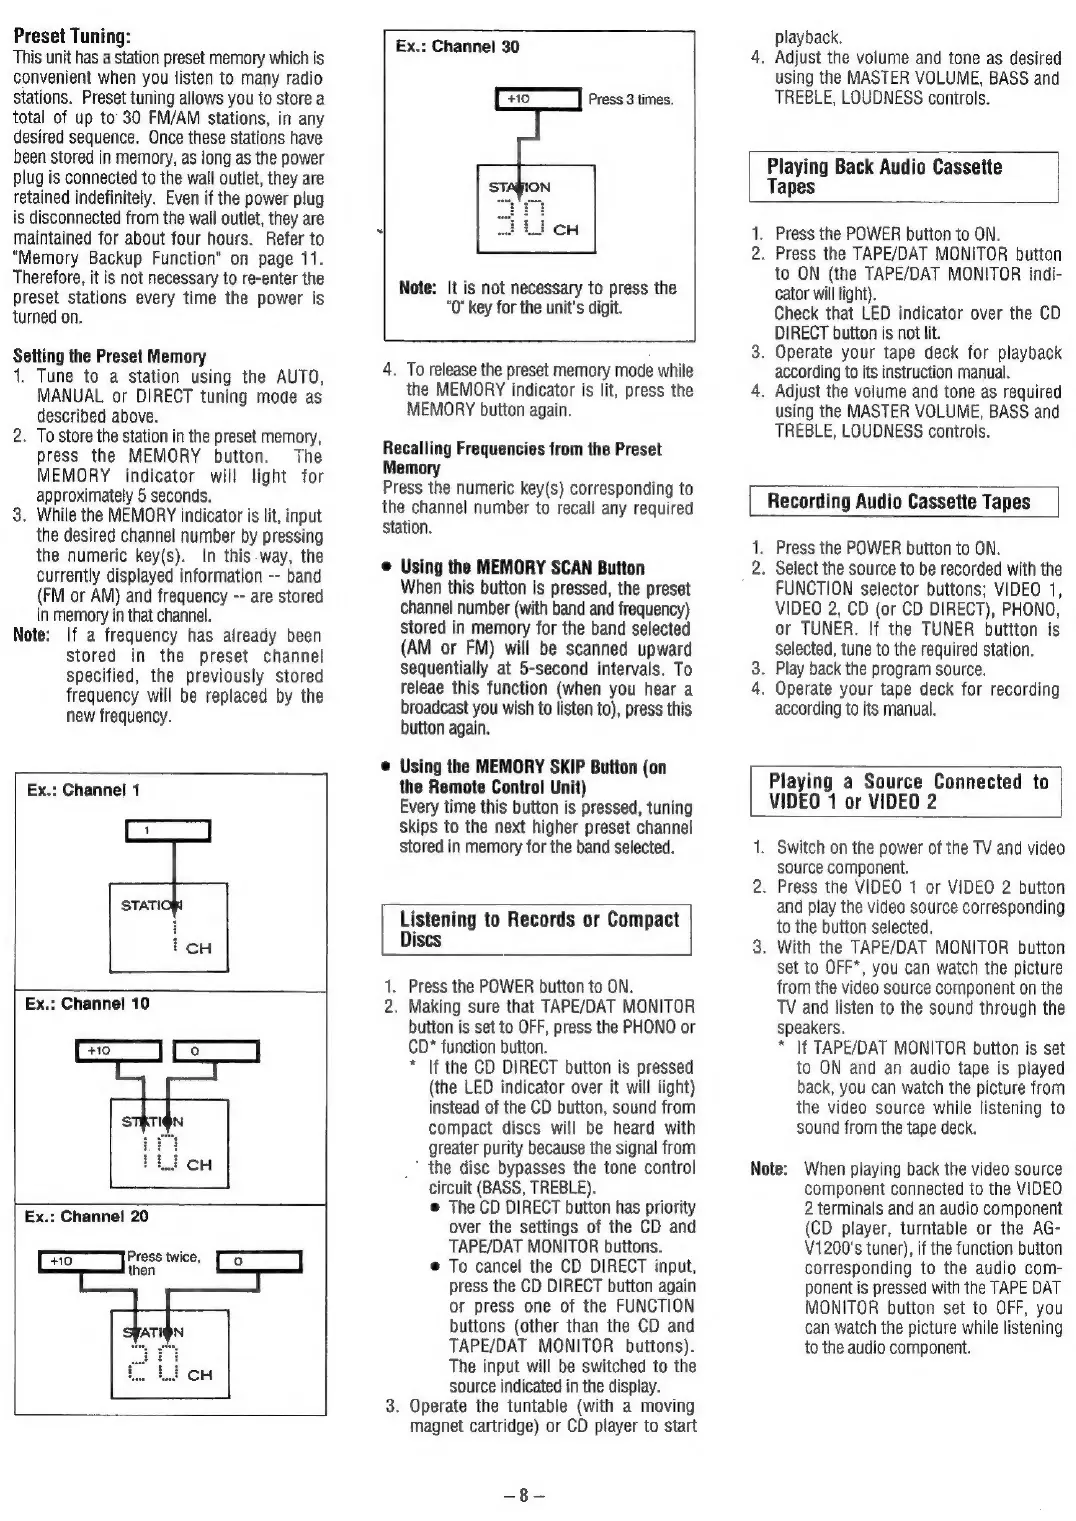
Ex.:
Channel
1
Ex.:
Channel
10
Ex.:
Channel
20
FEE
A
1
then
Ex.:
Channel
30
Press
3
times.
Note:
It
is
not
necessary
to
press
the
“O'
key
for
the
unit's
digit.
4.
To
release
the
preset
memory
mode
while
the
MEMORY
indicator
is
lit,
press
the
MEMORY
button
again.
Recalling
Frequencies
from
the
Preset
Memory
Press
the
numeric
key(s)
corresponding
to
the
channel
number
to
recall
any
required
station.
e
Using
the
MEMORY
SCAN
Button
When
this
button
is
pressed,
the
preset
channel
number
(with
band
and
frequency)
stored
in
memory
for
the
band
selected
(AM
or
FM)
will
be
scanned
upward
sequentially
at
5-second
intervals.
To
releae
this
function
(when
you
hear
a
broadcast
you
wish
to
listen
to),
press
this
button
again.
©
Using
the
MEMORY
SKIP
Button
(on
the
Remote
Control
Unit)
Every
time
this
button
is
pressed,
tuning
skips
to
the
next
higher
preset
channel
stored
in
memory
for
the
band
selected.
Listening
to
Records
or
Compact
Discs
1.
Press
the
POWER
button
to
ON.
2.
Making
sure
that
TAPE/DAT
MONITOR
button
is
set
to
OFF,
press
the
PHONO
or
CD*
function
button.
*
If
the
CD
DIRECT
button
is
pressed
(the
LED
indicator
over
it
will
light)
instead
of
the
CD
button,
sound
from
compact
discs
will
be
heard
with
greater
purity
because
the
signal
from
*
the
disc
bypasses
the
tone
control
circuit
(BASS,
TREBLE).
e
The
CD
DIRECT
button
has
priority
over
the
settings
of
the
CD
and
TAPE/DAT
MONITOR
buttons.
e
To
cancel
the
CD
DIRECT
input,
press
the
CD
DIRECT
button
again
or
press
one
of
the
FUNCTION
buttons
(other
than
the
CD
and
TAPE/DAT
MONITOR
buttons).
The
input
will
be
switched
to
the
source
indicated
in
the
display.
3.
Operate
the
tuntable
(with
a
moving
magnet
cartridge)
or
CD
player
to
start
waifhcn
playback.
4.
Adjust
the
volurne
and
tone
as
desired
using
the
MASTER
VOLUME,
BASS
and
TREBLE,
LOUDNESS
controls.
Playing
Back
Audio
Cassette
Tapes
1.
Press
the
POWER
button
to
ON.
2.
Press
the
TAPE/DAT
MONITOR
button
to
ON
(the
TAPE/DAT
MONITOR
indi-
cator
will
light).
Check
that
LED
indicator
over
the
CD
DIRECT
button
is
not
lit.
3.
Operate
your
tape
deck
for
playback
according
to
its
instruction
manual.
4.
Adjust
the
volume
and
tone
as
required
using
the
MASTER
VOLUME,
BASS
and
TREBLE,
LOUDNESS
controls.
Recording
Audio
Cassette
Tapes
.
Press
the
POWER
button
to
ON.
2.
Select
the
source
to
be
recorded
with
the
FUNCTION
selector
buttons;
VIDEO
1,
VIDEO
2,
CD
(or
CD
DIRECT),
PHONO,
or
TUNER.
If
the
TUNER
buttton
is
selected,
tune
to
the
required
station.
3.
Play
back
the
program
source.
4.
Operate
your
tape
deck
for
recording
according
to
its
manual.
Playing
a
Source
Connected
to
VIDEO
1
or
VIDEO
2
1.
Switch
on
the
power
of
the
TV
and
video
source
component.
2.
Press
the
VIDEO
1
or
VIDEO
2
button
and
play
the
video
source
corresponding
to
the
button
selected.
3.
With
the
TAPE/DAT
MONITOR
button
set
to
OFF*,
you
can
watch
the
picture
from
the
video
source
component
on
the
TV
and
listen
to
the
sound
through
the
speakers.
*
If
TAPE/DAT
MONITOR
button
is
set
to
ON
and
an
audio
tape
is
played
back,
you
can
watch
the
picture
from
the
video
source
while
listening
to
sound
from
the
tape
deck.
Note:
When
piaying
back
the
video
source
component
connected
to
the
VIDEO
2
terminals
and
an
audio
component
(CD
player,
turntable
or
the
AG-
1200's
tuner),
if
the
function
button
corresponding
to
the
audio
com-
ponent
is
pressed
with
the
TAPE
DAT
MONITOR
button
set
to
OFF,
you
can
watch
the
picture
while
listening
to
the
audio
component.