Do you have a question about the Teac W-890R and is the answer not in the manual?
Essential safety guidelines for operation, installation, and user care to prevent hazards and ensure safe use of the apparatus.
Explanation of Dolby NR noise reduction and its playback setting for reducing tape hiss.
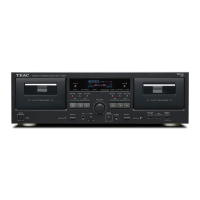
List of items included with the TEAC W-890R cassette deck, including remote and cables.
Details on typeface conventions used in the manual for controls, displays, and messages.
Guidelines for optimal placement and environmental conditions for the unit's operation and longevity.
Information and cautions regarding the types of cassette tapes to use or avoid for best performance.
Procedure for cleaning the cassette deck's heads, pinch rollers, and capstans for optimal performance.
How to connect the unit to an amplifier using RCA cables for audio input/output.
Instructions for setting the voltage selector and connecting the AC power cord to the wall outlet.
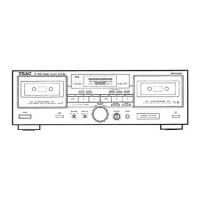
Description of the power switch and the TAPE I/II cassette compartments.
Overview of key controls like RTZ, Counter Reset, Synchro Reverse, Repeat, Parallel Record, Dub Start.
Details on MIC jack, Headphones jack, and Pitch/Rec Level controls on the front panel.
Guidelines for effective use of the remote control, including range and light sensitivity.
Instructions for inserting batteries and important safety cautions for battery handling.
Explanation of peak level meters showing recording/playback levels and the SYNC REV indicator.
Descriptions of PARALLEL, Pause, Record, and Play indicators for both TAPE I and TAPE II decks.
Details on tape counters and playback/recording direction indicators for TAPE I and TAPE II decks.
Steps for loading tape and starting playback on TAPE I or TAPE II decks.
Explanation of One Way, Two Way, and Repeat playback modes for continuous listening.
Setting the Dolby NR switch correctly for playback of recorded tapes.
Using STOP, PAUSE, fast wind, and tape counter reset for precise playback control.
Adjusting playback pitch and listening through headphones for personal monitoring.
How to set up relay playback between two tapes for uninterrupted listening.
Using RTZ to zero the counter and A-B Repeat for section playback.
Steps for powering on, loading tape, setting reverse mode, and Dolby NR for recording.
How to initiate recording and set the recording level using the REC LEVEL control.
Controlling the direction of recording on the tape for single or double-sided recording.
Using PAUSE to temporarily stop recording and REC MUTE to create blanks.
Method for erasing tape content without making a new recording.
Initiating recording and playback simultaneously with a single command.
How to record voice and another audio source together on tape with mic mixing.
Steps to balance microphone input and overall recording levels for optimal mix.
Loading tapes and setting the REV MODE for uninterrupted recording across two tapes.
How to start the recording process and check recording direction for continuous recording.
Recording the same material on both TAPE I and TAPE II decks simultaneously.
Instructions for copying tape contents from TAPE I to TAPE II, including speed options.
How to create blanks or skip unwanted sections during normal speed dubbing.
Key notes on dubbing, including pitch control, level adjustment, and interference issues.
How synchro reverse dubbing works with different tape lengths and automatic switching.
Steps to set REV MODE, check direction, and press SYNC REVERSE key to start.
Setting up the unit for automatic playback at a scheduled time using an audio timer.
Setting up the unit for automatic recording at a scheduled time using an audio timer.
Illustration and guide for connecting the unit to an audio timer and other audio components.
Solutions for common problems like no power, no sound, noisy playback, and recording errors.
Detailed technical data including track system, tape speed, frequency response, and S/N ratio.
Information on physical size, power requirements, consumption, and included accessories.
Guidelines for the proper disposal of electrical equipment and batteries in European regions.
| Brand | Teac |
|---|---|
| Model | W-890R |
| Category | Cassette Player |
| Language | English |