Do you have a question about the Technics SJ-HDA710 and is the answer not in the manual?
Check and identify the supplied accessories.
Guide to recording audio onto a MiniDisc.
Instructions for playing back audio from a MiniDisc.
Features that aid the recording process.
Alternative playback options such as direct, random, and program play.
Introduction to functions for editing recorded tracks and discs.
Lists potential error messages and their meanings.
Provides solutions for common operational problems.
Details the technical parameters of the Minidisc Deck.
Step-by-step guide for replacing the fuse in the AC mains plug.
Guidelines for positioning the unit for optimal performance and longevity.
Warnings regarding the use of appropriate power sources.
Advice on handling the power cord to prevent damage and shock.
Precautions against foreign objects and liquids entering the unit.
Instructions on when and how to seek professional repair services.
Explains connecting analog audio sources and outputs.
Details connecting digital audio sources via optical cable.
Describes the connection of the AC power cord.
Operates the unit between standby and active modes.
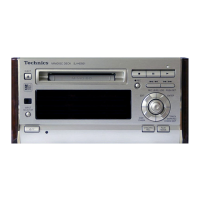
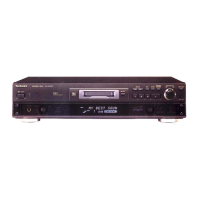
Shows the operational status of the unit.
Selects the audio input source for recording or playback.
Location for inserting the MiniDisc.
Shows information about the unit's status and operations.
Used to eject the MiniDisc from the unit.
Initiates the audio recording process.
Activates the track editing functions.
Confirms selections and enters data during operations.
Cycles through different display information.
Navigates between tracks or searches within a track.
Halts playback or recording.
Temporarily stops playback or recording.
Starts playback or recording.
Used for entering track numbers, titles, and text.
Initiates the program play mode.
Clears programmed track selections.
Activates random playback of tracks.
Enables repeating tracks or the entire disc.
Allows fast forwarding and rewinding through tracks.
Changes the display mode or selects text input mode.
Scrolls text displayed on the unit.
Sets track marks manually during recording or playback.
Removes tracks or titles.
Automatically adds track marks based on silence.
Checks the contents of a programmed sequence.
Starts recording automatically when sound is detected.
Repeats a specific segment between two points in a track.
Navigates to the next or previous track.
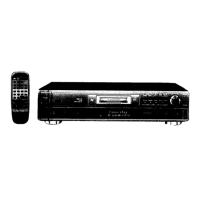
Instructions on how to insert batteries into the remote control.
Guidelines for effective and safe operation of the remote control.
Precautions to avoid damaging the remote control or the unit.
Step to insert the MiniDisc into the unit.
Choosing the audio input for recording.
Adjusting how track marks are applied during recording.
Initiating the recording process.
Halting the recording process.
Temporarily stopping recording.
Removing the MiniDisc from the unit.
Powering down the Minidisc Deck.
Guidance on recording from digital audio inputs like optical.
How to set the optimal audio input level for analog recording.
How track marks are automatically inserted during recording.
How to manually add track marks during recording.
Step to insert the MiniDisc for playback.
Initiating playback of the MiniDisc content.
Halting playback.
Temporarily stopping playback.
Removing the MiniDisc from the unit.
Powering down the Minidisc Deck.
How to move to the next or previous track.
How to quickly move through a track.
Automatically starts recording when sound input is detected.
Plays a specific track by entering its number.
Plays all tracks in a random order.
Choosing up to 24 tracks for playback in a specific order.
Stops and clears the programmed playback sequence.
Reviews the tracks included in the current program.
Removes specific tracks or the entire program.
Sets the unit to repeat a single track or all tracks.
Repeats a specific segment between two points in a track.
Cycles through different information displayed on the unit.
Scrolls long text information for better readability.
Outputs selected audio input to output terminals without recording.
Assigning text titles to tracks or the entire disc.
Modifying text by erasing, inserting, or changing characters.
Adding titles to tracks while they are being recorded.
Adding titles to tracks while they are being played.
Adding track marks to divide a single track into multiple parts.
Rearranging the playback order of tracks on the disc.
Merging adjacent tracks by removing their dividing marks.
Removing unwanted tracks from the MiniDisc.
Deleting a track while it is currently playing.
Deleting all tracks and returning the disc to a blank state.
Indicates the inserted MD has no recorded content.
Occurs when tracks cannot be merged due to system limitations.
Appears when trying to edit titles exceeding the character limit.
Indicates the user table of contents has reached its limit.
Shows when a digital input is not properly connected or active.
Signals that the inserted MD may be damaged.
Indicates that there is no remaining space on the disc.
Means the MD is write-protected and cannot be edited.
Indicates an issue occurred during recording.
Occurs when no MD is inserted into the unit.
Appears when trying to record or edit a prerecorded disc.
Prevents digital copying of copyrighted material.
Indicates a specific track is protected from erasure.
Signals a problem during MD insertion or ejection.
Addresses issues preventing playback from starting.
Solutions for problems encountered during recording.
Guidance for issues related to entering text titles.
Explains phenomena related to time and track limits during recording.
Details the core technical parameters of the Minidisc system.
Lists the parameters for analog and digital audio inputs.
Details the parameters for analog audio outputs.
Provides general information like power supply and dimensions.
Differentiates between prerecorded and recordable MiniDiscs.
Defines key terms related to MDs like Track Mark, TOC, UTOC, Marking.
Highlights differences between MDs and traditional cassettes.
Explains how to protect MDs from accidental erasure.
Guidelines for handling and cleaning MiniDiscs.
Precautions for handling and cleaning MiniDiscs.
Recommendations for storing MDs to prevent damage.
Instructions on how to clean the Minidisc Deck.
| Type | MiniDisc Player |
|---|---|
| Format | MiniDisc |
| Channels | 2 (Stereo) |
| Signal-to-Noise Ratio | 105 dB |
| Digital-to-Analog Converter | 1-bit MASH |
| Frequency Response | 5 Hz - 20 kHz |
| Headphone Output | Yes |
| Power Supply | AC 230V, 50Hz |
| Wow and Flutter | Below measurable level |