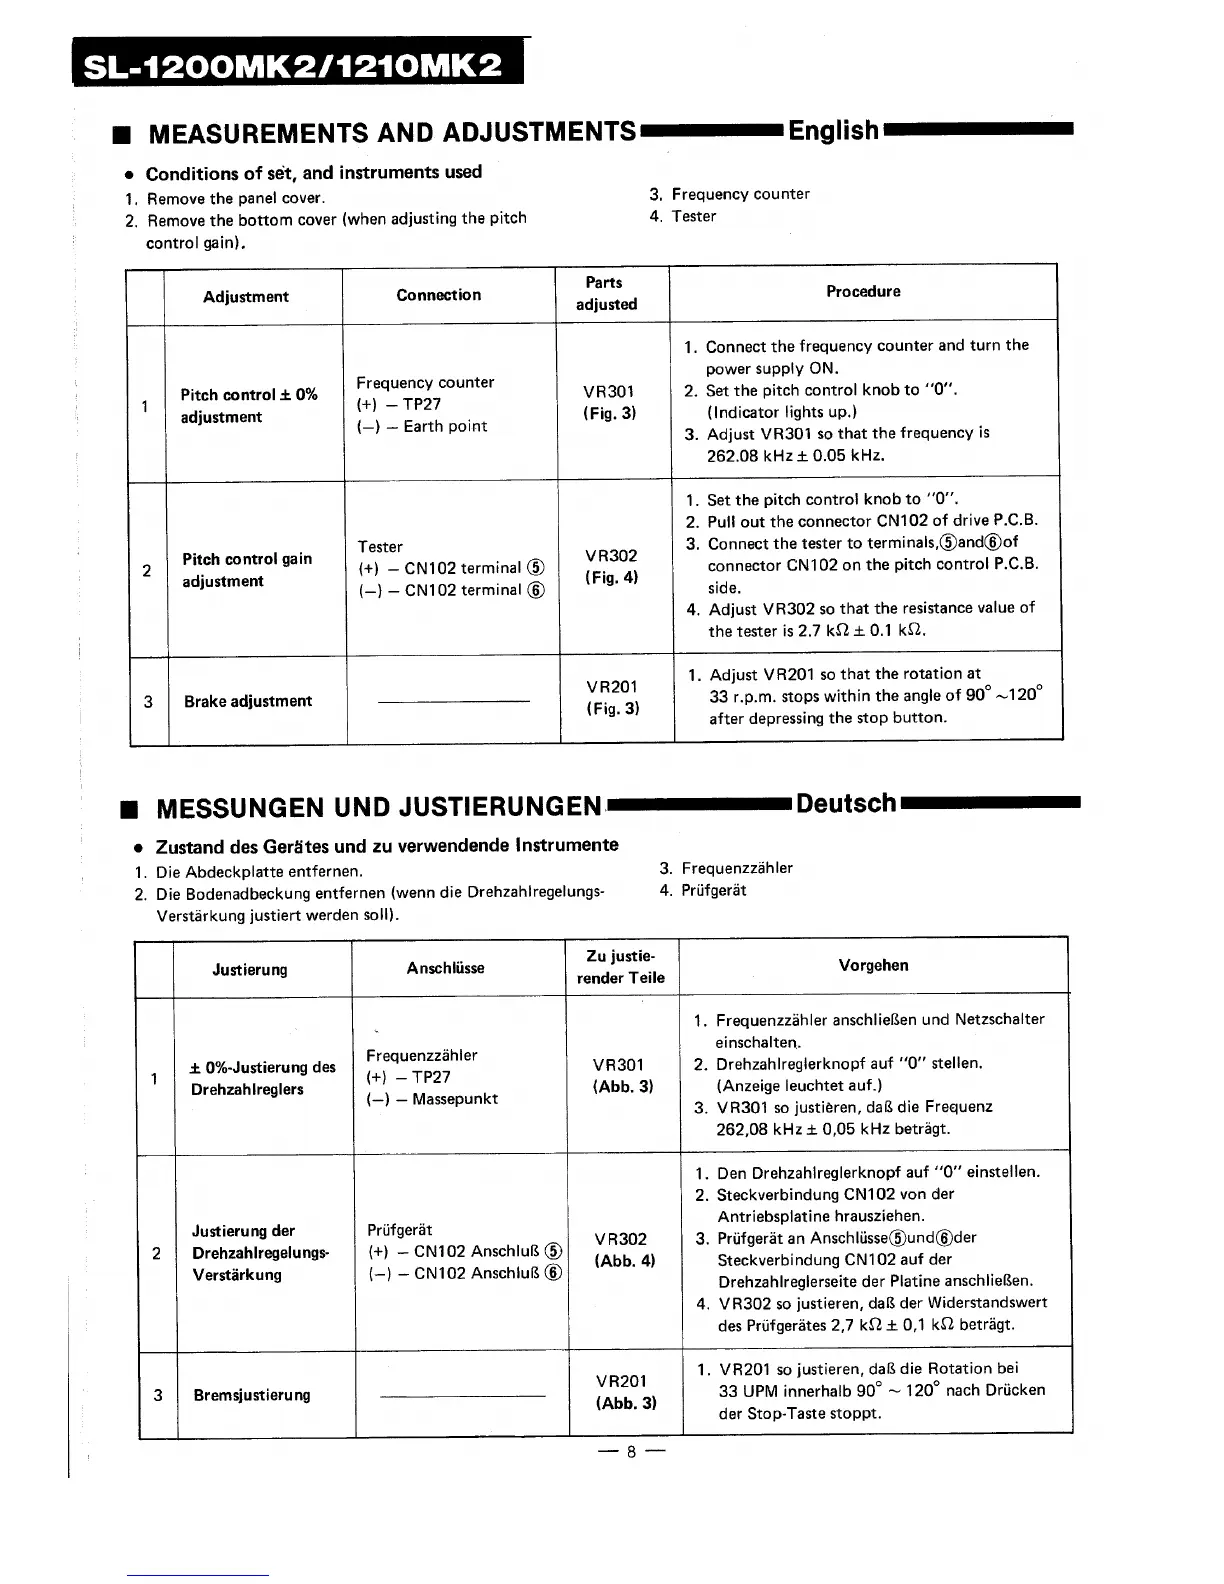
MEASUREMENTS AND ADJUSTMENTS English
• Conditions of set, and instruments used
1. Remove the panel cover.
2. Removethe bottom cover (when adjusting the pitch
control gain).
3. Frequency counter
4. Tester
I Parts Procedure
Adjustment Connection adjusted
Pitch control + 0%
adjustment
Pitch control gain
adjustment
Brake adjustment
Frequency counter
(+) - TP27
(-) - Earth point
Tester
(+) - CN102 terminal _)
(-) - CN102 terminal (_)
VR301
(Fig. 3)
VR302
(Fig. 4)
VR201
(Fig, 3)
1. Connect the frequency counter and turn the
power supply ON.
2. Set the pitch control knob to "0".
(Indicator lights up.)
3. Adjust VR301 so that the frequency is
262.08 kHz+ 0.05 kHz.
1. Set the pitch control knob to "0".
2. Pull out the connector CN102 of drive P.C.B.
3. Connect the tester to terminals,(_)and(_)of
connector CN102 on the pitch control P.C.B.
side.
4. Adjust VR302 so that the resistance value of
the tester is 2.7 k,Q + 0.1 k_.
1.
Adjust VR201 so that the rotation at
33 r.p.m, stops within the angle of 90 ° _120 °
after depressing the stop button.
• MESSUNGEN UND JUSTIERUNGEN
• Zustand des Ger_ites und zu verwendende Instrumente
1. Die Abdeckplatte entfernem
2. Die Bodenadbeckung entfernen (wenn die Drehzahlregelungs-
Verst_rkung justiert werden soil).
3. Frequenzz_ihler
4. Priifger_t
Deutsch
Zu justie- Vorgehen
Justierung AnschliJsse render Teile
_+_0%-Justierung des
Drehzahlreglers
Justierungder
Drehzahlregelungs-
Verstiirkung
Bremsjustierung
Frequenzz_ihler
(+) - TP27
(-) - Massepunkt
PriJfger_it
(+) - CN102 Anschlul& (_)
(-) - CN102 Anschlul& (_)
VR301
(Abb. 3)
VR302
(Abb. 4)
VR201
(Abb. 3)
1. Frequenzz_hler anschliel_en und Netzschalter
einschalten.
2. Drehzahlreglerknopf auf "0" stellen.
(Anzeige leuchtet auf.)
3. VR301 so justieren, dal_ die Frequenz
262,08 kHz + 0,05 kHz betr_gt.
1. Den Drehzahireglerknopf auf "0" einstellen.
2. Steckverbindung CN102 yon der
Antriebsplatine hrausziehen.
3. PrLifger_t an AnschliJsse(_und(_der
Steckverbindung CN102 auf der
Drehzahlreglerseite der Platine anschlie6en.
4. VR302 so justieren, dal_ der Widerstandswert
des PriJfger_ites 2,7 k_ + 0,1 k,Q betr_gt.
1. VR201 so justieren, dal_ die Rotation bei
33 UPM innerhalb 90 ° _ 120 ° nach Driicken
der Stop-Taste stoppt.
--8--