Jolly EVO
!
IT
Istruzioni originali
1 EN
Translation of the original instructions
6 FR
Traduction des instructions originales
11
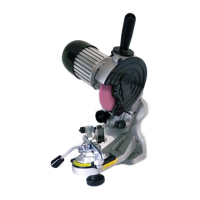
Aflatrice elettrica per catene da motosega Bench chain grinder Meuleuse électrique pour chaînes de scie électrique
MANUALE D’ISTRUZI
ONE
OWNER’S MANUAL MANUEL D’UTILISATION ET ENTRETIEN
Attenzione: non usare l’apparecchio senza aver letto
il manuale istruzioni
Attention: do not use the grinder before you have
read the owner’s manual in full
Attention : ne pas utiliser l’appareil sans avoir
préalablement lu le manuel d’utilisation et entretien
ES
Traducción de las instrucciones originales
16 PT
Tradução das instruções originais
21 DE
Übersetzung der Originalanleitungen
26
Esmeriladora eléctrica para cadenas de motosierra Máquina aadora para lâminas de serras de corrente Elektrische Schleifmaschine für Motorsägeketten
MANUAL DE INSTRUCCIONES MANUAL DE INSTRUÇÃO BEDIENUNGSANLEITUNGEN
Atención: no utilice la unidad sin haber leído el
manual de instrucciones
ATENÇÃO: não use o aparelho sem ter lido o
manual de instruções
Achtung: Vor dem Gebrauch des Geräts unbedingt
diese Bedienungsanleitungen lesen!
NL
Vertaling van de originele aanwijzingen
31 DA
Oversættelse af originalvejledningen
36 NO
Oversettelse av originalinstruksjonene
41
Elektrische kettingslijpmachine Elektrisk slibemaskine til motorsavskæder Elektrisk slipemaskin til motorsagkjeder
GEBRUIKSAANWIJZING BRUGSANVISNING BRUKSANVISNING
Attentie: Gebruik de machine niet voordat u de
gebruiksaanwijzing volledig gelezen heeft.
Pas på!: Brug ikke maskinen uden først at have læst
brugsanvisningen
Pass på! Ikke bruk maskinen uten å lese
bruksanvisningen først.
SV
Översättning av originalanvisningarna
45 FI
Alkuperäisten ohjeiden käännös
49 ET
Originaaljuhiste tõlge
53
Elektrisk slipmaskin för sågkedjor
Moottorisahan teräketjujen sähkökäyttöinen teroituslaite
Elektriline saeketi terituspink
BRUKSANVISNING KÄYTTÖOHJE KASUTUSJUHEND
Observera! Läs igenom bruksanvisningen innan
slipmaskinen används.
Varoitus: älä käytä laitetta, jos et ole lukenut
käyttöohjetta
Tähelepanu: ärge kasutage seadet, kui te pole
kasutusjuhendit läbi lugenud
LT
Originalios instrukcijos vertimas
57 LV
Instrukcijas tulkojums no oriģinālvalodas
62 PL
Tłumaczenie instrukcji oryginalnych
66
Motorinio pjūklo grandinės galandinimo - aštrinimo staklių
Motorzāģa ķēžu elektriskā asināšanas mašīna Ostrzarka elektryczna do łańcuchów pił motorowych
INSTRUKCIJŲ VADOVĖLIS ROKASGRĀMATA INSTRUKCJA OBSŁUGI
Dėmesio: nenaudokite galandinimo - aštrinimo
staklių prieš tai neperskaitę instrukcijų vadovėlio
Uzmanību: neizmantojiet mašīnu, ja neesat izlasījuši
rokasgrāmatu
Uwaga: nie używać urządzenie bez uprzedniego
przeczytania instrukcji obsługi
CS
Překlad původních pokynů
71 SK
Preklad pôvodných pokynov
75 HU
Eredeti utasítások fordítása
79
Elektrická ostřička řetězů motorových pil
Elektrická brúska na reťaze motorových píl Elektromos láncfűrészélező gép
UŽIVATELSKÁ PŘÍRUČKA NÁVOD NA POUŽITIE HASZNÁLATI ÚTMUTATÓ
Pozor: nepoužívejte přístroj bez toho, abyste si
přečetli uživatelskou příručku
Upozornenie: nepoužívajte prístroj bez toho, aby ste si
vopred prečítali tento návod na použitie
Figyelem: ne használja a berendezést a kézikönyv
előzetes elolvasása nélkül!
SL
Prevod originalnih navodil
84 RO
Traducere a instrucţiunilor originale
88 BG
Превод на оригиналните указания
92
Električni brusilni stroj za verige motornih žag
Maşină electrică de ascuţit lanţuri de motoferăstrău
Електрически точилен апарат за вериги за моторен трион
PRIROČNIK NAVODIL ZA UPORABO MANUAL DE INSTRUCŢIUNI РЪКОВОДСТВО ПО ЕКСПЛОАТАЦИЯТА
Pozor: Pred uporabo stroja, natančno preberite
navodila v danem priročniku
Atenţie: nu utilizaţi aparatul înainte de a citi manualul
de instrucţiuni
Внимание: Не използвайте апарата, без да сте
прочели ръководството по експлоатацията.
EL
Μετάφραση των πρωτότυπων οδηγιών
97 RU
Перевод оригинала инструкций
102 TR
Asıl talimatların çevirisi
107
Τροχιστική ηλεκτρική μηχανή για αλυσίδες μηχανοκίνητου πριονιού
Электрический станок для заточки пильных цепей Testere zincir bileyleme makinası
ΕΓΧΕΙΡΙΔΙΟ ΟΔΗΓΙΩΝ ИНСТРУКЦИЯ ПО ЭКСПЛУАТАЦИИ KULLANIM KILAVUZU
Προσοχή: μη χρησιμοποιείτε τη συσκευή χωρίς να έχετε
διαβάσει το εγχειρίδιο οδηγιών
Внимание: перед использованием станка
обязательно прочтите инструкцию по эксплуатации
Dikkat: Kullanım kılavuzunu okumadan bileyleme
makinasını kullanmayınız.
230 V~ 50 Hz