Soldering Techniques
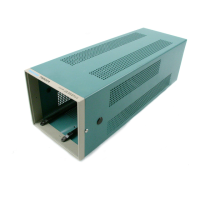
Removing the
Cabinet
Removing the
Circuit Board
3-4
WARNING I
To avoid electric-shock hazard, disconnect the instrument from the
power source before soldering.
The reliability and accuracy of this instrument can be maintained only if
proper soldering techniques are used when repairing or replacing parts.
General soldering techniques which apply to maintenance of any precision
electronic equipment should be used when working on this instrument. Use
only 60/40 rosin-core, electronic grade solder. The choice of soldering iron is
determined by the repair to be made.
When soldering on circuit boards or small wiring, use only a 15 watt, pencil
type soldering iron. A higher wattage soldering iron can cause the etched
circuit wiring to separate from the board base material and melt the insula-
tion from small wiring. Always keep the soldering iron tip properly tinned to
ensure the best heat transfer to the solder joint. Apply only enough heat to
remove the component or to make a good solder joint. To protect heat
sensitive components, hold the component lead with a pair of long-nose
pliers between the component body and the solder joint. Use a solder
removing wick to remove excess solder from connections or to clean circuit
board pads.
Before removing the cabinet, turn the power switch off and disconnect the
power cord. Remove any plug-in modules and the handle assembly.
Use the following steps to remove the cabinet:
1 . Remove the two screws on the side and one screw on the bottom
holding the cabinet to the TM 502A front casting.
2. Remove the four screws on the bottom and one screw on the back
holding the power supply to the cabinet.
3. Slide the power supply assembly out through the front of the cabinet.
4. Reinstall the cabinet to remove any shock hazards and to protect the
interior from dust.
Use the following procedure to remove the circuit board from the TM 502A
power module.
•
•
•
•
•
•
•
•
•
•
•
•
•
•
•
•
•
•
•
•
•
•
•
•
•
•
•
1. Remove the power supply assembly from the power module. Refer to e
Removing the Cabinet earlier in this section for instructions on removing
the cabinet. •
Maintenance
•
•
•
 Loading...