•
•
•
•
•
•
•
•
•
•
•
•
•
•
•
•
•
•
•
•
•
•
•
•
•
•
•
•
•
•
•
•
TM 502A Instruction Manual
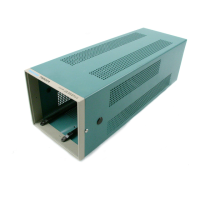
Perform the following steps to install a module in the TM 502A Power
Module .
1 . Check the location of the plastic barriers on the TM 502A interconnect-
ing jack to ensure that their locations match the slots in the edge of the
plug-in module's main circuit board. If they do not match, refer the
qualified service personnel to the Maintenance section of this manual for
more information .
2. Align the plug-in module chassis with the upper and lower guides of the
selected compartment. Push the module in and press firmly to seat the
circuit board in the interconnecting jack. (Remove the plug-in module
by pulling on the release latch in the lower left corner of the plug-in
module.)
Plug-in Retainer Clip Information
The retainer clip is used to ensure that an installed plug-in module can not
come out of the power module while it is moved or transported. Note that
plug-in modules cannot be removed or inserted with the retainer clip
installed .
1. Perform the following steps to install the retainer clip:
2. Stand the power module on end.
3. Remove the round-head Phillips screw located on the bottom side of the
TM 502A Power Module just behind the front casting .
4. Align the hole in the retainer clip with the following: the chassis hole, the
clip extending forward and into the module opening, and the bottom
edge of the plug-in module(s) .
5. Reinstall the screw .
Power-on Procedure
After completing the power module preparation and plug-in module installa-
tion instructions, install the power cord and connect the power cord to the
proper power outlet. Turn on the power switch on the rear of the power
module. Some plug-ins have independent power switches, usually labeled
"OUTPUT," that control power from the mainframe power to the plug-in .
2-5
 Loading...