PROCOM
2
AIRCRAFT INTERCOM
USER INSTRUCTIONS
INSTALLATION
(Refer to the System Configuration drawing)
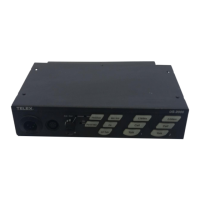
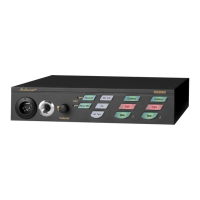
Plug the ProCom 2 (PC 2) into the aircraft radio or audio panel jacks.
NOTE: If the aircraft radio does not provide sidetone, the pilot will not be able to hear himself or herself
in the headset during aircraft-to-tower transmissions.
Plug pilot and copilot (or passenger) headphone and microphone plugs into the appropriate jacks on the top panel
of the PC 2.
Push To Talk
(PlT)
Swltch Notes
1. If the aircraft has a built-in pilot yoke switch, it is not necessary to use the pilot PTT jack on the PC
2.
However,
it
is important that the aircraft radio or audio panel microphone jack tip
be
wired so that
keying the transmitter with the built-in yoke switch will also ground the jack tip. This signal is then
sensed by the PC
2
(via the Ytable microphone/PTTplug) to cause proper operation of the intercom
during transmission.
2. If the aircraft has a built-in copilot yoke switch, it should not
be
used. lf copilot PTT capability is
desired, use a portable PTT switch plugged into the copilot PTT switch jack on the PC 2.
3. If poltable
PTT
switches are used,
do
not plug microphones into them, as the PTT switches will have
to
be
pressed to talk over the intercom. Plug microphones into the PC 2 microphone jacks only.
Connect an extemal msic source to the rear panel MUSIC INPUT jack of the PC 2 using a 0.140-inch (3.6 mm)
stereo "miniplug."
Use one of two methods to provide power to the PC 2 intercom:
For internal power operation, install a 9-~0lt battery in the side compartment of the PC 2.
For external power operation, use an optional aircraft cigarette lighter cable (Telex Catalog Number 96513-
000). It is recommended that you use a 100 mA (fast blo) fuse in the external power source. Plug the cable
into the aircraft cigarette lighter and into the AUX POWER jack on the rear panel of the PC 2.
CAUTION
Ensure that the polarity of the external power is as shown in the figure
below. lrrpmper connection may result in damage to the PC 2.
AUX POWER
12-28 VDC
@
100MA
O
Copyright
Telex
Communicalions.
Inc.
All
tights
resewed.
TELEX,