The Tenda XPON ONT HG1 is a passive optical network (PON) optical network terminal (ONT) designed for home use, providing internet access through a fiber optic connection. This device acts as a bridge or router, allowing users to connect to their Internet Service Provider (ISP) network.
Function Description
The primary function of the Tenda XPON ONT HG1 is to convert optical signals from a fiber optic network into electrical signals that can be used by standard Ethernet devices, such as computers, routers, or switches. It supports both GPON (Gigabit Passive Optical Network) and EPON (Ethernet Passive Optical Network) modes, which can be identified through the device's web UI. The ONT can be configured in two main modes for internet access:
- Router Mode: In this mode, the ONT itself handles the internet connection configuration, including PPPoE dial-up, and provides IP addresses to connected devices. This allows devices directly connected to the ONT's LAN port to access the internet.
- Bridge Mode: When set to bridge mode, the ONT acts as a transparent bridge, passing the internet connection directly to a connected router or computer, which then performs the dial-up (e.g., PPPoE) and manages the network. This is useful when a separate Wi-Fi router is preferred for network management and wireless coverage.
Important Technical Specifications
- Model: HG1
- PON Mode: Supports both GPON and EPON, identifiable via the Admin page in the web UI (GPON Settings or EPON Settings).
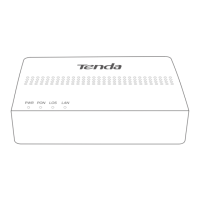
- Ports:
- PON Port: Optical fiber port for connecting to the optical network via a fiber cord.
- LAN Port: Ethernet port for connecting to a router, switch, or computer.
- PWR Jack: For connecting the included power adapter.
- Buttons:
- RST (Reset) Button: Used to reset the device to factory default settings. This can be done by holding the button for more than 10 seconds with a spiked object while the PWR LED is solid on.
- LED Indicators:
- PWR (Green):
- Solid on: Powered on.
- Off: Powered off.
- PON (Green):
- Solid on: Registered successfully.
- Blinking: Registering.
- Off: Unregistered.
- LOS (Red):
- Blinking: Received optical power lower than optical receiver sensitivity (indicates a potential fiber connection issue).
- Off: Received optical power at a proper value.
- LAN (Green):
- Solid on: LAN port connected properly without data transmitting.
- Blinking: LAN port connected properly with data transmitting.
- Off: No Ethernet device connected.
- Power Adapter:
- Models: BN003-A05009E, BN003-A05009B
- Input: 100-240V AC, 50/60Hz 0.3A
- Output: 9V DC, 0.6A
- Operating Environment:
- Temperature: 0 °C to 40 °C
- Humidity: (10% - 90%) RH, non-condensing
- Storage Environment:
- Temperature: -40 °C to +70 °C
- Humidity: (5% - 90%) RH, non-condensing
- Wall-mounting Hole Specifications (Self-prepared materials):
- Expansion bolt: Inner diameter: 2.4 mm; Length: 26.4 mm.
- Screws: Quantity: 2; Thread diameter: 3 mm; Length: 14 mm; Head diameter: 5.2 mm.
- Default Web UI Access:
- IP Address: 192.168.1.1
- User Name: admin
- Password: admin
- Optical Power Range (for LOS LED off):
- GPON mode: Rx Power between -28 dBm to -8 dBm.
- EPON mode: Rx Power between -27 dBm to -3 dBm.
Usage Features
- Easy Installation: The device comes with a Quick Installation Guide that outlines the steps for connecting the ONT and registering it with the ISP.
- Flexible Deployment: Can be placed on a desktop or wall-mounted (wall-mounting materials are self-prepared). For wall mounting, the equipment is suitable for heights ≤ 2m. For desktop mounting, it must be horizontally mounted.
- Web-based Configuration: The ONT can be configured and managed through a web-based user interface (UI) by accessing its default IP address (192.168.1.1) from a connected computer.
- Manual Registration: If the ISP provides specific parameters, users can manually register the ONT via the web UI under Admin > GPON Settings (or EPON Settings).
- Internet Access Configuration:
- Router Mode Setup: Users can configure WAN settings (e.g., PPPoE username/password, VLAN ID) directly on the ONT via WAN > PON WAN in the web UI.
- Bridge Mode Dial-up:
- Via Router: Connect the ONT's LAN port to a router's WAN port, and the router handles the PPPoE dial-up.
- Via Computer (Windows 10 example): Connect the ONT's LAN port directly to a computer, and then set up a PPPoE broadband connection on the computer.
- LED Indicators for Status Monitoring: The front panel LEDs provide quick visual feedback on the device's power status, PON registration, optical signal strength, and LAN connection activity.
- Reset Functionality: A physical reset button allows for easy restoration of factory default settings, which can be useful for troubleshooting or reconfiguring the device. The reset can also be performed via the web UI under Admin > Backup/Restore.
Maintenance Features
- Troubleshooting Guide (FAQ): The manual includes a FAQ section to help users resolve common issues such as inability to log into the web UI or failure to access the internet after configuration.
- LED-based Diagnostics: The LED indicators are crucial for initial troubleshooting, helping to identify problems related to power, optical signal, PON registration, and LAN connectivity. For example, a blinking LOS LED indicates an issue with the optical signal, suggesting a problem with the fiber connection or optical power.
- Web UI for Advanced Diagnostics: The web UI provides detailed status information (e.g., Status > PON page for optical power levels) and configuration options for more in-depth troubleshooting.
- Firmware Updates: While not explicitly detailed in this quick guide, Tenda devices typically support firmware updates to improve performance, add features, or fix bugs.
- Safety Precautions: The manual outlines important safety guidelines, including:
- Avoiding direct eye exposure to the PON port or fiber cord terminal due to laser radiation.
- Using only the included power adapter.
- Ensuring proper ventilation and operating within specified temperature and humidity ranges.
- Disconnecting the device during lightning storms or prolonged periods of disuse.
- Warning against unauthorized disassembly or modification, which voids the warranty and poses safety risks.
- Environmental Responsibility: The product bears the WEEE symbol, indicating that it should be handled as electronic waste for recycling to minimize environmental impact. Users are encouraged to dispose of the product through competent recycling organizations or retailers.
- Technical Support: Contact information for Tenda's technical support (website and email) is provided for further assistance.