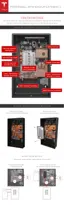
STEP 8 - REMOVE THE PALLET
Caution: Reinstall the front cover of the box for structural stability while lifting.
Note: Two people are needed for this procedure.
1. Place the box lid carefully back over Powerwall and move it sideways until the inside of the
box lid touches the top edge of Powerwall. This leaves room for the bottom of the box to flex
without damaging Powerwall's bottom cover.
2. Align the lower edge of the box between the upper and lower wood blocks on the sides of the
Powerwall.
3. Use a T20 Torx to securely reinstall 2 screws into each of the 4 upper blocks attached to the
sides of the Powerwall (8 screws total). Now the Powerwall is secured to the sides of the box
with the top blocks, and the bottom blocks remain with the pallet.
4. Tuck all wiring into the box lid to avoid pinching or pulling the wires.
5. With one hand on the front cover and one hand under the pallet towards the top corner, both
installers carefully tilt the box up onto its bottom end so that the Powerwall is standing right
side up. Ensure the box is in a stable location, such as against a wall, where it will not be
bumped or tip over.
Caution: Never leave a Powerwall unattended while it is in a standing position.
Step-by-Step Installation Instructions
Tesla Energy 17

 Loading...