EasyManua.ls Logo

The Land of Nod Cargo Twin-over-Full Bunk Bed User Manual

The Land of Nod Cargo Twin-over-Full Bunk Bed
10 pages
To Next Page IconTo Next Page
Page #1 background imageLoading...
Page #1 background image
Made in Vietnam - r02
The Land of Nod
8135 River Drive Morton Grove, IL 60053 p: (800) 933-9904 e: customerservice@landofnod.com www.landofnod.com
WARNING
!
Cargo Twin-over-Full Bunk Bed Assembly Instructions
- STRANGULATION HAZARD - Never attach or hang items to any part of the bunk bed that are not
designed for use with the bed; for example, but not limited to, hooks, belts and jump ropes.
- Do not suspend strings over a bed for any reason.
- Always use guardrails on both long sides of the upper bunk. If the bunk bed will be placed next to
the wall, the guardrail that runs the full length of the bed should be placed against the wall to
prevent entrapment between the bed and well.
- Do not allow children under 6 years of age to use the upper bunk.
- Do not allow more than one person on upper bunk at a time.
- Always use the ladder for entering and leaving the upper bunk.
- Use of night light may provide added safety precautions for a child using the upper bunk.
- Do not allow horseplay on or under the bed and prohibit jumping on the bed.
- Always use the recommended size mattress or mattress support, or both, to help prevent the
likelihood of entrapment or falls.
- The intended mattress dimension on the be are as follow:
Twin: 37-1/2”-38-1/2”W x 74”-75”L x 9”thickness (maximum)
Full: 53“-54W x 74” – 75”L x 9”thickness (maximum)
- Ensure thickness of mattress does not exceed 9” and the mattress is at least 5” below upper
edge of guardrails. - The use of water or sleep otation mattresses is prohibited.
- Do not use substitute parts. Contact the Land of Nod® for replacement parts, hardware or
additional guardrails.
- Follow the information on the warnings appearing on the upper bunk end structure and on the
carton. Do not remove warning label from bed.
- Periodically check and ensure that the guardrail, ladder and other compenents are in their proper
position, free from damage, and that all connectors are tight.
- Keep these instructions for future reference.
Question and Answer IconNeed help?

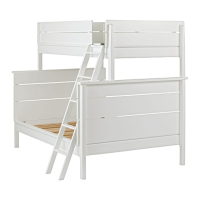
Do you have a question about the The Land of Nod Cargo Twin-over-Full Bunk Bed and is the answer not in the manual?

The Land of Nod Cargo Twin-over-Full Bunk Bed Specifications

General IconGeneral
Product NameThe Land of Nod Cargo Twin-over-Full Bunk Bed
CategoryIndoor Furnishing
Bed SizeTwin-over-Full
Weight Capacity (Top Bunk)250 lbs
Assembly RequiredYes
Recommended Age6 years and up
Mattress Size (Top Bunk)Twin
Mattress Size (Bottom Bunk)Full
MaterialWood
GuardrailsYes
LadderYes, angled ladder

Summary

General Safety Warnings

Strangulation Hazards

Never attach or hang items not designed for the bed; do not suspend strings over a bed.

Guardrail and Ladder Safety

Always use guardrails on both long sides of the upper bunk and use the ladder for entry/exit.

Age, Occupancy, and Activity Limits

Restrict upper bunk use to children over 6, one person at a time, and prohibit jumping.

Mattress and Parts Requirements

Use recommended mattress size/support; ensure proper height and do not substitute parts.

Parts and Hardware Identification

Hardware List

Identifies screws, bolts, nuts, and other hardware components with their respective quantities.

Component Illustrations

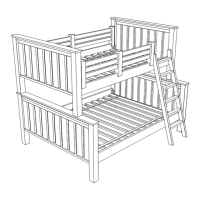
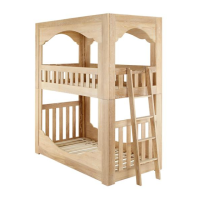
Shows visual representations of all individual bed frame and ladder parts included.

Care and Maintenance

Cleaning Guidelines

Clean surfaces with a dry or damp cloth; avoid using abrasive cleaners.

Assembly Steps 1-2

Step 1: Frame Preparation

Attaching components to the first bed frame section as illustrated.

Step 2: Second Frame Preparation

Attaching components to the second bed frame section as shown.

Assembly Steps 3-4

Step 3: Attaching Side Rails

Connects side rails to the headboards using specified hardware.

Step 4: Securing Second Side Rails

Secures the second set of side rails to the headboards.

Assembly Steps 5-6

Step 5: Configuration Options

Illustrates assembly options and attaches components with hardware.

Step 6: Adding Support Brackets

Attaches labeled brackets 'A' and 'B' to the bed frame.

Assembly Steps 7-8

Step 7: Installing Bed Slats

Secures the bed slats across the frame using hardware.

Step 8: Connecting Frame Sections

Connects bed frame sections using specific hardware.

Assembly Steps 9-10

Step 9: Finalizing Side Rails

Completes the attachment of side rails to the bed structure.

Step 10: Securing Frame Components

Attaches specific components to ensure frame stability.

Assembly Steps 11-12

Step 11: Upper Bunk Slats

Installs the bed slats for the upper bunk section.

Step 12: Frame Supports

Attaches additional support pieces to the bed frame.

Assembly Steps 13-14

Step 13: Upper Bunk Assembly

Assembles the upper bunk structure onto the lower bunk.

Step 14: Ladder Attachment

Attaches the ladder securely to the bunk bed structure.

Related product manuals