EasyManua.ls Logo

The Land of Nod Storagepalooza 1-Bin User Manual

The Land of Nod Storagepalooza 1-Bin
7 pages
To Next Page IconTo Next Page
Page #1 background imageLoading...
Page #1 background image
The Land of Nod
8135 River Drive Morton Grove, IL 60053p: (800) 933-9904 e: customerservice@landofnod.com www.landofnod.com
Page 1 of 7Made in China - r08
x 12
x 06 x 06
x 04x 02x 04
x 06
ENGLISH
This page lists the contents included in the box. Please
take time to identify the hardware as well as the individual
components of the product. As you unpack and prepare
for assembly, place the contents on a carpeted or padded
area to protect them from damage. Please follow the
assembly instructions closely. Improper assembly can
result in personal or property damage.
Note: 2 people are required to safely assemble this product.
FRANÇAIS
Cette feuille présente la liste du matériel contenu dans le
carton. Veuillez prendre un moment pour identifier chaque
pièce de quincaillerie et chacune des composantes. Afin
de protéger les composantes du meuble, les poser sur un
tapis ou sur une surface matelassée au fur et à mesure du
déballage et de la préparation au montage. Veuillez suivre
avec attention les étapes du montage présentées. Si le
meuble n’est pas monté correctement, il y a risque de
dégâts pour vous ou vos biens.
Attn: Il faut 2 personnes pour monter correctement ce meuble.
x 01
x 04
x 02
x 02 x 02 x 02 x 02x 04
MOUNTING HARDWARE
MATÉRIEL DE MONTAGE
NOT INCLUDED
NON FOURNI
!
Storagepalooza 1-Bin Assembly Instructions
Question and Answer IconNeed help?

Do you have a question about the The Land of Nod Storagepalooza 1-Bin and is the answer not in the manual?

The Land of Nod Storagepalooza 1-Bin Specifications

General IconGeneral
BrandThe Land of Nod
ModelStoragepalooza 1-Bin
CategoryIndoor Furnishing
LanguageEnglish

Summary

Product Overview and Preparation

Hardware Identification

Lists and illustrates all hardware components included in the assembly kit.

Component Identification

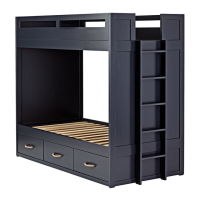
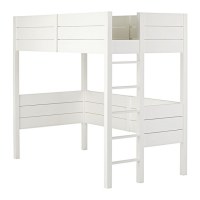
Provides diagrams and labels for all individual product components (A-F).

Assembly Instructions

Step 1: Attach Front and Side Pieces

Connects panel D to panel E using screws.

Step 2: Assemble Base and Sides

Attaches side panels B to the base panel A with screws.

Step 3: Secure Front Panel

Attaches the front panel D to the assembled side panels.

Step 4: Attach Side Panel

Secures one of the side panels B to the structure.

Step 5: Insert Back Panel

Slides the back panel F into the assembled unit.

Step 6: Attach Top Panel

Fastens the top panel C to the main body of the unit.

Advanced Assembly and Safety

Multiple Bin Assembly

Instructions for connecting multiple units together for stability.

Safety Mounting Instructions

Guidance on securely mounting the unit to a wall to prevent tip-over.

Related product manuals