Do you have a question about the Thor Kitchen HRE Series and is the answer not in the manual?
Key instructions for professionals installing the appliance, covering safety and compliance.
Essential advice for users regarding safe operation and maintenance of the appliance.
Information relevant to service technicians regarding electrical diagrams and maintenance procedures.
Legal notice regarding potential cancer and reproductive harm associated with the product.
Explains that manual warnings may not cover all scenarios, emphasizing common sense.
Defines symbols and explains the meaning of warning and caution labels used in the manual.
General safety precautions to follow when using electrical appliances, including installation and usage guidelines.
Safety guidelines specific to the operation and use of the surface cooking units.
Critical safety instructions related to the electrical connection and operation of the appliance.
Precautions to ensure the safety of children around the appliance during operation.
Safety guidelines and warnings pertaining to the use and operation of the oven.
Safety advice for maintaining and using the ventilating hood associated with the appliance.
Warnings and precautions for safely using and cleaning the glass/ceramic cooktop surface.
Essential warnings and requirements for the proper and safe installation of the appliance.
Important cautions and advice to follow during the regular use of the appliance to prevent hazards.
Detailed dimensions and diagrams for the 24-inch model of the electric range.
Detailed dimensions and diagrams for the 30-inch model of the electric range.
Detailed dimensions and diagrams for the 36-inch model of the electric range.
Specifies the minimum required clearances and dimensions for preparing the installation site.
Outlines the necessary voltage, frequency, and circuit requirements for connecting the appliance.
Instructions for accessing and preparing the power cord connection point on the appliance.
Detailed steps for installing a 4-wire power cord, including wiring and grounding.
Instructions for installing a 3-wire power cord, covering wiring connections and safety precautions.
Guidance on how to securely reattach the terminal block cover after electrical connections are made.
Guidance on inspecting and identifying the correct knobs for installation on the range shafts.
Reference to a table indicating the quantity of each type of knob required for different range models.
Steps for correctly fitting and securing the knobs onto the range's control shafts without friction.
Instructions to verify the contents of the installation kit for the oven door handles.
Steps for attaching the door handle holders to the main handle component.
Instructions for securing the oven handle to its holders using screws for stability.
Instructions for securing the oven handle to its holders using screws for stability.
Steps to align and attach the oven door handle to the door using the provided wrench.
Final step to ensure the door handle assembly is securely tightened using the installation wrench.
Verify that the necessary accessories, including rubber pads and screws, are included in the kit.
Instructions for correctly attaching the two rubber pads to the back panel of the range.
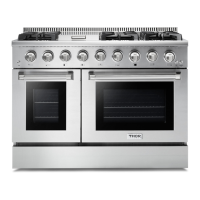
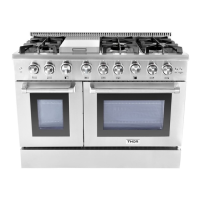
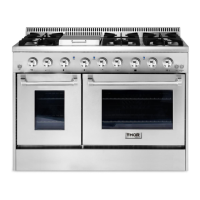
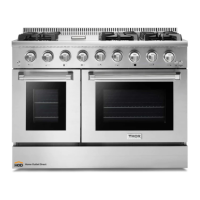
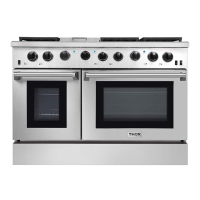
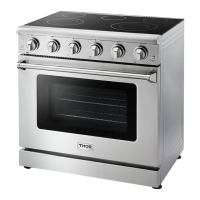
Visual overview and identification of components for the 24-inch range model.
Visual overview and identification of components for the 30 and 36-inch range models.
Initial cleaning and conditioning procedures for the oven before its first use.
Advice on optimizing cooking efficiency and reducing energy consumption during operation.
Explanation of how radiant surface elements heat up, cycle, and retain heat for cooking.
Diagram and description identifying the location and function of cooktop controls and elements.
Identifies the cooking zones on the glass surface and provides guidance on matching pan size to element size.
Explains how to operate single and dual burner control knobs for various cooking settings.
Lists characteristics of suitable cookware for optimal performance and to prevent issues.
Guidelines for cleaning and preventing damage, stains, and scratches on the ceramic cooktop surface.
Step-by-step instructions for safely removing an oven rack from its position.
Step-by-step instructions for safely reinstalling an oven rack into its position.
Instructions on how to operate the oven burner using the control knob for baking.
Instructions on how to operate the broiler burner using the control knob.
Essential safety precautions and warnings to follow during oven operation to prevent hazards.
Explains different oven functions like Natural Airflow Bake and Convection Bake.
Detailed instructions and safety tips for performing broiling operations in the oven.
Advice on selecting shelf positions and bakeware for optimal broiling results.
Procedures for cleaning and maintaining the stainless steel surfaces of the appliance.
Instructions for cleaning the oven racks by hand to remove grease and residue.
Guidelines for safely cleaning the oven door, including the gasket and glass window.
Instructions for safely removing and cleaning the surface burner control knobs.
Procedures for cleaning the cooktop surface to prevent dull spots and damage.
Instructions for cleaning hot sugary spills and melted plastics to prevent cooktop damage.
Steps for removing normal burned-on residue from the cooktop surface.
Methods for removing stubborn or heavy burned-on residue from the cooktop.
How to clean the seal around the cooktop using a damp cloth.
General advice on lifting and handling the oven door during removal and replacement.
Step-by-step instructions for safely detaching the oven door from the appliance.
Step-by-step instructions for correctly reattaching the oven door to the appliance.
Common installation problems and their solutions, focusing on leveling and stability.
Troubleshooting common issues related to the cooktop's surface units and controls.
Troubleshooting common problems encountered with the oven's heating, lighting, and fan functions.
Information on product warranty coverage and how to obtain service or register the product.
| Model | HRE Series |
|---|---|
| Fuel Type | Gas |
| Color | Stainless Steel |
| Ignition System | Electronic |
| Material | Stainless Steel |
| Number of Burners | 6 |
| Oven Type | Convection |
| BTU | 18, 000 BTU |
| Width | 36 inches |