Keep hold of the connection using an adjustable spanner and tighten the hose connection with another spanner. (Fig. 5)
Screw the thread at the other end of the hose to the spray gun connection. Keep hold of the spray gun by applying an adjustable 5.
spanner to the handle and tighten the hose nut using another spanner. (Fig. 6)
Place the nozzle holder on the spray gun (Fig. 7A ) and rotate it into the nal position (Fig. 7B), in order to x it. 6.
Pull the red shutter out of the paint entry point. (Fig. 8, 1)7.
Connect the suction hose to the paint entry point and secure into position. (Fig. 8)8.
Push the return line on to the return ow connector. (Fig. 9)9.
Remove the cap (g. 28, 1) with a screwdriver and ll oil up to the upper edge of the display window (2).10.
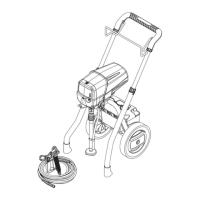
Control elements on the device (Fig. 10)
A The ON/OFF switch turns the power to the sprayer on and o (0=OFF, l=ON).
B The following settings can be made with the selector switch:
PRIME (Switch set vertically)
For prelling the system with paint
•
For pressure relief
•
SPRAY (Switch set horizontally)
For using the spray gun
•
C The pressure of the spray is set by the pressure regulator.
The correct spray pressure depends on the paint being used.
Telescopic handle
The telescopic handle can be extended or retracted:
To unlock the telescopic handle:
Turn the locknut (g. 11, 1) in an anti-clockwise direction
To lock the telescopic handle:
Turn the locknut (g. 11, 1) in a clockwise direction
Spray Gun
Always lock the trigger o when attaching the spray nozzle or when the spray gun is not in use.
The gun is secured when the trigger lock is at a 90° angle (perpendicular) to the trigger in either direction. (Fig. 12)
•
Insert the nozzle with the tip pointing forwards. (Fig. 13)
•
Another nozzle size and gun lter must be used, depending on the material to be processed.
Information about all the available nozzles and lters can be found in the section about "Accessories".
Pressure Relief Procedure
Be sure to follow the Pressure Relief Procedure when shutting the unit o for any purpose.
This procedure relieves the pressure from the spray hose and the gun.
1. Secure the spray gun. (Fig. 12)
Switch the device o.
2.
Turn the switch into the PRIME position (vertical). (Fig. 14)
Release the spray gun. Hold the spray gun over an empty container and press the trigger to relieve the pressure.3.
4. Secure the spray gun.
Start-up
Before connecting to the mains supply, be sure that the supply voltage is identical with the value given on the rating
plate.
Depress the automatic lubricator button 2 or 3 times. (Fig. 15, 1)1.
Disconnect the return ow pipe from the suction hose.2.
3. Place the suction hose (Fig. 15, 2) in the material container and the return line (Fig. 15, 3) in an empty container.
Press the red inlet valve pusher to ensure that the inlet valve is free. (Fig. 16)4.
5. Plug in the power cable.
6. Turn the switch into the PRIME position (vertical).