GH4 CAMERA APP
NOTICE: If your camera features the function of connecting the camera aperture with
the WIFI through mobile device, you can mount your mobile device on the phone
holder for better photography experience. Taking Panasonic GH4 as an example:
Mobile APP Installation
STEP 1) Install Panasonic Image APP in your phone.
STEP 2) When turning on the Camera, press Fn1 or switch on the WiFi function in the
Settings manual.to activate Camera WiFi function, and then the WiFi Indicator will
glow solid blue.
STEP 3) Recognize the WIFI SSID and password on your camera screen, and then
connect your mobile device to the camera through the WiFi.
STEP 4) Tap the APP downloaded in your mobile device, then you can take the mobile
device as a camera aperture.
STEP 5) When the phone is activated the remote control function, it can also control the camera.
SINGLE HAND OPERATION:
Lift the center carrying handle with one hand. When holding the ProAction™ with
single hand, press the Function Switch Button in the rear of the Pitch Control Wheel.
The Control Status Indicator will glow solid blue when successfully switched.
The control right has been switched to the Pitch Control Wheel on the center carrying
handle. The Gimbal Control Stick on the right side of the ProAction™ is disabled in
Pitch direction.
NOTICE: When the user holds the ProAction™ with single hand in the Global Mode,
the user can control the camera in the Yaw direction through the Gimbal Control Stick.
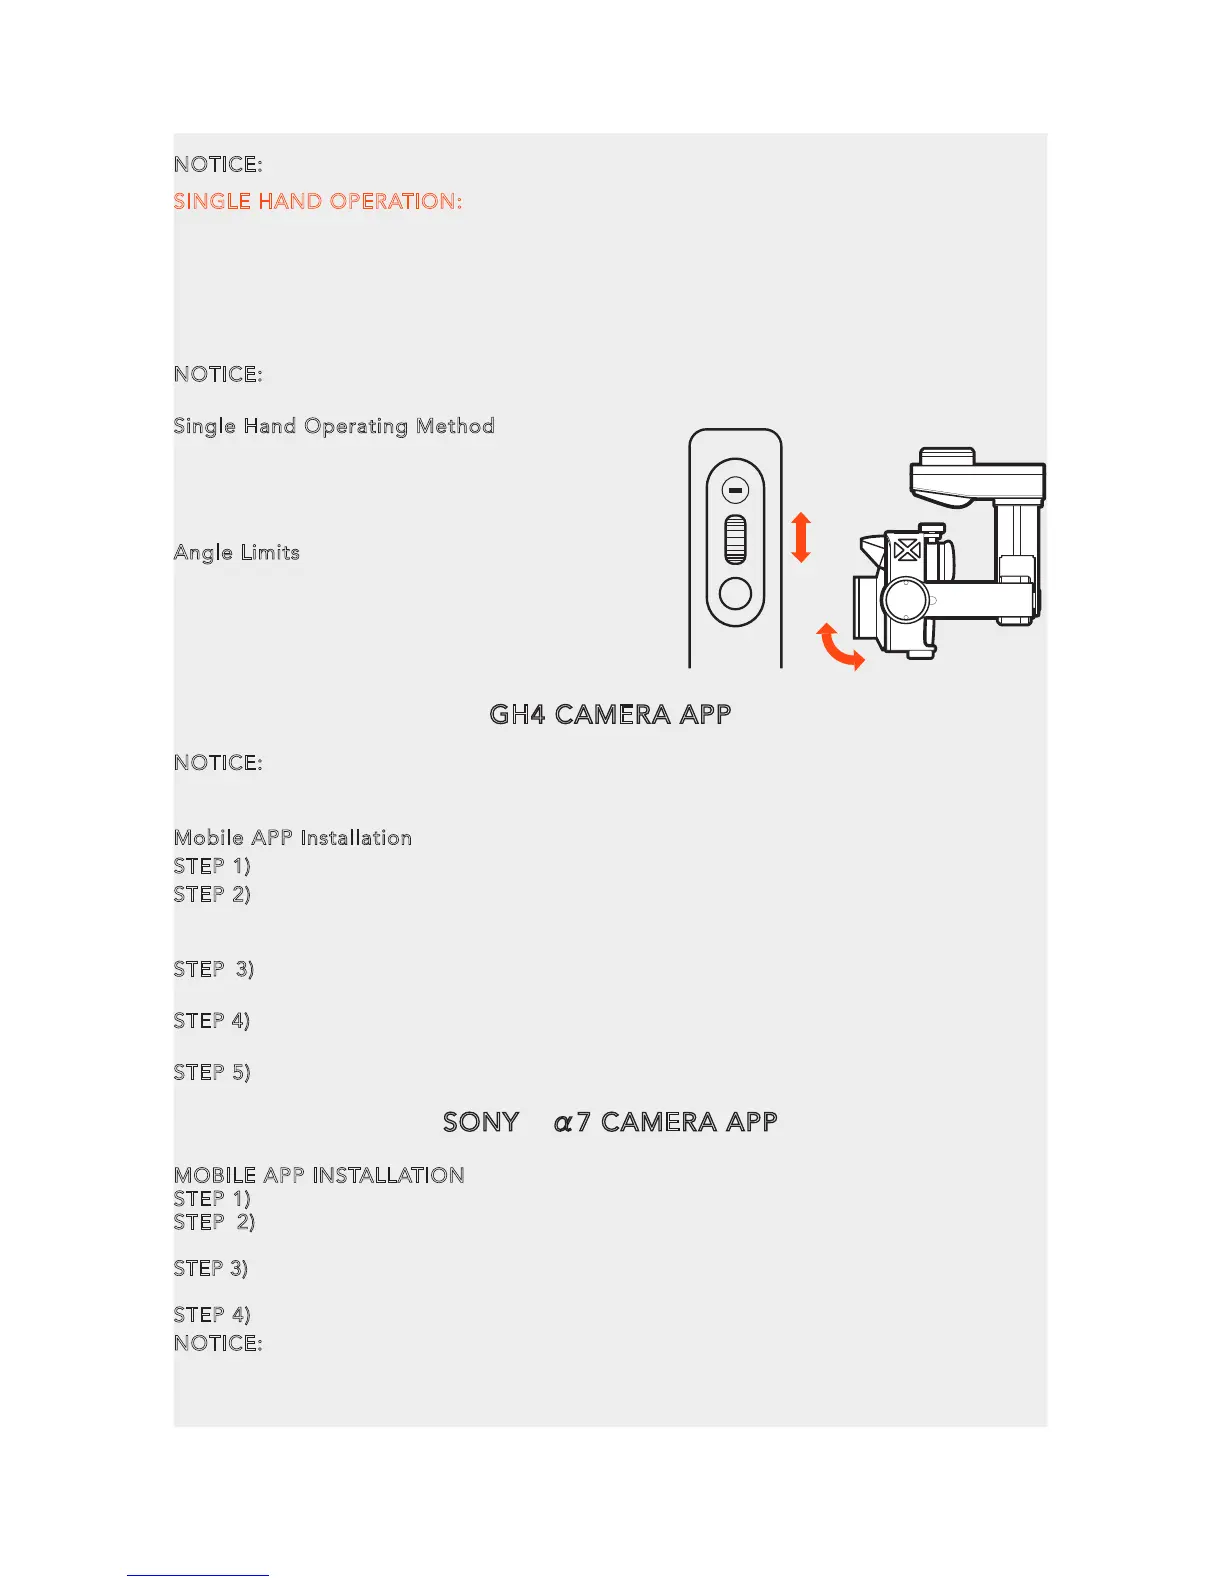
Single Hand Operating Method
Roll the Pitch Control Wheel forward to move
the camera pitch/angle downward, and roll the
Pitch Control Wheel backward to move the
camera pitch/angle upward.
Angle Limits
When operating the ProAction™, it is
suggested to hold it horizontally for better
photography experience, or at least to make
sure the roll angle is less than 40 degree.
34
SONY® α7 CAMERA APP
MOBILE APP INSTALLATION
STEP 1) Install PlayMemories Mobile APP in your phone.
STEP 2) When turning on the SONY® α7 CAMERA, press the Menu and tap the
Application on the screen, then choose the Application List.
STEP 3) Tap the Smart Remote Embedded and recognize the WIFI SSID and password on
the camera screen, and then connect your mobile device to the camera through the WiFi.
STEP 4) After the connection is completed, you can take the mobile device as a camera aperture.
NOTICE: After the mobile device is connected to the camera. The mobile
device/camera can't record videos. It can ONLY take pictures.
TIPS: If no ‘Application List’ is in the ‘Application’ on the camera screen, please
download the APP from the SONY® official website.
PROACTION™ CONTROLS
The Power and Mode Selection Switch has three gears. The Left is Power-off, the Middle
is Follow Mode and the Right is Global Mode.
FOLLOW MODE: In the Follow Mode, the camera lens will track the gimbal in Yaw axis.
The user can only control the pitch direction through Gimbal Control Stick or Pitch Control
Wheel on the right.
GLOBAL MODE: In the Global Mode, the camera lens stick to a fixed direction instead of
following the movement of the ProAction™ Frame. The user can control the pitch direction
through Pitch Controll Wheel or Gimbal Control Stick and the Pitch Control Wheel to control Yaw
and Pitch Direction.
NOTICE: Place the ProAction™ on a flat and stable surface and then connect the gimbal
power cord into the gimbal connect port with the Poraction™. Switch on the Poraction™
and wait it to complete the initialization. Whichever mode the gimbal is in, it will boot-up.
Once the gimbal is powered on, it starts self-check and the Battery Indicator will be solid
green. At the same time, the Control Status Indicator blinks red and blue alternatively. When
the self-check (start-up) process completes, the Control Status Indicator will glow solid red.
The user can switch freely between Follow Mode and Global Mode without powering off the
gimbal.
THE PROACTION™ FEATURES TWO GIMBAL GRIPPING METHODS:
DOUBLE HANDS OPERATION:
Grip the left and right handles of the ProAction™ with both hands. The Power and Mode
Selection Switch is on the left side, while the Gimbal Control Stick is on the
right side.
NOTICE: Once the ProAction™ is started up, no matter which mode it
is in, the default mode is Double Hands Operating. The Control Status
Indicator on center carrying handle will be solid red. The user can ONLY
take control of the gimbal through Gimbal Control Stick on the right side.
Double Hands Operating Method
In the Follow Mode, the camera lens track the ProAction™ in Yaw axis. The
user can only control the pitch direction through Gimbal Control Stick
on the right.
Move the Gimbal Control Stick upward to trim the camera lens up.
Move the Gimbal Control Stick downward to trim the camera lens down.
In the Global Mode, the camera lens does not move in the direction of
the ProAction™ Frame but sticks to a fixed direction. The user can
control both the Yaw and Pitch directions through Gimbal Control Stick.
Move the Gimbal Control Stick upward/downward to trim the camera