Do you have a question about the Toro 127-6818 and is the answer not in the manual?
Prepare the mower by securing the handle and tipping it safely for maintenance.
Steps to safely remove the mower blades using a block of wood and proper tools.
Instructions for attaching the baffle to the mower housing using provided hardware.
Detailed procedure for correctly installing the new high-lift blades with torque specifications.
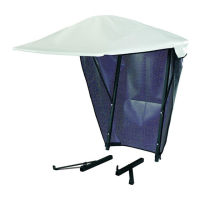
This document details the installation instructions for the High-Lift Blade and Baffle Kit designed for 2013 and after TimeMaster Lawn Mowers, specifically Model No. 127-6818. The kit is intended to enhance the mower's performance, likely by improving its ability to lift and cut grass more effectively, which is particularly beneficial for bagging or mulching operations. The "high-lift" design of the blades, combined with the baffle, creates a stronger airflow under the mower deck, which helps to stand the grass up for a cleaner cut and to propel clippings more efficiently into the collection bag or to circulate them for finer mulching.
The installation process is divided into several key stages, each with specific steps and safety precautions. Before beginning any work, the manual emphasizes the importance of having a torque wrench for proper blade installation, highlighting that incorrect torque can lead to safety hazards or damage to the machine. If a user is uncomfortable with this procedure, they are advised to contact an Authorized Service Dealer. This underscores the precision required for safe and effective operation after installation.
The initial preparation involves positioning the machine correctly and ensuring safety. The user is instructed to lock the mower's handle in the vertical position and then tip the machine onto its side, with the dipstick down, until the upper handle rests on the ground. This orientation provides clear access to the underside of the mower deck where the blades and baffle are located. A critical safety warning is issued regarding the sharpness of the blades, advising users to disconnect the spark plug wire to prevent accidental starting and to wear gloves when handling the blades. These steps are crucial for preventing serious personal injury during the installation process.
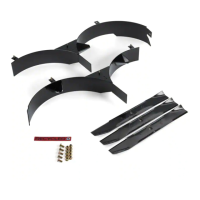
The first major step in the installation is "Removing the Existing Blades." This procedure requires the use of a block of wood to hold each blade steady while turning the blade bolt counterclockwise to loosen it. The manual provides clear illustrations to guide the user in identifying the spindle, blade driver, blade, and blade bolt. This step is essential for making way for the new high-lift blades.
Following the blade removal, the next stage is "Installing the Baffle." The baffle is a component that works in conjunction with the high-lift blades to optimize airflow within the mower deck. The installation involves removing four existing bolts and nuts from the front of the machine housing, then using these same fasteners to secure the new baffle in place. This ensures that the baffle is properly integrated into the mower's design to achieve the desired performance improvements.
The final and most critical stage is "Installing the High-lift Blades." This process begins with installing the first blade horizontally, along with all mounting hardware. A key instruction here is to tighten the bolt initially with fingers, followed by a crucial note on blade orientation: the curved ends of the blades must point toward the machine housing. Furthermore, the raised areas on each blade driver must nest with the recesses in the head of its corresponding spindle, and the pins on the other side of each blade driver must align with the holes in its corresponding blade. This precise alignment is vital for the blades to function correctly and safely.
The manual then instructs the user to steady each blade with a block of wood and turn the blade bolt clockwise using a torque wrench. The specified torque is 60 ft-lb (82 N-m), and the manual emphasizes that this is a very tight setting, requiring the user to put their weight behind the wrench to secure the bolt properly. It also notes that this bolt is very difficult to overtighten, providing reassurance while stressing the importance of achieving the correct torque.
After the first blade is securely installed, the user is directed to rotate it 1/4 turn until it is vertical. Then, the second blade is installed in the same manner. A critical check follows: the blades should be perpendicular, forming an inverted "T" shape. Finally, the user must rotate the blades by hand a full 360-degree turn to ensure they do not touch each other. If the blades do touch, it indicates incorrect mounting, and the user must repeat the installation steps until the blades no longer make contact. This check is a vital safety measure, as touching blades could cause severe damage to the machine or injury to the operator or bystanders.
The manual includes a "CALIFORNIA Proposition 65 Warning," indicating that the product contains chemicals known to the State of California to cause cancer, birth defects, or reproductive harm. This is a standard disclosure for products sold in California that may expose users to certain substances.
Overall, the document provides a comprehensive, step-by-step guide for installing the High-Lift Blade and Baffle Kit, with a strong emphasis on safety, proper technique, and the use of appropriate tools like a torque wrench. The detailed instructions and warnings are designed to ensure that the installation is performed correctly, leading to enhanced mower performance and safe operation. The kit's function is to improve cutting efficiency and clipping management, making the TimeMaster Lawn Mower more effective for various lawn care tasks.
| Part Number | 127-6818 |
|---|---|
| Category | Lawn Mower Accessories |
| Material | Steel |
| Replaces | 108-9764-03 |
| Mounting Hole | 5/8 inch |