Do you have a question about the Toro 140-2054 and is the answer not in the manual?
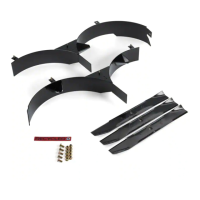
Prepare the mower by parking, shutting off the engine, and removing rear tires.
Secure the receiver brackets to the front frame using bolts and lockwashers.
Connect the front, top, and rear bows using bolts and locknuts.
Secure braces to the rear bow and insert posts into receiver brackets.
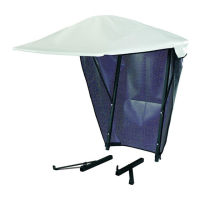
Tighten all fasteners, secure the rear screen, and install the sunshade.
Reinstall the rear wheels and torque the lug nuts to the specified range.
This document provides installation instructions for the Toro Sunshade Kit, Model No. 140-2054, designed for TimeCutter® Riding Mowers. The kit is intended to provide shade for the operator during mower operation.
The sunshade kit consists of a frame structure and a fabric sunshade. The frame is assembled from various bows, braces, and posts, which are then attached to the mower's frame. The fabric sunshade is slipped over this frame to provide protection from the sun. The design allows for adjustment of the top bow's angle to tighten or loosen the sunshade, ensuring a secure fit and optimal shade coverage.
The sunshade kit aims to enhance operator comfort by providing shade, while its design and installation process incorporate practical considerations for safety, ease of use, and maintenance.
| Brand | Toro |
|---|---|
| Model | 140-2054 |
| Category | Lawn Mower Accessories |
| Language | English |