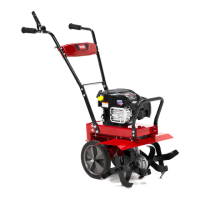
This document describes the Toro Front Tine Tiller, Model No. 58602, with serial numbers 321000001 and Up. It is a machine designed for residential homeowners or professional operators to break through hard soil conditions for planting and cultivating gardens.
Function Description:
The Front Tine Tiller is a motorized piece of equipment used for tilling and cultivating soil. It features rotating tines that break up the ground, making it suitable for gardening and planting. The machine is operated by a drive-control lever, which engages and disengages the tines, and an engine On/Off switch for starting and stopping the engine. The tiller's design incorporates safety features and operational controls to ensure efficient and safe use.
Important Technical Specifications:
- Height: 117.9 cm (46.4 inches)
- Length: 122.2 cm (48.1 inches)
- Width: 55.9 cm (22.0 inches)
- Weight: 46.7 kg (103 lb)
- Tilling width: 28 to 53 cm (11 to 21 inches)
- Tilling depth: Up to 28 cm (11 inches)
- Engine oil capacity: 0.44 L (15 fl oz)
- Engine oil viscosity: SAE 30 or SAE 10W-30 detergent oil
- API service classification: SJ or higher
- Spark plug type: Champion RN9YC or equivalent
- Spark plug air gap: 0.75 mm (0.03 inch)
Usage Features:
The tiller is designed for ease of use and adaptability to different tilling needs.
- Adjustable Tilling Width: The outer tines can be installed in different positions to achieve tilling widths of 40.6 cm (16 inches) or 53.3 cm (21 inches). For a 16-inch width, the short end of the tine pipe faces toward the center of the machine. For a 21-inch width, the short end of the tine pipe faces toward the outside. The arrows on the tines must point in the direction of forward rotation (counterclockwise when viewed from the left side).
- Adjustable Handlebar Height: The handle can be rotated to high, middle, or low positions to suit the operator's comfort. Bolts should be installed with the head facing outward.
- Adjustable Drag Stake: The drag stake regulates tilling depth and prevents the tiller from jerking forward. Setting it in the lowest position increases resistance for deeper digging, while raising it is for transport. Adjustments should be made one hole at a time, testing operation after each adjustment. Raising the drag stake too high can lead to loss of control.
- Drive-Control Lever: Squeezing this lever engages the tines, and releasing it disengages them.
- Engine On/Off Switch: Used to start and shut off the engine. Ensure it is in the "On" position before starting.
- Starting the Engine: Set the engine on/off switch to "On," then pull the recoil-start handle. Pull lightly until resistance is felt, then pull sharply, allowing the rope to return slowly.
- Shutting Off the Engine: Release the drive-control lever, move the engine on/off switch to "Off," and wait for all moving parts to stop.
- Adjusting Tail Mount Position: The hinged tail mount can be rotated to Transport (downward) or Operating (upward) positions using the handle on the drag stake. Operators should keep clear of pivot points during adjustment to avoid pinching hazards.
- Tilling Soil: Adjust the drag stake to the desired depth, squeeze the drive-control lever to engage tines, till as required, then release the lever to disengage tines.
Maintenance Features:
Regular maintenance is crucial for the tiller's performance and safety.
- Daily/Before Each Use: Check engine-oil level and add as needed, check belt tension, and clean debris from cooling fins, air inlets, and linkages.
- Every 2 Hours: Check belt tension.
- Every 10 Hours: Clean the tine axle shaft. Remove all vegetation, string, wire, and other material accumulated on the axle between the inner tines and the transmission housing.
- Every 25 Hours: Service the air filter. More frequent servicing is recommended in dusty conditions.
- Every 50 Hours/Yearly (whichever comes first): Replace the drive belt and lubricate moving parts using 30-weight oil.
- Every 100 Hours/Yearly (whichever comes first): Check the spark plug.
- Yearly: Replace the air filter. More frequent replacement is recommended in dusty conditions.
- Preparing for Maintenance: Move the machine to a level surface, shut off the engine, and wait for all moving parts to stop. Disconnect the spark-plug wire. Before tipping the machine, allow the fuel tank to run dry or use a hand fuel pump to remove fuel.
- Servicing the Air Filter: Unclip the top of the air-filter cover, remove and inspect the air filter. If excessively dirty, replace it; otherwise, gently tap to loosen debris. Install the filter and secure the cover.
- Changing the Engine Oil: Run the engine for a few minutes to warm the oil. Move the machine to a level surface. Remove the dipstick. Tip the machine onto its side (air filter up) to drain used oil. Return to operating position, pour about 3/4 of the engine capacity of oil into the oil-fill tube, wait 3 minutes, wipe dipstick clean, insert and remove dipstick to check level. Add small amounts if low, drain if high, repeating until correct. Install dipstick securely. Recycle used oil properly.
- Servicing the Spark Plug: Disconnect the spark-plug wire. Clean around the spark plugs. Remove the spark plug. Inspect for black coating, worn electrodes, oily film, or cracks; replace if any are present. If light brown/gray, engine is operating properly. Set air gap to 0.75 mm (0.03 inch). Install the spark plug, tightening to 15 ft-lb (20 N·m).
- Belt Maintenance: Check and adjust belt tension regularly. If a constant buzzing sound occurs when tines are engaged, or squealing under load, adjustment may be needed. Remove the dirt shield. Measure the relaxed cable spring length. Pull down the drive-control lever and measure the extended cable spring length; the difference should be 0.6 cm (1/4 inch). Adjust jam nuts in 0.32 cm (1/8 inch) increments if needed. If tension is still incorrect after maximum adjustment, move the Z-bend end of the cable to the next hole in the drive-control lever. If still incorrect, replace the belt.
- Replacing the Drive Belt: Remove the dirt shield and drive belt cover. Gently pull the engine recoil rope to rotate the pulley. Force the belt off the V-groove, slide it off the engine pulley, pull it down and out of the way, and push it forward and out the front of the machine. To install, place the belt in the transmission pulley groove, gently pull the engine recoil rope to rotate the engine pulley while forcing the belt into the V-groove. Install the drive belt cover and dirt shield. Check and adjust belt tension.
- Cleaning and Storing: Park on a level surface, shut off engine, wait for parts to stop. Remove debris from tines, axle, transmission housing, and engine. The machine can be washed with mild detergent and water, but avoid pressure washing or excessive water near the engine and transmission. Coat axles lightly with axle grease. Service the air filter. For storage over 30 days, add fuel stabilizer/conditioner to fresh fuel, run engine for 5 minutes, shut off, allow to cool, drain fuel tank, then run engine until it shuts off. Dispose of fuel properly. Remove spark plug, pour 15 ml (1 tablespoon) of engine oil into the hole, install plug, and pull recoil rope 3 times to coat cylinder (do not reconnect wire). Check and tighten fasteners. Paint scratched metal surfaces. Store upright in a clean, dry garage, out of reach of children. Cover the machine.
This tiller is a robust tool, and adherence to the provided instructions will ensure its optimal performance and longevity, while prioritizing user safety.