BrakeMaintenance
AdjustingtheParking
Brake
ServiceInterval:Aftertherst100hours
Every500hoursthereafter
Note:Performthisprocedureattherecommended
serviceintervalorwhenabrakecomponenthasbeen
removedorreplaced.
1.Parkthemachineonalevelsurface,disengage
theblade-controlswitch(PTO),andengagethe
parkingbrake.
2.Shutofftheengine,removethekey,andwait
forallmovingpartstostopbeforeleavingthe
operatingposition.
3.Raisethebackofthemachineandsupportthe
machinewithjackstands.
CAUTION
Raisingthemachineforservice
ormaintenancerelyingsolelyon
mechanicalorhydraulicjackscouldbe
dangerous.Themechanicalorhydraulic
jacksmaynotbeenoughsupportormay
malfunctionallowingthemachinetofall,
whichcouldcauseinjury.
Donotrelysolelyonmechanical
orhydraulicjacksforsupport.Use
adequatejackstandsorequivalent
support.
4.Removethereartiresfromthemachine.
5.Removeanydebrisfromthebrakearea.
6.Rotatethedrive-wheelreleasehandleto
thereleasedposition;refertoUsingthe
Drive-Wheel-ReleaseValves(page34).
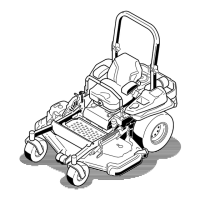
7.Checktoseeifthereisavisiblegapbetween
theL-bracketandthelinkagestop(Figure87).
g026961
Figure87
LeftSideShown
1.L-bracket4.Rearlinkageassembly
2.Linkagestop
5.Caliper
3.Gap
6.Wheelhub
8.Disengagetheparkingbrake,thelevershould
beinthedownposition.
9.Turnthewheelhubbyhandinbothdirections
relativetothecaliper;thewheelhubshould
movefreelybetweenthecaliper.
10.Ifagapisneededorthewheelhubdoesnot
movefreely:
A.Disengagetheparkingbrake.
B.Disconnectandne-tunetherearlinkage
assembly:
•Shortenthelinktocreateagap.
•Lengthenthelinktoallowwheelhub
movement.
C.Connecttherearlinkageassembly.
11.Engagetheparkingbrakeandcheckthegap.
12.Repeatsteps8through12untilavisiblegapis
achievedandthewheelhubrotatesfreely.
13.Repeatthisprocedureforthebrakeonthe
oppositeside.
14.Rotatethedrive-wheelreleasehandleto
theoperatingposition;refertoUsingthe
Drive-Wheel-ReleaseValves(page34).
15.Installthereartiresandtorquethelugnuts;
refertoCheckingtheWheelLugNuts(page53).
16.Removethejackstands.
58
 Loading...