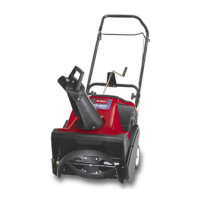
12
Maintenance
Recommended
Maintenance Schedule
Service
Item
Service Operation
Initial Annually Comments
Control cable
Check the control cable. Adjust if necessary
. X X
Check and adjust
as needed.
Fuel tank
Drain the fuel and run the engine until the fuel tank
and the carburetor are dry
.
X
Scraper
Check the scraper
. Replace if necessary
. X
Drive belt
Inspect the drive belt. Replace if necessary
. X
Spark plug
Clean, inspect, and gap. Replace if necessary
. X
Rotor blades
Inspect the rotor blades. Replace if necessary
. X
Tighten
fasteners
Check and for loose fasteners and tighten them if
necessary.
X X
T
ighten fasteners
as needed.
CAUTION
POTENTIAL
HAZARD
•
If you leave the wir
e on the spark plug, someone could start the engine.
WHA
T CAN HAPPEN
•
Someone accidentally starting the engine could seriously injur
e you or other bystanders.
HOW T
O A
V
OID THE HAZARD
•
Pull the wir
e off of the spark plug befor
e you do any maintenance. Also, push it aside so it
does not accidentally contact the spark plug.
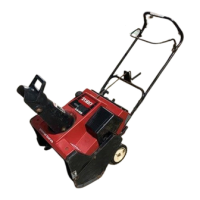
Adjusting
the Control Cable
Periodically
check the control cable for proper
adjustment.
1.
Stop the engine and wait for all moving parts to stop.
2.
Move the control bar back toward the handle to
remove the slack in the cable (Fig. 7 or Fig. 8).
3.
Ensure that a 1/16 to 1/8 in. (0.16 to 0.32 cm) gap
exists between the control bar and the handle (Refer to
the inset in Fig. 7). T
o adjust the cable, go to step 4.
Note: The control cable must have slack in the
disengaged position.
4.
Adjust the cable as follows:
Models 38413 and 38419 only:
A.
Unhook the spring end from the top hole in the
control bar bracket (Fig. 7).
B.
Slide the spring cover of
f the spring and the cable
adjuster.
C.
Unhook the Z fitting from the cable adjuster and
reposition the Z fitting in the top or bottom hole on
the adjuster to obtain a proper gap of 1/16 to 1/8 in.
(0.16 to 0.32 cm) between the control bar bracket
and the handle (Fig. 13).
897
4321
Figure
13
1. Spring
2. Cable
adjuster
3.
Z fitting
4. Cable
D. Install
the spring cover over the cable adjuster and
the spring.
E.
Hook the spring into the top hole of the control bar
bracket (Fig. 7).
Models 38439, 38440, and 38445 only:
 Loading...