This document is an operator's manual for the Toro Flex-Force Power System™ 60V MAX String Trimmer, covering Model Nos. 51832, 51832T, and 51836. It provides comprehensive instructions for assembly, operation, maintenance, and troubleshooting, ensuring safe and effective use of the device.
Function Description
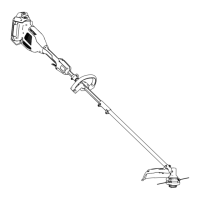
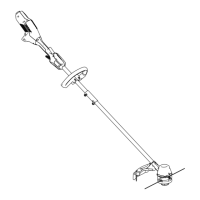
The Toro Flex-Force Power System™ 60V MAX String Trimmer is designed for residential homeowners to trim grass outdoors. It operates using a 60V MAX lithium-ion battery pack, providing cordless convenience for various trimming tasks. The power head (Model 51810T) is compatible with several Toro-approved attachments, including a string trimmer (Model 88716), pole saw (Model 88710), edger (Model 88714), cultivator (Model 88715), and hedge trimmer (Model 88713), making it a versatile tool for yard maintenance. This manual specifically focuses on the string trimmer attachment.
The string trimmer's primary function is to cut grass using a monofilament string that spins at high speed. It is intended for light-duty trimming around obstacles, along edges, and in areas where a lawnmower cannot reach. The device is designed for outdoor use and should not be used for purposes other than its intended application, as this could lead to dangerous situations for the user and bystanders.
Usage Features
The string trimmer is designed for ease of use and safety, incorporating several features to enhance the user experience.
- Battery-Powered Operation: The trimmer is powered by a 60V MAX lithium-ion battery pack, offering freedom from power cords and the associated hazards. The battery packs (Models 88620, 88625, 88640, 88650, 88660, or 88675) are charged using specific Toro battery chargers (Models 88602, 88605, or 88610).
- Attachment System: The power head features a quick-connect system for installing attachments. The string trimmer attachment's square shaft slides into the power head's square shaft, and a locking button secures the two shafts together. A screw-handle then tightens the connection for a firm hold.
- Auxiliary Handle: An auxiliary handle is provided for improved control and comfort during operation. It is installed by separating it from its handle plate, aligning it on the trimmer handle, and securing it with screws. This handle allows for a two-handed grip, which is crucial for safe and stable operation.
- Guard: A guard is installed over the cutting head to protect the user from flying debris and the cutting line. It is secured to the trimmer using washers and bolts. The guard also includes a line trimming cut-off blade to maintain the correct string length.
- Starting and Stopping: To start the trimmer, the user must first ensure the battery pack is properly installed and locked into the latch. Then, the lockout button is pressed, followed by squeezing the run trigger. Releasing the trigger stops the trimmer.
- Variable-Speed Switch: The trimmer is equipped with a variable-speed switch, allowing the user to adjust the cutting speed to suit different tasks and grass conditions.
- Battery Removal: For safety, the battery pack should be removed whenever the trimmer is not in use, during transport, or before any adjustments, servicing, cleaning, or storage. This prevents unintentional starting.
- Line Advancement (Bump Feed): The trimmer features a bump feed system for advancing the cutting line. While the trimmer is running at full throttle, tapping the bump button on the ground advances the line. The line cut-off blade on the guard automatically trims the line to the correct length.
- Manual Line Advancement: If the line is too short to advance via the bump feed, the battery pack can be removed, and the bump button can be pushed while pulling on the trimmer line to manually extend it.
- Adjustable Cutting Swath: The cutting swath can be adjusted from 33 cm (13 inches) to 38.1 cm (15 inches). This is achieved by removing and rotating the swath blade on the guard by 180 degrees, then re-securing it. This feature allows users to customize the cutting width based on their needs.
- Operating Tips: The manual provides tips for effective trimming, such as tilting the trimmer toward the cutting area, moving the trimmer from right to left to direct debris away from the user, and using only the tip of the string for cutting. It also warns against forcing the string head into uncut grass and advises caution around fences, walls, and trees to prevent string wear and damage to property.
- Daylight Operation: The trimmer should only be operated in daylight or good artificial light to ensure visibility and safety.
Maintenance Features
Proper maintenance is essential for the longevity and safe operation of the string trimmer. The manual outlines several key maintenance procedures.
- Post-Use Cleaning: After each use, the battery should be removed, and the trimmer should be wiped clean with a damp cloth. It is crucial not to hose down or submerge the trimmer in water. The cutting head area should be cleaned of debris accumulation.
- Fastener Checks: All fasteners should be checked and tightened regularly. Any damaged or lost parts should be repaired or replaced by an Authorized Service Dealer.
- Ventilation Maintenance: Air intake vents and exhaust on the motor housing must be kept clear of debris to prevent motor overheating.
- String Replacement: The manual provides detailed instructions for replacing the monofilament string. It specifies using only 2 mm (0.080 inch) diameter monofilament string (Part No. 88611) and not exceeding 3.9 m (13.0 ft) in length, as using other gauges or types of string or exceeding the recommended length can damage the trimmer. The process involves removing old string, cutting a new piece, aligning arrows on the string head knob, inserting the line through the eyelets, and winding the line by rotating the bump knob clockwise.
- Battery Charging and Storage: The battery pack should be charged in a well-ventilated area and within specific temperature ranges. For long-term storage, the battery should be removed from the charger and stored with 2 or 3 LED indicators green (partially charged) to optimize battery health. It should not be stored fully charged or fully depleted. The tool, battery pack, and charger should be stored in an enclosed, clean, dry area, out of reach of children and away from corrosive agents.
- Battery Recycling: The manual emphasizes responsible disposal of lithium-ion battery packs, recommending the Call2Recycle® program for recycling. Users are instructed to cover battery terminals with heavy-duty adhesive tape upon removal for recycling and not to attempt to destroy or disassemble the battery pack.
- Professional Service: For any service or repair beyond the scope of the instructions, or if troubleshooting steps do not resolve a problem, users are advised to contact an Authorized Service Dealer. This ensures that genuine manufacturer parts are used and that the product is safely maintained.
- Safety Decal Maintenance: Safety decals and instructional labels are crucial for operator safety. Users are instructed to replace any decal that becomes damaged or missing to ensure all warnings and instructions are clearly visible.