EasyManua.ls Logo

Toro GrandStand Mulching Kit - User Manual

Toro GrandStand Mulching Kit
8 pages
Print Icon
To Next Page IconTo Next Page
Loading...
FormNo.3431-157RevC
MulchingKit
GrandStand
®
MowerWith91cmRearDischargeTURBOFORCE
®
CuttingUnit
ModelNo.134-3217
InstallationInstructions
Safety
RearDischargeorMulch
Grass
WARNING
Withoutthegrassguardmountedinplace,
youandothersareexposedtobladecontact
andthrowndebris.Contactwithrotating
mowerblade(s)andthrowndebriswillcause
injuryordeath.
Neverremovethegrassguardfromthe
mowerbecausethegrassguardroutes
materialdowntowardtheturf.Ifthe
grassguardiseverdamaged,replaceit
immediately.
Neverputyourhandsorfeetunderthe
mower.
Nevertrytoclearthedischargeareaor
mowerbladesunlessyouengagethe
parkingbrake,disengagethepowertake
off(PTO)lever,shutofftheengine,remove
theignitionkey,andwaitforallmotion
tostop.Alsopullthewireoffthespark
plug(s).
Ensurethatthemowerhasthereargrassguardto
dispersesclippingstotherearwardanddowntoward
theturf,whileinreardischargemode.
Tomulchgrassclippings,installthebafesonthe
mowerdeckasinstructedinthefollowingprocedures.
©2019—TheToro®Company
8111LyndaleAvenueSouth
Bloomington,MN55420
Registeratwww.T oro.com.
OriginalInstructions(EN)
PrintedintheUSA.
AllRightsReserved
*3431-157*C
Question and Answer IconNeed help?

Do you have a question about the Toro GrandStand Mulching Kit and is the answer not in the manual?

Summary

Safety

Rear Discharge or Mulch Grass

Safety precautions for rear discharge and mulching grass, warning about debris and blade contact.

Installation

Loose Parts

Lists and verifies all parts included in the mulching kit for installation.

Preparing the Mower

Steps to prepare the mower before installing the mulching kit.

Removing the Existing Blades

Instructions for safely removing existing mower blades from the deck.

Drilling the Mower Deck

Installing the Baffles

Installing the Kicker Fittings

Installing the Recycler Blades

Converting the Mower Deck for Rear-Discharge Operation

Preparing to Remove the Mulching Kit

Steps to prepare the mower for removing the existing mulching kit.

Removing the Kicker Fittings

Procedure to remove kicker fittings from the mower deck.

Removing the Baffles

Finishing Converting the Mower Deck for Rear-Discharge Operation

Operation

Selecting the Proper Height of Cut

Guidance on adjusting mower height for optimal grass cutting performance.

Mowing in Extreme Conditions

Tips for mowing in challenging grass and weather conditions.

Mowing at Proper Intervals

Recommendations for mowing frequency based on grass growth rates.

Mowing with Sharp Blades

Explains the importance of sharp blades for grass health and appearance.

Cleaning the Mower Deck

Instructions for cleaning the mower deck after each use for optimum performance.

Overview

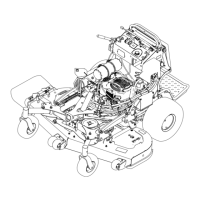
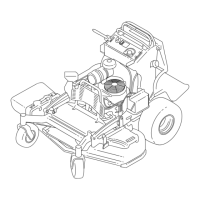
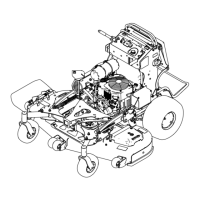
This document describes a mulching kit for a Toro GrandStand Mower with a 91cm Rear Discharge TURBO FORCE Cutting Unit (Model No. 134-3217). The kit is designed to convert the mower deck for mulching grass clippings or for rear-discharge operation.

Function Description:

The mulching kit allows the Toro GrandStand Mower to effectively mulch grass clippings, returning them to the turf as a natural fertilizer. This is achieved by installing baffles and special recycler blades (sold separately) onto the mower deck. When the mulching kit is installed, the mower is configured for mulching. The document also provides instructions for converting the mower deck back to rear-discharge operation by removing the mulching kit components and installing non-recycling blades.

Important Safety Information:

The manual emphasizes critical safety precautions related to operating the mower, especially when dealing with the cutting unit. A prominent warning highlights the danger of operating the mower without the grass guard, which exposes the operator and others to blade contact and thrown debris, potentially causing injury or death. Key safety rules include:

  • Never remove the grass guard, as it directs material downward. Replace it immediately if damaged.
  • Keep hands and feet away from under the mower.
  • Before clearing the discharge area or blades, always engage the parking brake, disengage the power take-off (PTO) lever, shut off the engine, remove the ignition key, and wait for all motion to stop. Additionally, pull the wire off the spark plug(s).
  • Ensure the rear grass guard is in place for rear-discharge mode to disperse clippings rearward and downward.

Installation Features:

The installation process is broken down into several procedures, each with a list of required parts and step-by-step instructions.

  • Preparing the Mower: This initial step involves parking the machine on a level surface, disengaging the cutting unit, engaging the parking brake, shutting off the engine, removing the key, and waiting for all movement to stop. The mower deck must be thoroughly cleaned to ensure proper fit of the baffles, and any damaged areas of the deck should be repaired.
  • Removing the Existing Blades: The existing blades are removed from the spindles. These blades should be saved for use when cutting grass in rear-discharge mode. The blade bolt and washer will be reused for installing the recycler blades.
  • Drilling the Mower Deck: This procedure involves drilling pilot holes in specific locations on both the left and right sides of the mower deck using a 10 mm (3/8 inch) drill bit. Burrs from the drilled holes must be removed.
  • Installing the Baffles: This involves aligning and loosely assembling the left and right baffles to the mulching-plate flange and the small baffle of the mower deck using carriage bolts (3/8 x 1 inch) and flange locknuts (3/8 inch). The holes drilled in the previous step are used for alignment. The flange locknuts are then torqued to 37 to 45 N·m (27 to 33 ft-lb).
    • Parts needed: 1 Left baffle (3 holes), 1 Right baffle (4 holes), 6 Carriage bolt (3/8 x 1 inch), 6 Flange locknut (3/8 inch).
  • Installing the Kicker Fittings: Kicker fittings are assembled to both the right and left sides of the mower deck by aligning slots with the drilled holes and securing them with carriage bolts (3/8 x 1 inch) and flange locknuts (3/8 inch). The flange locknuts are torqued to 37 to 45 N·m (27 to 33 ft-lb).
    • Parts needed: 2 Kicker fitting, 4 Carriage bolt (3/8 x 1 inch), 4 Flange locknut (3/8 inch).
  • Installing the Recycler Blades: Recycler blades (sold separately) are installed onto the mower. The manual refers to the machine's Parts Catalog for the correct blade part number and the Operator's Manual for installation instructions. A warning emphasizes that blades are sharp and requires wearing gloves or wrapping sharp edges with a rag.
    • Parts needed: 2 Recycler blades (sold separately).

Converting the Mower Deck for Rear-Discharge Operation:

This section provides instructions for removing the mulching kit components to revert the mower to rear-discharge mode.

  • Preparing to Remove the Mulching Kit: This involves preparing the mower as described in the initial preparation step and removing the recycling blades (referencing the Operator's Manual).
  • Removing the Kicker Fittings: The carriage bolts and flange locknuts securing the kicker fittings to the deck are removed, and the kicker fittings are detached. These parts should be retained for future mulching kit installations. Flange-head capscrews (3/8 x 1 inch) are then installed into the vacated holes and secured with the previously removed flange locknuts.
    • Parts needed: 6 Flange-head capscrews.
  • Removing the Baffles: The carriage bolts and flange locknuts securing the left and right baffles to the deck are removed, and the baffles are detached. These parts should also be retained. Flange-head capscrews (3/8 x 1 inch) are installed into the vacated holes and secured with the previously removed flange locknuts.
  • Finishing Converting the Mower Deck for Rear-Discharge Operation: Non-recycling blades are installed, referring to the Operator's Manual for instructions.

Usage Features (Operation):

  • Selecting the Proper Height of Cut: For optimal cutting, remove approximately one inch or no more than 1/3 of the grass blade. In lush or dense grass, it may be necessary to raise the height-of-cut or switch to rear-discharge operation.
  • Mowing in Extreme Conditions: Airflow is crucial for cutting and recutting clippings. Avoid setting the height-of-cut too low or completely surrounding the housing with uncut grass. Keep the back of the mower deck clear of uncut grass to allow air intake. When cutting through an uncut area, operate slower and back up if the mower clogs.
  • Mowing at Proper Intervals: Mowing frequency depends on grass growth rates. Typically, mowing every 4 to 5 days is recommended. In early spring, more frequent mowing might be needed, while in midsummer, every 8 to 10 days might suffice. Maintaining a consistent height-of-cut is important. If unable to mow for an extended period, convert to rear discharge or mow at a high level first, then again 2 to 3 days later at a lower setting.
  • Mowing with Sharp Blades: Sharp blades cut cleanly, preventing tearing or shredding of grass, which can lead to browning, impaired growth, and increased susceptibility to disease.

Maintenance Features:

  • Cleaning the Mower Deck: The underside of the mower deck should be cleaned after each use to ensure optimum performance. Accumulation of grass residue can decrease cutting performance.

Toro GrandStand Mulching Kit Specifications

General IconGeneral
BrandToro
ModelGrandStand Mulching Kit
CategoryLawn Mower
LanguageEnglish

Related product manuals