– 81 –
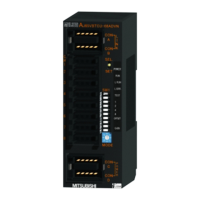
Electrical control
box
No. Part to be replaced Work procedure Remarks
1. Detachment
1) Carry out the detachment of item
1
(Front panel).
2) Remove connectors which are connected from the
control P.C.board to the other parts and then remove
wiring from the clamp.
CN030 ... FS (Flow switch) Red 3P
CN033 ... LM (2way valve) Green 3P
CN102 ... TCJ Red 2P
CN101 ... TWO (TC2) Black 2P
CN100 ... TC1 Brown 3P
CN103 ... TCJ2 (TF) Green 2P
CN104 ... TWI (TA) Yellow 2P
CN082 ... PMV Blue 6P
3) Remove wires which are connected to the terminal
block and then remove wiring from the clamp.
4) Remove the screws for the electrical control box.(4x10,
4pcs.)
5) Lift the electrical control box up to about 10mm, pull the
electrical control box and then remove the electrical
control box.
CAUTION
Be careful of the hook provided on the Electrical control
box to detach properly.
3
2. Attachment
1) Carry out installation by following the detachment
procedure in reverse.
NOTE:
• Let TCJ, TWI (TA), TCJ2 (TF), PMV and LM (2way valve
coil) wiring pass throuh the left side clamps.
• Let TC1, TWO (TC2) and FS (flow switch) wiring pass
through the right side clamps.
• Let PMV and FS (flow switch) relay connectors locate in
the electrical control box.
Clamp Clamp
Clamp
Terminal block
Terminal block
10mm
Right side clamps:
TC1, TWO (TC2), FS
(flow switch) and PMV
wiring are passed through.
Left side clamps:
TCJ, TWI (TA), TCJ2 (TF) and
LM (2way valve coil) wiring are
passed through.
Flow switch relay conector (White)
 Loading...