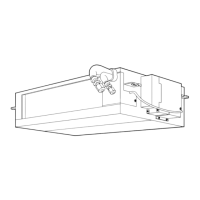
Fan motor relay connector
Bundling band
IPDU P.C. board
Inverter fixed board
Fixing
screw
Valve fixing board
Fixing screw
No.
4
Part name
Inverter
assembly
Procedure
1) Perform works Detachment 1 of
1
and
3
.
WARNING
Never disassemble the inverter until 5 minutes
after the power supply was turned off because
there is a fear that an electric shock may occur.
NOTE)
When working, be sure to use the insulate tools
and put on the insulated gloves.
Remarks
PMV coil
Temperature sensor
CDB P.C. board
2) Tak
e off screw for the inverter assembly and the
v
alve fixed board. (ST1T Ø4 × 8, 1 pc.)
3) T
ake off the screw fixed to the terminal fixed board
in order to remov
e the inverter fixed board.
(ST1T Ø4 × 8, 1 pc
.)
4) Remove the connectors that are connected from
CDB
P
.C.
board
to the other parts.
CN600: TD sensor (3P, White)
CN602: TO sensor (2P, White)
CN604: TGa sensor (2P, Yellow)
CN605: TGb sensor (2P, Red)
CN606: TGc sensor (2P, Green)
CN607: TGd sensor (2P, Blue)
CN608: TGe sensor (2P, Black)
CN700: PMV coil (6P, Yellow)
CN701: PMV coil (6P, Red)
CN702: PMV coil (6P, Green)
CN703: PMV coil (6P, Blue)
CN704: PMV coil (6P, Black)
5) Cut the bundling band that binds the PMV coil and
the relay lead wire.
6) Remove the connectors, relay connector and the
lead wire that are connected from IPDU P.C. board
to the other parts.
CN609 : Compressor case thermo. (2P: Blue)
CN690 : Relay connector for High pressure switch
(2P: White)
7) Remove connectors that are connected from the
fan motor to the fan motor relay P.C. board.
• Unlock the lock of the housing unit and then
remove the connectors.
 Loading...