CVHE-SVN04M-EN
21
is to remove the sensor and carefully coil the wire after
labeling the device and its location to aid in
reinstallation. All sensors connect to the buss wiring
with a universal plug. This allows easy disconnection
and reconnection of the sensors.
Purge Unit Removal
WWAARRNNIINNGG
RReeffrriiggeerraanntt MMaayy BBee UUnnddeerr PPoossiittiivvee
PPrreessssuurree!!
FFaaiilluurree ttoo ffoollllooww iinnssttrruuccttiioonnss bbeellooww ccoouulldd rreessuulltt iinn
aann eexxpplloossiioonn wwhhiicchh ccoouulldd rreessuulltt iinn ddeeaatthh oorr
sseerriioouuss iinnjjuurryy oorr eeqquuiippmmeenntt ddaammaaggee..
SSyysstteemm ccoonnttaaiinnss rreeffrriiggeerraanntt aanndd mmaayy bbee uunnddeerr
ppoossiittiivvee pprreessssuurree;; ssyysstteemm mmaayy aallssoo ccoonnttaaiinn ooiill..
RReeccoovveerr rreeffrriiggeerraanntt ttoo rreelliieevvee pprreessssuurree bbeeffoorree
ooppeenniinngg tthhee ssyysstteemm.. SSeeee uunniitt nnaammeeppllaattee ffoorr
rreeffrriiggeerraanntt ttyyppee.. DDoo nnoott uussee nnoonn--aapppprroovveedd
rreeffrriiggeerraannttss,, rreeffrriiggeerraanntt ssuubbssttiittuutteess,, oorr nnoonn--
aapppprroovveedd rreeffrriiggeerraanntt aaddddiittiivveess..
WWAARRNNIINNGG
HHaazzaarrddoouuss VVoollttaaggee ww//CCaappaacciittoorrss!!
FFaaiilluurree ttoo ddiissccoonnnneecctt ppoowweerr aanndd ddiisscchhaarrggee
ccaappaacciittoorrss bbeeffoorree sseerrvviicciinngg ccoouulldd rreessuulltt iinn ddeeaatthh oorr
sseerriioouuss iinnjjuurryy..
DDiissccoonnnneecctt aallll eelleeccttrriicc ppoowweerr,, iinncclluuddiinngg rreemmoottee
ddiissccoonnnneeccttss aanndd ddiisscchhaarrggee aallll mmoottoorr ssttaarrtt//rruunn
ccaappaacciittoorrss bbeeffoorree sseerrvviicciinngg.. FFoollllooww pprrooppeerr
lloocckkoouutt//ttaaggoouutt pprroocceedduurreess ttoo eennssuurree tthhee ppoowweerr
ccaannnnoott bbee iinnaaddvveerrtteennttllyy eenneerrggiizzeedd.. FFoorr vvaarriiaabbllee
ffrreeqquueennccyy ddrriivveess oorr ootthheerr eenneerrggyy ssttoorriinngg
ccoommppoonneennttss pprroovviiddeedd bbyy TTrraannee oorr ootthheerrss,, rreeffeerr ttoo
tthhee aapppprroopprriiaattee mmaannuuffaaccttuurreerr’’ss lliitteerraattuurree ffoorr
aalllloowwaabbllee wwaaiittiinngg ppeerriiooddss ffoorr ddiisscchhaarrggee ooff
ccaappaacciittoorrss.. VVeerriiffyy wwiitthh aa CCAATT IIIIII oorr IIVV vvoollttmmeetteerr
rraatteedd ppeerr NNFFPPAA 7700EE tthhaatt aallll ccaappaacciittoorrss hhaavvee
ddiisscchhaarrggeedd..
FFoorr aaddddiittiioonnaall iinnffoorrmmaattiioonn rreeggaarrddiinngg tthhee ssaaffee
ddiisscchhaarrggee ooff ccaappaacciittoorrss,, sseeee PPRROODD--SSVVBB0066**--EENN..
To remove the purge assembly from the top of the
condenser:
1. Isolate the purge unit from the condenser shell by
closing the vapor and liquid line valves.
2. Disconnect and mark all piping and wiring attached
to the purge unit. Sand all paint off at points and
use a tubing cutter where cuts are to be made. See
Figure 5, p. 21, and Figure 6, p. 21.
3. Remove the fasteners connecting the purge unit
base to its mounting bracket.
4. Two people will be needed to lift purge unit clear of
the chiller. Refer to Table 10, p. 18 for purge unit
weight. Store the purge unit in a clean dry area.
Reassemble the purge unit in reverse order when the
process is complete.
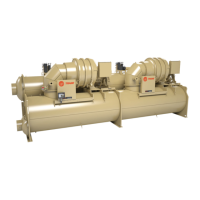
Figure 5. Example purge unit
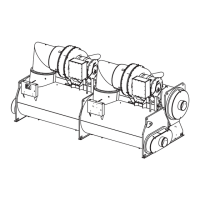
Figure 6. Purge unit detail
NNoottee:: Purge unit may appear slightly different than
example shown here.
DDiissaasssseemmbbllyy

 Loading...