Do you have a question about the Trane CenTraVac CVHE and is the answer not in the manual?
Explains types of advisories: Warning, Caution, Notice for safety and operational guidance.
Discusses chemicals affecting the ozone layer and responsible refrigerant handling.
Highlights Trane's belief in responsible refrigerant handling and technician certification.
Emphasizes qualified personnel for field wiring and adherence to electrical codes for safety.
Mandates proper PPE for potential electrical, mechanical, and chemical hazards during service.
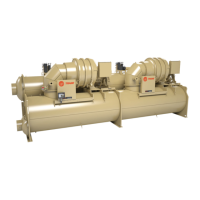
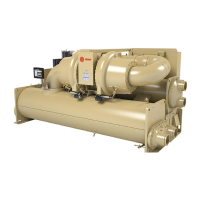
Describes how the unit model and size are identified on the nameplate.
Details the electrical specifications for the unit as listed on the nameplate.
Specifies the correct refrigerant charge and type as indicated on the unit nameplate.
Lists the test pressures and maximum operating pressures found on the unit nameplate.
Describes the service model number's role in identifying unit features for service and parts.
Recommends meeting or exceeding ASHRAE Standard 15 for indoor chiller installations.
Details inspection of the unit upon arrival for shipping damage and verification of factory charge.
Lists typical contractor responsibilities for the unit installation process.
Warns that shrink-wrap is combustible and to avoid open flames and hot sparks.
Provides guidelines for storing the chiller, emphasizing protection from elements and freezing.
Warns that freezing can cause equipment damage, and Trane is not responsible for unheated rooms.
Advises on preventing damage to factory-installed insulation from sunlight or solvents.
Details necessary clearances around the chiller for service and maintenance operations.
Provides NEC requirements for clearances around unit-mounted starters.
Lists representative operating and shipping weights in pounds for 60 Hz chillers.
Lists representative operating and shipping weights in kilograms for 60 Hz chillers.
Specifies requirements for the operating environment, including temperature and avoiding corrosive fumes.
Details requirements for the chiller mounting surface, emphasizing rigidity and support for full weight.
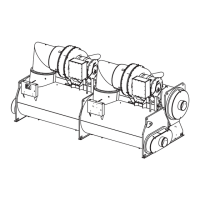
Provides guidelines for safely moving chillers using lifting equipment and proper techniques.
Warns about the hazards of lifting heavy objects and ensuring proper equipment rating.
Alerts to the risks of improper lifting, which can cause unit dropping and serious injury.
Warns that rigging and assembly can damage unit wiring, leading to equipment failure.
Outlines the steps for performing a standard chiller lift using rigging shackles and chains.
Addresses specific lifting requirements, including oil loss prevention and fork lift use.
Warns about preventing oil migration from the tank during lifting to avoid equipment failure.
Prohibits using a fork lift to move the chiller due to potential equipment or property damage.
Alerts to potential compressor misalignment if lifting is done improperly.
Explains the importance of installing isolation pads or spring isolators to minimize sound and vibration.
Provides instructions on positioning and installing isolation pads under the chiller feet.
Discusses the use of spring isolators for upper-story installations and their placement.
Provides instructions for leveling the chiller to within 1/16 in. (1.6 mm) over its length and width.
Outlines the water piping circuits that must be installed and connected to the chiller.
Emphasizes the importance of proper water treatment to prevent inefficiency and tube damage.
Warns that untreated water can cause scaling, erosion, and corrosion, recommending a specialist.
Provides guidance on locating pressure gauge taps for accurate readings.
Explains the installation of air vents and drain valves on waterboxes, warning against overtightening.
Warns against overtightening or using excessive Teflon tape on waterbox valves to prevent damage.
Advises installing pressure-relief valves in water circuits to prevent damage from hydrostatic expansion.
Stresses the need for pipe strainers in water supplies to prevent component damage from debris.
Explains the use of paddle switches or flow detection controllers for verifying water flow and protecting the unit.
Details the installation of paddle switches, including placement and adjustment.
Provides instructions for installing the ifm efector flow detection controller and sensor.
Warns against exceeding torque specifications when installing the flow sensor probe to prevent damage.
Warns against applying electrical power to a unit in a vacuum to prevent motor and compressor damage.
Lists evaporator water piping connection sizes for 1-pass, 2-pass, and 3-pass configurations.
Lists condenser water piping connection sizes for 2-pass configurations.
Warns against swapping marine-style waterboxes due to potential operational impact.
Details the use of standard flexible grooved pipe couplings for Victaulic connections.
Describes flange-to-groove adapters used to convert flanges for grooved-pipe connections.
Warns against welding to cast boxes, as it will result in equipment damage.
Warns that leaks can occur if seals are not effective, leading to equipment or property damage.
Provides step-by-step instructions for installing Victaulic gaskets correctly.
Describes the sequence for tightening screws on flanges to prevent leaks.
Lists recommended torque values for flange screws based on screw size and gasket type.
Outlines procedures and precautions for pressure testing waterside piping.
Recommends eddy current inspection of condenser and evaporator tubes every three years.
Covers general requirements for refrigerant vent lines, including codes, materials, and sizing.
Explains that purge discharge piping must conform to ASHRAE Standard 15 requirements for relief piping.
Discusses compatible materials for vent line systems, including steel, copper, and PVC.
Details vent line sizing requirements based on local codes and ASHRAE Standard 15 for safe venting.
Provides important guidelines for installing the rupture disk vent line, consulting local codes.
Warns that improper torque can damage the rupture disk assembly.
Warns about the hazard of improper vent-line termination, which can spray refrigerant.
Warns that improper vent line termination can lead to rainwater entry and chiller damage.
States that all vent lines must have drip legs, which need periodic draining to prevent overflow.
Provides reference tables and figures for determining vent line sizes based on "C" values.
Covers factory-installed insulation options and requirements for field-installed insulation.
Warns that failure to remove strain relief with sensor can cause equipment damage.
Lists required square footage of insulation for evaporators based on size and thickness.
Details insulation thickness and types used for different unit parts.
Describes the factory-applied insulation, its type, and coverage.
Warns about preventing damage to factory-installed insulation from sunlight or solvents.
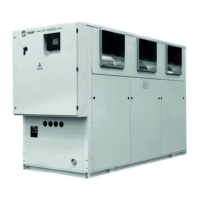
Describes the Symbio 800 controller as a factory-installed, programmable unit for chiller control.
Explains the AdaptiView display as the user interface for operators, technicians, and owners.
Introduces Tracer TU as a service tool required for chiller servicing, upgrades, and configuration.
Lists hardware and software requirements for running Tracer TU on a laptop.
Details the standard control panel assembly, showing low and high voltage areas for wiring.
Provides step-by-step instructions for installing the Tracer AdaptiView display and support arm.
Warns about potential injury from unexpected movement of the spring-loaded support arm.
Guides on adjusting the display arm joints to achieve desired tension and position.
Introduces the Air-Fi wireless communications interface and its installation.
Introduces the Wi-Fi module and its installation for wireless communication.
Outlines general requirements for electrical installation, including wiring and grounding.
Reinforces the need for qualified personnel and adherence to codes for safe wiring and grounding.
Warns that debris inside AFD/starter panels can cause shorts and damage.
Warns of death or injury risk from capacitors if power is not disconnected and they are not discharged.
Reinforces the mandatory use of PPE for electrical safety and hazard prevention.
States that working with live electrical components requires a qualified electrician.
Details standard field power wiring requirements for Trane-supplied starters.
Details field wiring requirements for customer-supplied remote starters.
Addresses wire sizing for current and potential transformers and separation from other wiring.
Reinforces the need for qualified personnel and adherence to codes for safe wiring and grounding.
Guides on installing and connecting three-phase power supply wiring to the starter panel.
Warns that debris inside AFD/starter panels can cause shorts and damage.
Stresses using copper conductors as equipment is not designed for others, preventing damage.
Guides on sizing motor overload protection to account for PFCCs and ensuring proper current detection.
Discusses conduit layouts and field installation of interconnecting wiring for remote starters.
Details wiring requirements for connecting the starter to the motor terminal box for remote starters.
Mentions that ground wire lugs are provided in the motor terminal box and starter panel.
Describes terminal clamps used with motor terminals and their purpose.
Details the requirement for field-supplied wire terminal lugs and their proper sizing.
Warns that incorrect wiring to terminals can cause catastrophic starter/motor failure.
Discusses the availability and use of bus bars for connecting starters.
Details wiring requirements between the remote-mounted starter and the control panel.
Advises maintaining separation between low/high voltage circuits to prevent electrical noise.
Warns about hazardous voltages and the need for power disconnection before servicing.
Describes the steel motor terminal box for field power connection.
Details requirements for motor supply wiring, including shielding and grounding.
Details requirements for field-provided ring-type lugs and their connection to motor terminals.
Warns that applying torque to the motor terminal during lug tightening can cause damage.
Explains the purpose and connection of the ground wire terminal lug in the motor terminal box.
Provides a table detailing 120 Vac unit control panel wiring for various inputs and outputs.
Explains water pump interlock circuits and flow switch inputs for proper operation.
Repeats the warning about hazardous voltages and the need for disconnection before servicing.
Details wiring for the chilled water pump contactor and connections.
Explains the function of the chilled water proof of flow circuit for chiller operation and shutdown.
Details wiring for the condenser water pump contactor and connections.
Explains the function of the condenser water proof of flow circuit for chiller operation and shutdown.
Explains the function of the heat recovery proof of flow circuit.
Covers installation of temperature sensors, including the optional outdoor air sensor.
Details the outdoor air temperature sensor, its probe, module, and wiring.
Warns about maintaining separation between low/high voltage circuits to prevent electrical noise.
Refers to system control wiring for optional circuits based on owner specifications.
Details checking and configuring starter module settings during start-up commissioning.
Provides an overview of operation and maintenance information for 50/60 Hz chillers with Symbio 800.
Describes the basic cooling cycle, including refrigerant distribution, vaporization, and compression stages.
Explains the operation of the 3-stage compressor, including gas flow and economizer function.
Explains the operation of the 2-stage compressor, including gas flow and economizer function.
Details how oil is pumped, filtered, and sent to compressor bearings for lubrication.
Explains how compressor motors are cooled with liquid refrigerant.
Describes the AdaptiView display's role in providing operational information and diagnostics.
Introduces common control sequences used in CenTraVac™ chillers.
Presents a diagram of the five possible software states and transitions.
Details the Wye-delta start-up sequence, including pump verification and compressor start.
Explains how the chiller operates in Delta configuration and modulates vanes for setpoint.
Describes the panic stop sequence initiated by an immediate stop command.
Explains how to enable/disable the Ice Building feature and its operational parameters.
Explains how the chiller functions as a heat exchanger using free cooling, and its operational requirements.
Provides steps to enable and disable Free Cooling mode.
Explains the HGBP control option for stable operation under minimum load conditions.
Describes using the chiller for heating as a primary mission with hot water temperature control.
Describes heat recovery as salvaging heat for beneficial use, like simultaneous heating and cooling.
Describes auxiliary condensers used for preheat functions, noting their smaller size.
Provides a step-by-step guide for daily unit start-up.
Provides steps for seasonal unit start-up, including draining and filling procedures.
Provides steps for daily unit shutdown.
Details procedures for seasonal unit shutdown, emphasizing control power.
Repeats the capacitor hazard warning and safety precautions.
Warns that frequent purging may indicate leaks, requiring investigation to prevent chiller damage.
Warns against using non-genuine Trane parts to avoid damage and maintain warranty.
Emphasizes the importance of regular record keeping for identifying trends and diagnosing issues.
Lists normal operating readings for evaporator pressure, condenser pressure, and oil temperatures/pressures.
Details recommended daily, 3-monthly, 6-monthly, and annual maintenance tasks.
Provides guidance on recommended compressor oil changes and oil analysis.
Warns that water presence during evacuation can cause freezing damage.
Covers refrigerant charging procedures and safety warnings.
Repeats the warning about mixing refrigerants or oils causing damage.
Details procedures and warnings for safe leak testing.
Warns of explosion hazards if safe leak test procedures are not followed.
Warns about violent explosions due to hazardous pressures and safe heating methods.
Discusses condenser tube fouling and cleaning methods (mechanical/chemical).
Discusses evaporator maintenance, typically requiring cleaning every three years.
Recommends inspecting coated waterboxes/tubesheets within months of operation for defects.
Discusses replacement schedules for sacrificial anodes and inspection intervals.
Warns that improper chemical cleaning can cause corrosion damage to the unit and tubes.
Stresses that only qualified technicians should perform waterbox removal and installation.
Discusses recommended hoist ring/clevises and lifting techniques, emphasizing proper training and inspection of devices.
Warns about the risks of heavy objects falling, causing serious injury or death.
Warns that improper vertical lifts can cause eyebolts to break, leading to injury from dropping objects.
Outlines the step-by-step procedure for removing and installing waterboxes.
Warns against standing below suspended heavy objects due to the risk of falling objects.
Provides torque requirements for waterbox screws and notes SAE fastener usage.
Provides weights and lifting connection details for various waterbox types and sizes.
Lists available connection devices and their part numbers for ordering.
States that start-up must be performed by Trane or an authorized agent with advance notification.
Requires submitting this form to the Trane Service Agency for start-up.
Checklist section for verifying chiller placement and piping.
Checklist section for verifying water piping connections for chiller, AHUs, pumps, and cooling towers.
Checklist items related to starter installation and wiring compliance.
States that Trane will not pay for expenses due to improper installation.
Checklist section for equipment room safety features.
Checklist section for owner instructions and refrigerant MSDS.
Section for requesting Trane service for start-up.
Checklist section for general inspection items before start-up.
Checklist section for pre-start operational checks.
Checklist item for checking electrical and controls.
Repeats warning about applying power in a vacuum to prevent motor/compressor damage.
Checklist section for preparing the system for start-up.
Checklist section for chiller start-up procedures.
Lists inspection items for the compressor and motor.
Lists inspection items for the starter and AFD.
Lists inspection items for the oil system.
Lists inspection items for the condenser.
Lists inspection items for the evaporator.
Lists inspection items for heat recovery components.
Lists inspection items for control circuits.
Lists inspection items related to leak testing.
Lists inspection items for the purge unit.
Lists inspection items for the chiller's exterior.
Lists inspection items for optional accessories.
Lists parameters to log for the evaporator.
Lists parameters to log for the condenser.
Lists parameters to log for the compressor.
Lists parameters to log for the purge system.