5
1) Some water may accumulate inside the boat. Empty any standing
water out of the boat between runs. Pour any water out the side
or front of the boat. Do not drain the water out of the back of the
boat (near the radio system).
2) Check the wiring for any frayed wires or loose connections.
3) Check the tightness of the grub screws in the collars on the
steering linkages, in the propellers, and in the universal joint
yokes (connecting the outdrives to the driveshafts). Thread-
locking compound can be applied to these screws to prevent
them from loosening.
4) Check the mounting of the receiver and servos.
5) Check the driveshaft seals for damage. Do not attempt to run
the Nitro Vee if these seals are damaged in any way.
6) Check the tightness of the propellers. Visually inspect the props
for nicks, dings, and warpage. Replace if any damage is noticed.
7) Check the operation of the radio system, especially the condi-
tion of the batteries.
8) Visually inspect the hull for any cracks, damage, or possible leaks.
THE ENGINE
This section describes the basic operation, controls, and main-
tenance procedures for the Traxxas TRX Pro-15 marine engine.
Read it before attempting to start the engine. It is written with the
assumption that this is your first fuel-powered model. Even if you
are already experienced with model engines, please read this
information. Fuel requirements and break-in procedures for the
TRX Pro-15 may be different from other engines.
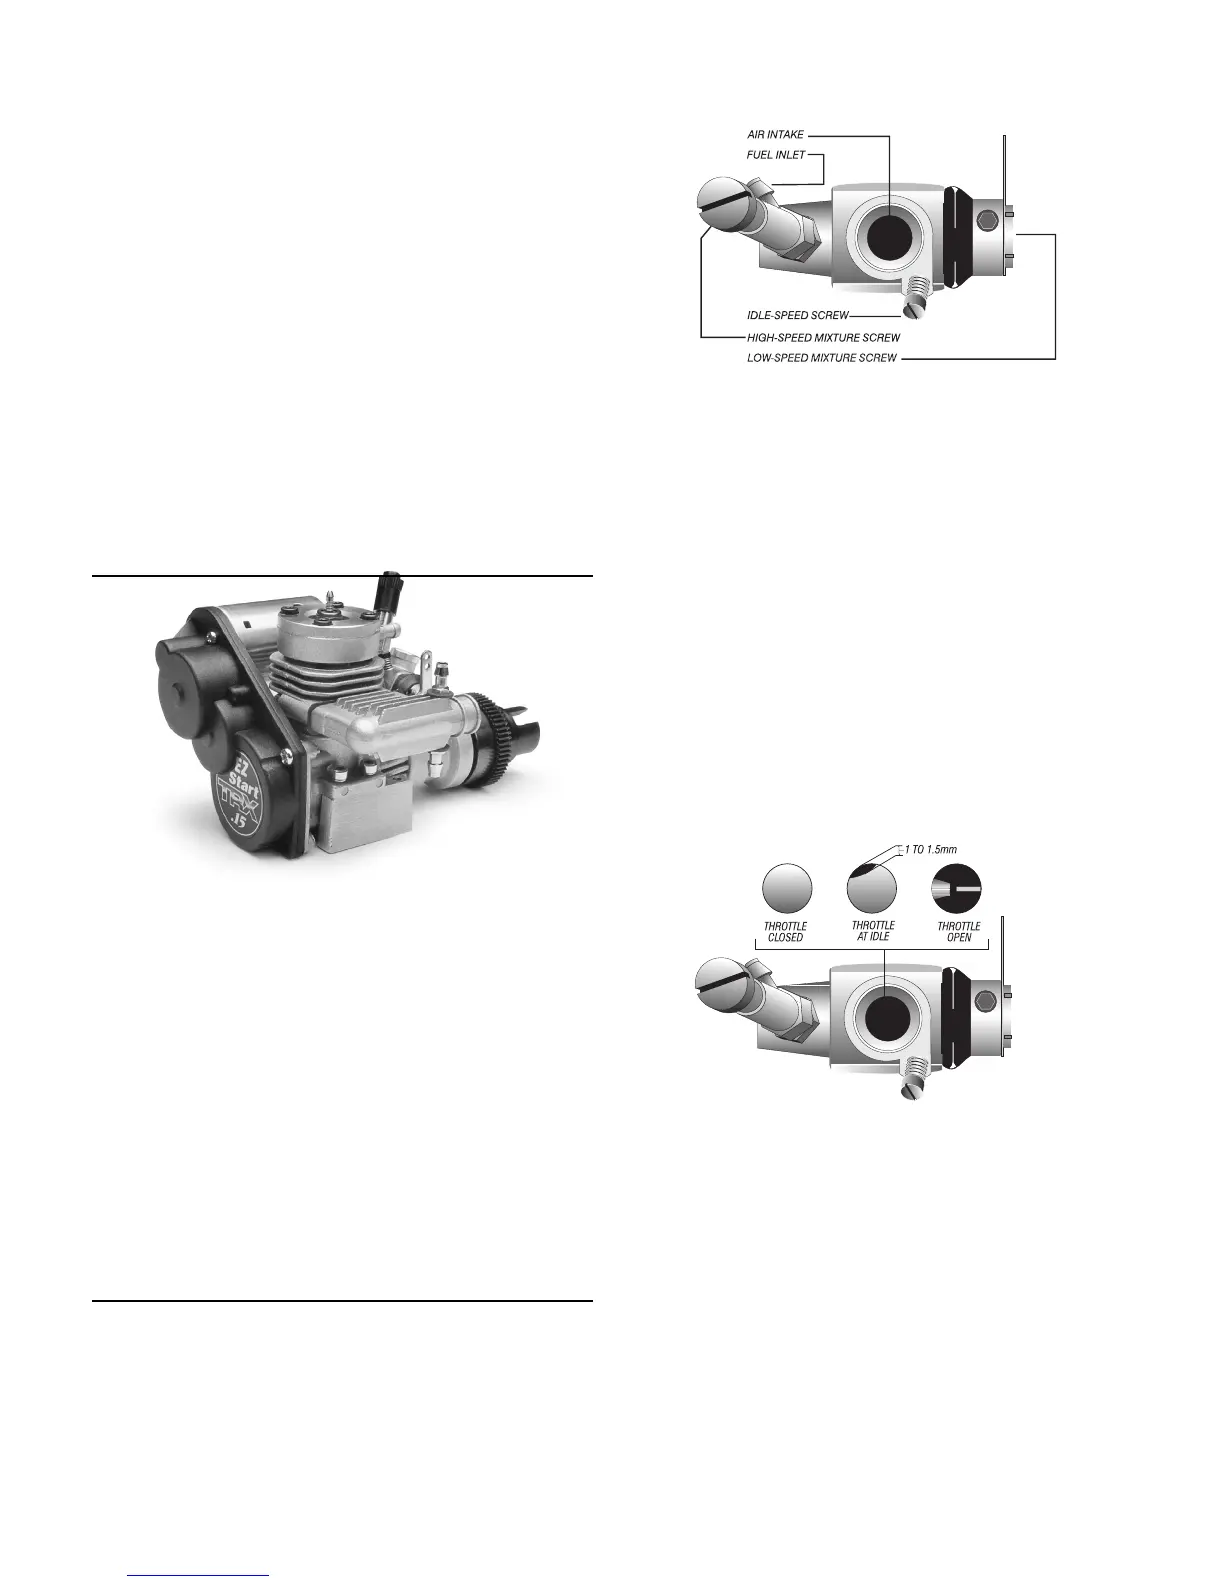
FUEL MIXTURES
The fuel mixture (ratio of air to fuel) is critically important. A mix-
ture that is too “rich” means that there is too much fuel, and a mix-
ture that is too “lean” means that there is not enough fuel for the
given amount of air. When the mixture is too rich, performance will
be sluggish and there will be an excessive amount of smoke. The
glow plug may also become fouled if the mixture is too rich. When
the mixture is too lean, there is not enough fuel to carry oil for cool-
ing and lubricating the internal engine components. Damage is
almost certain when the fuel mixture is too lean. Set your carbure-
tor’s high and low-speed mixture screws (needles) to the specifi-
cations in this manual.
STARTING THE ENGINE
STEP 1: FILLING THE FUEL TANK
Position the boat on its stand so that it is level. The fuel tank has
a capacity of 120 cc. Use small fuel bottle or bulb to put fuel into
the tank. Only fill the tank to the bottom of the fill neck. do not allow
the fuel to spill inside the boat. If any fuel does spill, wipe it off
immediately. Do not allow puddles of fuel to accumulate inside the
boat. Be especially careful not to allow the fuel to come in contact
with the foam flotation inside the bow of the boat, or stay in con-
tinuous contact with the plastic inner hull. The fuel can quickly
damage the plastic.
STEP 2: SETTING THE HIGH-SPEED MIXTURE
The mixture screw controls how much fuel enters the engine.
With the radio system on and the air filter removed, adjust the
throttle trim knob on the transmitter until the throttle just closes
against its stop. Now, turn the mixture screw clockwise, by hand,
until it stops (Do not tighten or the needle may be damaged). Now,
turn the mixture screw out, counter-clockwise, 2
1
/
2
complete turns.
Note: If you live in higher altitudes (3000 feet or higher above sea
level), it may be necessary for you to set your fuel mixture as lean
as 2
1
/
4
turns out from closed. Call 1-888-TRAXXAS if you have
questions about setting your fuel mixture.
STEP 3: SETTING THE LOW SPEED MIXTURE
The low-speed mixture screw is located in the end of the carbu-
retor, inside the throttle arm. This screw has been preset at the fac-
tory and it is not necessary to adjust it. If for some reason the set-
ting gets changed, gently turn the screw clockwise until it stops
and back it out 1
3
/
4
complete turns. This setting may also need to
be set as lean as 1
1
/
4
turns in higher altitudes.
STEP 4: SETTING THE IDLE SPEED
The throttle opening at idle should be set as shown in the drawing.
The opening should be 1 to 1
1
/
2
millimeters at the widest point in
the opening. The idle speed may need to be readjusted after the
engine is running and warmed up. Do not use the throttle trim
adjustment on the transmitter to adjust the final idle speed. Always
set it at the carburetor.
STEP 5: CONNECTING THE EZ-START
Remove the top cover and connect the EZ-start control box, with
a fully-charged battery pack, to the plug inside the boat. The plug
is keyed so it will only connect one way.
STEP 6: SHUTTING OFF THE ENGINE
Before starting the engine it is important to know how to shut it
off. The correct method is to pinch and hold the carburetor’s fuel
inlet line while running at idle speed.
 Loading...