Removal of Venting Connection
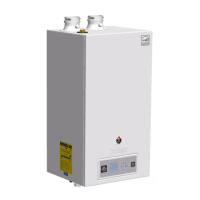
1. Use a flat head screw driver to loosen the banding
clamp located on the vent outlet adapter. (Fig. 4).
2. Remove vent piping from vent outlet adapter as
the internal flue tube / vent outlet adapter must be
removed.
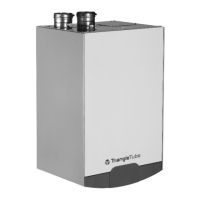
3. Disconnect the yellow wire leads/Molex plug
from the flue temperature sensor (shown as
Item 1 in Figs. 1-3). The flue temperature sen-
sor may be located in the vent pipe or the con-
densate pan depending on the model. Use care
when disconnecting the wire leads as not to
damage the sensor terminals or the wire leads.
Before disconnecting any wire connections mark
and label all connections and location of the con-
nections.
Stainless Steel Vent Outlet Adapter Removal
1. Dismount the vent outlet adapter from top of boil-
er cabinet by removing the 4 mounting screws.
Do not discard the mounting screws and vent out-
let adapter as they will be reused. (Fig. 4)
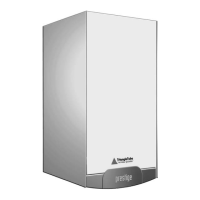
2. Remove entire vent outlet adapter by lifting ver-
tically upward and out of the boiler cabinet
using a twisting / rocking motion (Fig. 5).
NOTICE
PRESTIGE Solo 60, 110, 175 and 250
HX Field Replacement
Kit
3
Fig. 3: Prestige Solo 175/250
V
ent Outlet
A
dapter
Test
Port
B
anding
Clamp
Mounting
S
crews
(4) Each
Vent Outlet
A
dapter Gasket
Fig. 4: Vent Outlet Adapter Mounting
Vent/Heat
Exchanger
Gasket
Heat Exchanger
Adapter
Vent Outlet
Adapter
Fig. 5: Removal of Vent Outlet Adapter
 Loading...