Installation & Assembly Instructions
Please contact our Customer Service Division with any questions at:
30700 D Carter Street ∙ Solon, OH 44139 ∙ (P) 440.248.5480 ∙ support@tritonproducts.com
For a full line of products visit www.tritonproducts.com 1 INLBD2102
Read all instructions completely before installing. Should you have any questions about your installation,
please call Customer Service at 440-248-5480
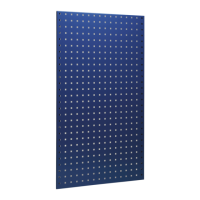
2 pcs. 24” x 42-1/2” x 9/16” LocBoards (B=Blue, R=Red, T=Tan, W=White)
These rugged steel tool boards can be easily and quickly positioned to conform to your storage
requirements.
Boards can be positioned side by side or above one another in vertical and horizontal mounting
positions.
Additional boards and hooks can be added to your system as your needs continue to grow.
LocBoards fasten directly to concrete, solid wood and hollow wall structures without the use of
furring strips. (Mounting hardware not included.)
LocBoards are designed with internal ribbed support members that not only keep mounting
hardware hidden from sight but also add to the board’s structural integrity and holding power.
LocBoard™ Installation:
For Concrete block installation: (mounting hardware not included.) You can use either masonry
screws or concrete plastic anchors with appropriate sized #8 screws. Head diameter of screw
should not exceed .36 (3/16” masonry screws will work.)
For Drywall and plaster installation: (mounting hardware not included.) Use either self-drilling
drywall anchors or normal heavy-duty plastic drywall anchors in addition to #8 screws.
Select a wall location for your LocBoards and the desired vertical or horizontal mounting
pattern you wish to mount in.
See Figure 1-1: There are 2 mounting/internal ribbed support brackets on the back of each
LocBoard. Each bracket has 6 pre-punched mount holes that are accessible from the front
side of each panel through the square holes. For a typical installation use one hole from
Group “A” and one hole from Group “B” for each bracket.
Determine which holes you would like to use for the mounting of your board.
Holding panel in-place with mounting brackets/ribbed supports flat against wall and making
sure each panel is level and plumb. From the front side of your panel mark each hole’s
location you wish to use for mounting using a pencil or marker. Mark at least two (2) holes
per bracket equally spaced to ensure proper holding power.
Once you have marked a minimum of 2 mount hole locations per bracket using figure 1-1:
You are now ready to pre-drill all holes in accordance to the specifications called out by the
manufacturer of mounting hardware to be used.
Once all holes are drilled and all wall anchors are securely in place where needed, you’re
ready for the final attachment.
Installation mounting screws will be inserted through the front square opening of each
panel in alignment with the pre-punched mounting holes in your back braces. Mounting
screw heads should not be visible from the front of each screw and should be securely
tightened.
Hook Installation: Insert the hook back locking tabs into front square openings of tool board.
Slide each hook securely into place and install required number of LocScrews (LocScrews are
supplied with each pack of LocHooks.)
LB2-B, R, T, W - (2) 24” x 42-1/2” x 9/16” LocBoard®(s)