~aintenance/Rep=a~ir~s~~~~~~~~~~~~~~_
WARNING
To
Prevent
Personal
Injury:
•
The
chipper
blade
is
very
sharp.
Wear
thick
gloves
and
handle
blade
with
extreme
care.
•
Do
not
operate
machine
unless
fan
cover
and
chipper
chute
are
securely
installed.
To
Remove
and
Install
the
Blade:
1.
Shut
off
the engine, disconnect
the spark plug wire from the
spark plug,
and
make sure that all
moving parts have come to a com-
plete stop.
2. Remove the fan
cover
and the
shredder screen by following the
screen removal instructions on
Page 23.
3. The chipper blade (see A,
Figure 5-7) is attached to the left
side
of
the rotor assembly (B) by
three flat head socket screws
(C)
and three nylon collar locknuts
(D). To remove the chipper blade,
first remove the rotor assembly, as
follows:
a.) Prevent the rotor assembly
from turning in a counterclockwise
direction by wedging a block
of
wood between one
or
more
of
the
fan blades and the wall
of
the fan
chamber. Or, you can insert a
thick, hardwood dowel through the
slot below the blade and into the
chipper chute opening in the wall
of
the chamber.
Over a period
of
time, the cutting
edge on the chipper cutting blade
(Figure 5-6) will dull. Sharpen
or
replace the blade when the chipper
no longer cuts as efficiently as
when new.
• Discard a cracked or severely
nicked blade because it could break
apart and cause personal injury.
• Sharpen a blade that
is
dull
or
that has only minor nicks. The
blade is made from tempered steel
and is extremely hard - do not at-
tempt to sharpen with a hand file.
We recommend that you take the
blade to a professional sharpening
service for proper sharpening. All
grinding must be done flat and uni-
form along the beveled edge only,
being sure to maintain the original
45
0
cutting angle.
• The width
of
a new blade mea-
sures 1-1/4 inches (see Figure 5-6).
Do
not reuse the blade
if
the width
measures less than 1-1/8 inches as
this could affect the balance
of
the
rotor assembly. The rotor assembly
will cause excessive vibration if it
is
unbalanced.
CAUTION
Before
inspecting,
cleaning
or
servici
ng
th
e
rna
ch
i
ne,
shut
off
engine,
disconnect
spark
plug
wire,
and
make
sure
that all moving parts
have
come
to
a complete
stop.
Failure
to
follow
these
in-
structions
can
result
in
per-
sonal injury
or
property
damage.
With the exception
of
the engine,
the machine is lifetime lubricated.
You do not need to oil
or
grease
any parts
of
the machine.
CHECK
AND
TIGHTEN
NUTS
AND
BOLTS
Be
sure that all nuts and bolts are
always tightened securely.
With
the engine shut
off
and the spark
plug wire disconnected,
check the
nuts and bolts after every 10 oper-
ating hours. Refer to your Parts
Catalog for replacement nuts and
bolts information.
MACHINE
MAINTENANCE/REPAIRS
SHARPENING
OR
REPLACING
THE
CHIPPER
CUTTING
BLADE
LUBRICATION
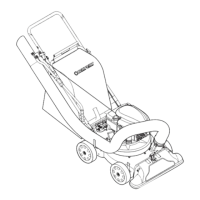
Figure 5-6: Sharpen
chipper
cutting
blade
at
a
4SO
angle. The
width
of
a
new
blade
measures 1-1/4
inches. Do
not
reuse
blade
if
width
is
less
than
1-118
inches.
38