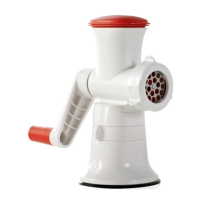
Instructions (See Product Insert For Pictures)
Read these instrucons carefully before using this appliance and save them for future reference. The Fusion Master is intended for indoor household use only. Wash all the parts
that could come in contact with food before rst use (see Cleaning Guidelines).
Assembly for Mincing
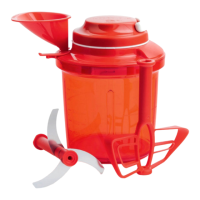
1. Ensure the sucon foot’s ring (L) is in the unlock posion.
2. Place the sucon foot (K) on a clean and stable countertop. Slide the hopper (E) into the sucon foot’s groove (J) (g. 2).
3. To bond the sucon foot to the countertop and lock the hopper to the foot, turn the ring (L) to its lock posion. Make sure all the parts are locked together.
4. Slide the mincer screw (C) into the hopper. The metal end should be on the hopper’s front side facing outward.
5. Fit the cung fan (I) on the mincer screw with the at side facing outward. When securing the fan, make sure the metal end of the mincer screw
is protruding. NOTE: The product will not work correctly if the at side of the cung fan faces towards the mincer screw (g. 3).
6. Select and mount one of the mincer discs (B) onto the hopper’s front with the tab ng into
the groove on the hopper’s front (g. 3).
7. Follow the arrow towards the lock pictogram
on the screw ring. Turn the screw ring (A) counterclockwise gently with your index nger only. As soon as you feel resistance, turn an extra 90° (or ¼ of a turn) and then stop
turning.
8. Slide the crank (G) on the gear side of the screw and x them together by rotang the crank screw (you can also do this aer step 4).
How to use your mincer
1. Do not use the Fusion Master without any ingredients inside the hopper. This can cause damages to your product and is not covered by the Tupperware Guarantee.
2. Aer assembling the unit, place a bowl or container below the head to collect the minced food owing through the mincer disc. NOTE: Completely thaw food but leave cold before
mincing. This product is intended for household use on boneless meat only. Check meat for bones or unwanted fat and remove before processing. Clean meat and dice into cubes
sized to ll the hopper. With fay meats, smaller cubes work best.
3. Turn the crank clockwise to process the food. If necessary, use the plunger (F) to keep the food moving. Do not apply excessive force, as it will only make processing more dicult
and could damage your mincer. NOTE: Always use the plunger provided. Never use your ngers or any other utensils (spatula, knife, etc.).
4. Food may jam in the mincer screw during operaon. Should this occur, turn the crank counterclockwise a few mes to release the jam and then revert to the forward direcon.
Again, do not apply excessive force. NOTE: Do not try to mince food with hard bers (ginger, nuts, etc.).
How to make sausage
1. To create tradional or healthier sausages such as chicken sausage, mince food unl you achieve desired texture and mixture. This can be done prior to using the sausage insert.
2. Assemble the sausage insert by following assembly steps 1–6. Slide the sausage insert (H) through the screw ring, align the cut-outs with the splines and slide into place on the
screw ring unl you hear it click into place. Then, follow assembly step 7.
3. Slide the enre sausage skin over the sausage insert and knot the end. We recommend using type 32/34 hog casings.
4. To create the desired sausage tube, press the sausage skin around the sausage insert and control the squeezing pressure while processing the food. When nished, knot the other
end.
5. To create sausages of any length you prefer,
use your ngers to squeeze at the desired length and turn the sausage around its own axis once or twice. This can be done during or aer all food is processed. Knot the end to
close the last sausage.
Cleaning Guidelines
Immediately aer use, thoroughly clean all parts used to process food. The Fusion Master is dishwasher safe. However, it is recommended to hand wash and dry the metal parts and
the sucon foot. If you clean the foot in the dishwasher, rinse it in clear running water immediately aerwards. Without aempng to completely remove it, gently push down on the
silicone tab of the foot to release water. Do not use abrasive cleaners, scouring pads, knives or other sharp utensils in contact with the silicone disc of the foot. Do not aempt to open
the foot. Do not let the cung fan come in contact with other metal, ceramic or glass instruments, as this would damage its cung edges.
5. Baked Ragu Bolognese
6. Beef & Blue Burgers
7. Black Bean Burgers
8. Breakfast Sausage Paes
9. Chicken Chorizo Burger
10. Chicken Jalapeño Burgers
11. Chicken Nuggets
12. Chicken Parmesan Meatballs
13. Chipotle Beef Tacos
14. Crab Cake Burger
15. Feta & Red Pepper Turkey
Burgers
16. Hawaiian Chicken Burgers
17. Italian Chicken Burgers
18. Hidden Veggie Burgers
19. Mega Meatballs
20. Mexican Chicken Burger
21. Quinoa Burger
22. Southwest Turkey Burger
23. Thai Fish Burgers
Fusion Master Mincer Recipes