12
ENITESPTCNTCNSJP KR
7. GENERAL NOTES ABOUT ASSEMBLY
This user manual is not intended as a comprehensive use, service, repair, or maintenance guide.
Please see your Authorized Specialized Retailer for all service, repairs, or maintenance. Your
Authorized Specialized Retailer may also be able to refer you to classes, clinics, or books on bicycle
use, service, repair, and maintenance.
WARNING! Due to the complexity of the Vado bicycle, proper assembly
requires a high degree of mechanical expertise, skill, training, and
specialty tools. Therefore, it is essential for your safety that the assembly,
maintenance, and troubleshooting be performed by an Authorized
Specialized Retailer. Before your first ride, make sure your components, such
as brakes and drivetrain, are assembled and adjusted in accordance with the
manufacturer’s instructions and are functioning properly.
WARNING! Many components on the Vado, including, but not limited to the
motor, battery, display, and cable guides, are proprietary to the Vado. Only
use originally supplied components and hardware at all times. The use of
other components or hardware will compromise the integrity and strength
of the assembly. Vado specific components should only be used on the Vado
and not on other bicycles, even if they fit. Failure to follow this warning could
result in serious injury or death.
WARNING! Never modify your frame or bicycle in any way. Do not sand,
drill, file, or remove parts from your bicycle. Do not install incompatible
components or hardware. Failure to follow this warning may result in serious
personal injury or death.
WARNING! Electrical components can be exposed when working on your
bicycle. Do not touch any part of the electrical system while under electric
charge. Do not expose the connections of the battery and frame to water. If
any live components or the battery are damaged, stop riding immediately and
bring your bicycle to your Authorized Specialized Retailer.
7.1. HEADSET BEARINGS
The headset uses a 1 1/8” (41.8 mm x 30.5 x 8 mm, 45 x 45°) Campagnolo Standard compatible
upper bearing and a 1.5” (51.8 mm x 40 x 8 mm, inside 36° x outside 45°) lower bearing. Ensure
that replacement bearings are compatible with the Specialized headset specification. No tools are
needed for installation or removal of both bearings. Grease the bearing surfaces before installation.
WARNING: Inspect the fork, stem, seatpost, and seat tube to ensure that
there are no burrs or sharp edges. Burrs and sharp edges can damage
carbon and alloy surfaces of the components. Any deep scratches or gouges
in the stem or fork can weaken the components. Remove any burrs or sharp
edges using fine-grit sandpaper. All edges of the stem in contact with the
steerer tube should be rounded out to eliminate any stress points.
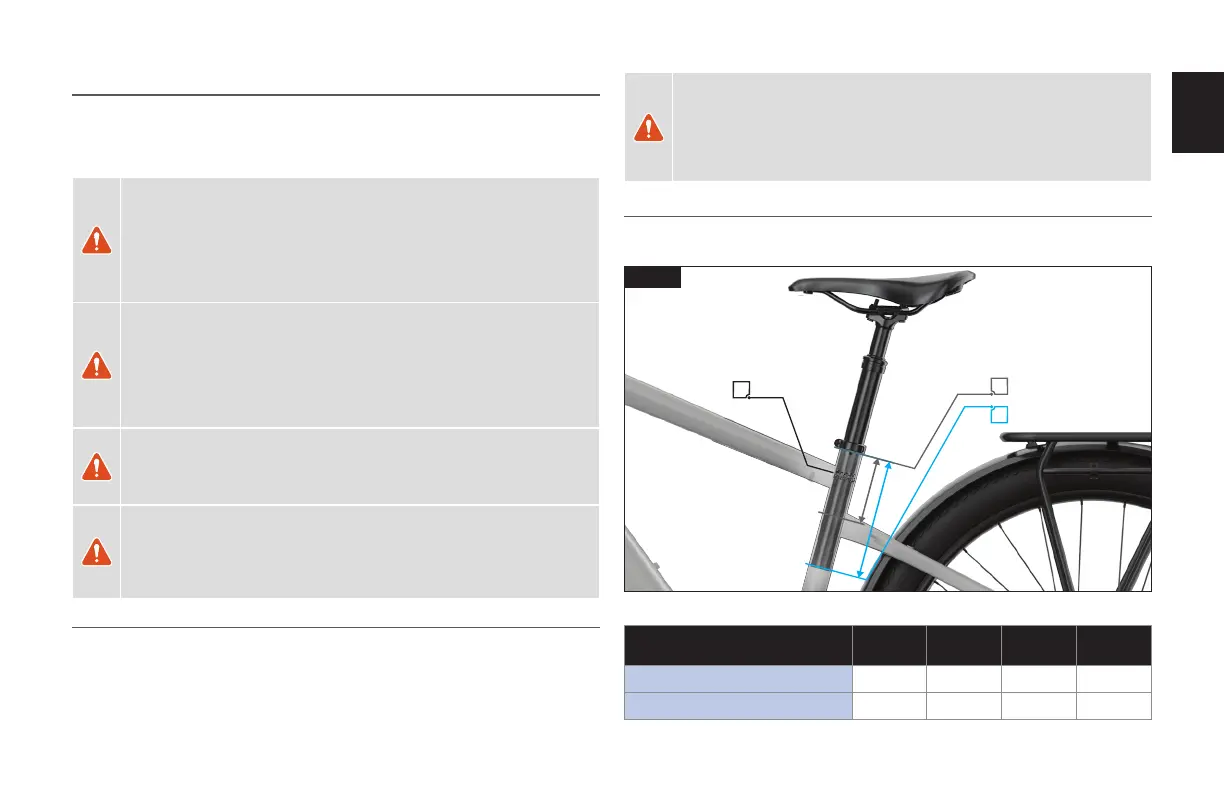
7.2. SEATPOST MINIMUM AND MAXIMUM INSERTION
Both the frame and seatpost have minimum insertion requirements. In addition, the frame has
a maximum insertion requirement to prevent damage to the frame and seatpost.
A
B
C
7.1
Fig. 7.1
FRAME SIZE S M L XL
MIN INSERTION (mm)
80 80 80 80
MAX INSERTION (mm)
200 260 260 260
 Loading...